• Skip to primary navigation
  • Skip to main content
  • Skip to primary sidebar
Biting into Life logo
  • Recipes
    • Quick & Easy Meals
    • Comfort Food
    • High-Protein Plant-Based Meals
    • Main Dishes
    • Breakfast
    • Snacks
    • All Recipes
  • Ressources
    • My products
    • Nutrition Guides
  • About Me
    • My Mission
    • My Story
    • Press & Media
    • Food Stories
    • Contact Me
  • Freebies
  • English
    • Français
  • Nav Social Menu

menu icon
go to homepage
subscribe
search icon
Homepage link
  • Home
  • Recipe Index
  • About Me
    • My Mission
    • My Story
  • Nutrition Guides
  • Subscribe
  • English
    • Français
    • English
      • Français
    • Facebook
    • Instagram
    • Pinterest
    • Twitter
    • YouTube
  • ×
    Home

    Blog

    Low-FODMAP Savory Buckwheat with Cherry Tomatoes, Eggplant and Lemon Cream

    Apr 19, 2021 · 17 Comments

    Buckwheat with cherry tomatoes, roasted eggplant, cream cheese style cream, mint on a plate

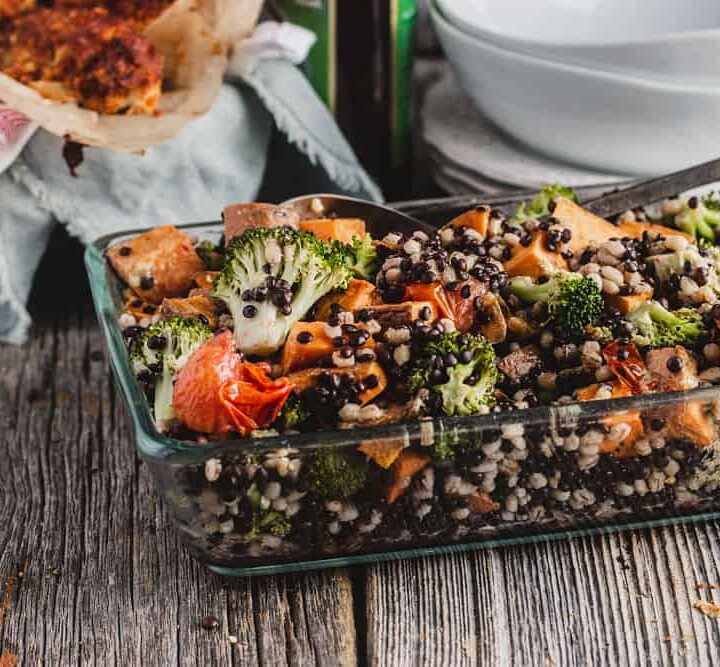
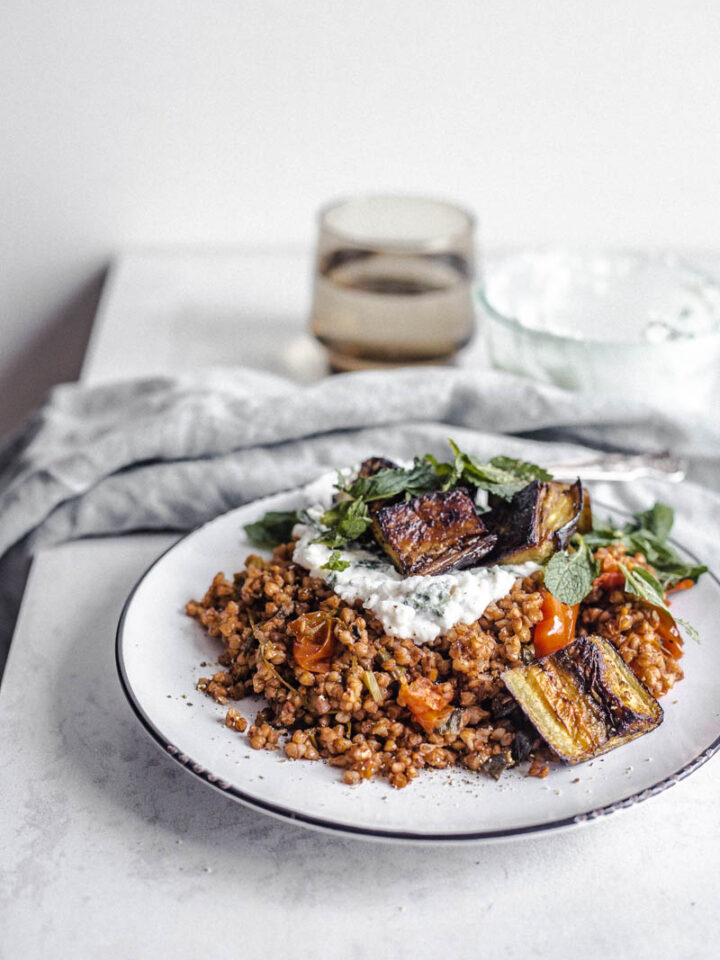
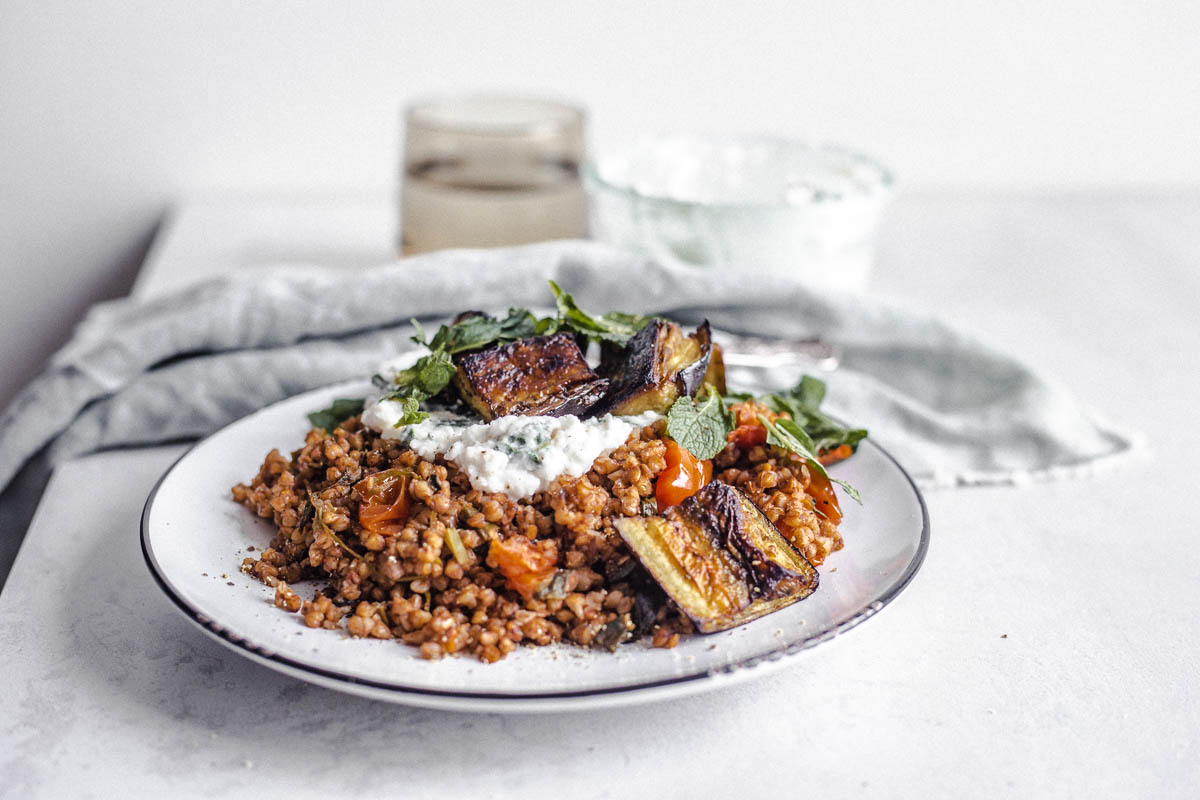
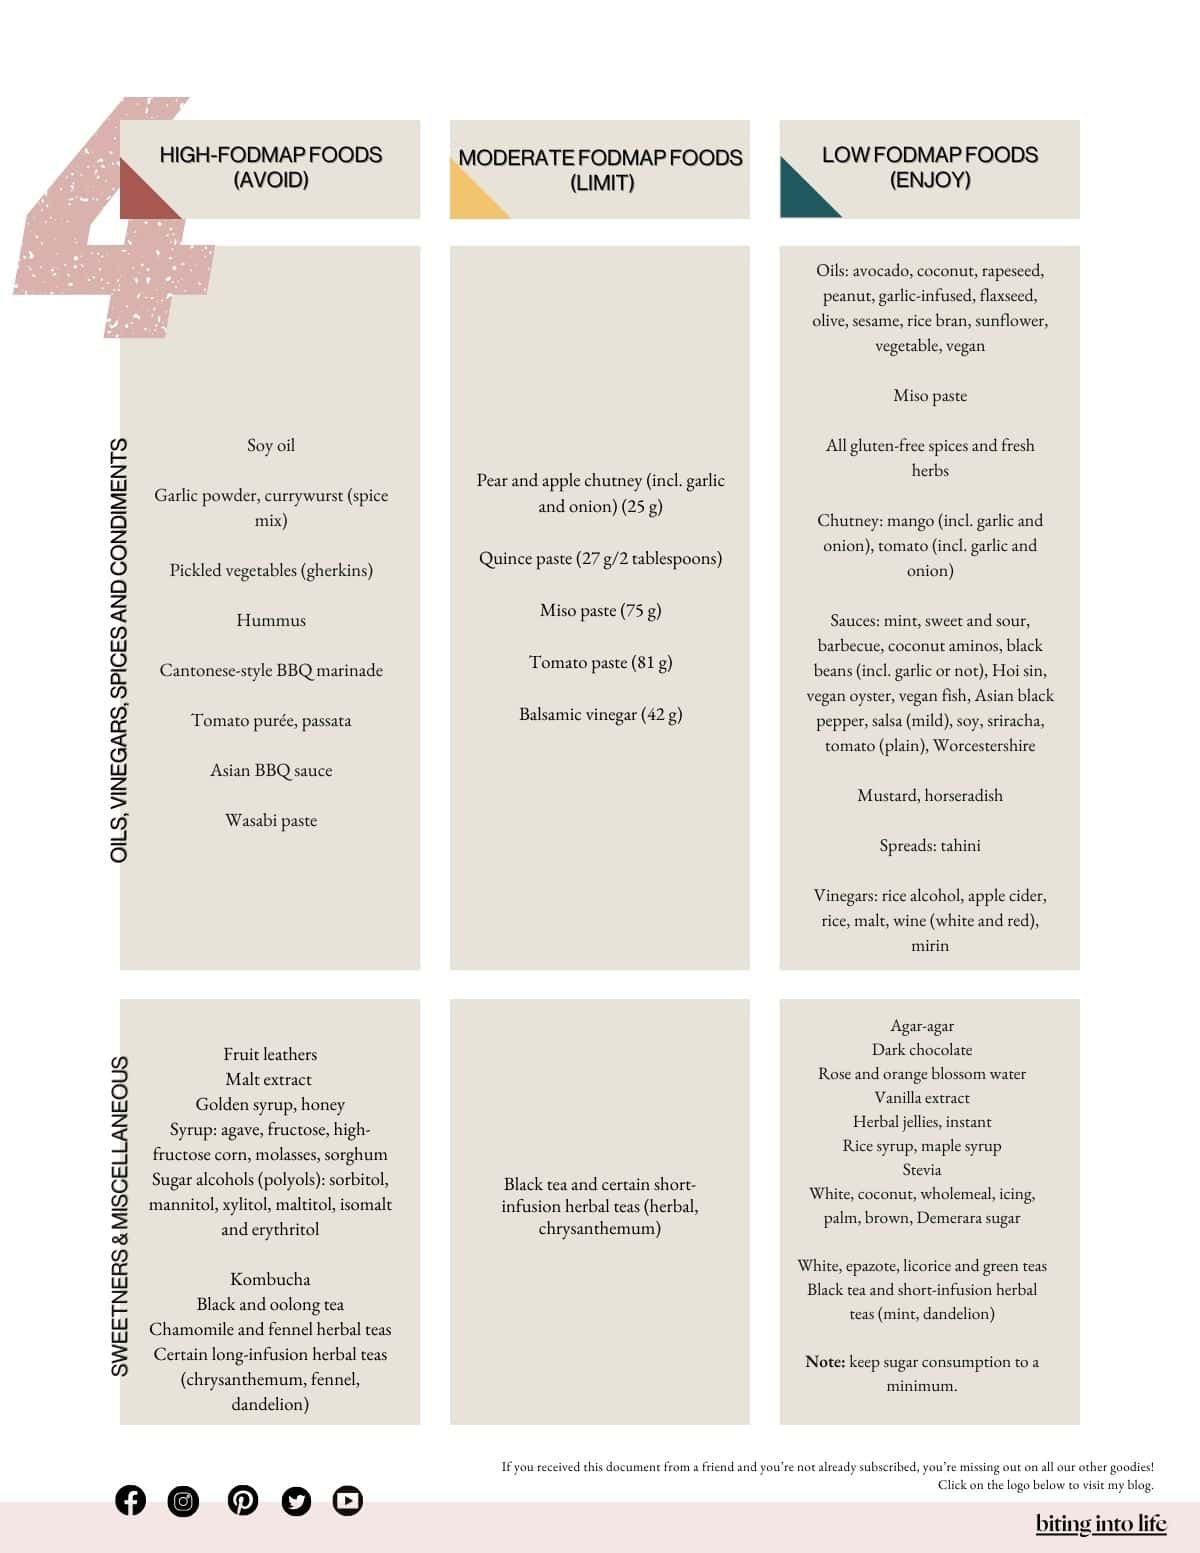
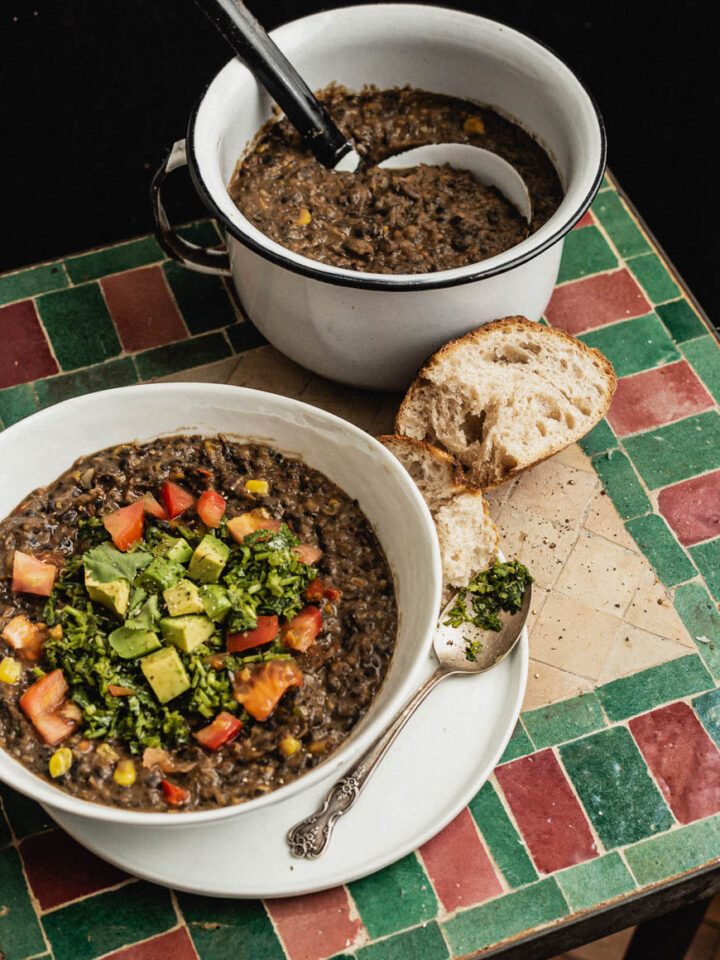
    This savory buckwheat contains the right ingredients to improve your digestion. It's possible to follow a plant-based low-FODMAP diet and be delighted with it without regret. Cherry tomatoes, roasted eggplants, and a preserved lemon cream give something very satisfying.

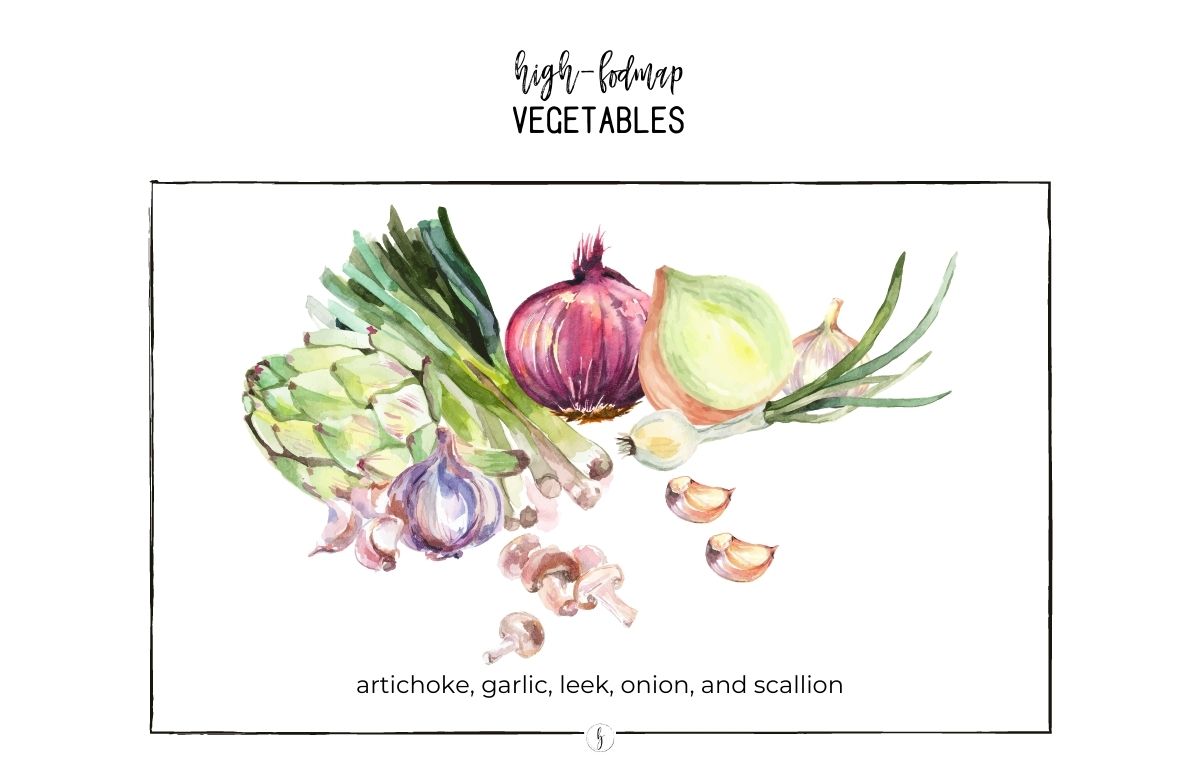
    The secret to spicing up this dish is the green parts of green onions and asafoetida to replace the regular onion and garlic, respectively. That's what makes it so delicious!

    Kasha with cherry tomatoes, roasted eggplant, cream cheese style cream, mint on a plate
    Enjoy peeled and roasted buckwheat seeds in a savory dish like this one.
    [feast_advanced_jump_to]

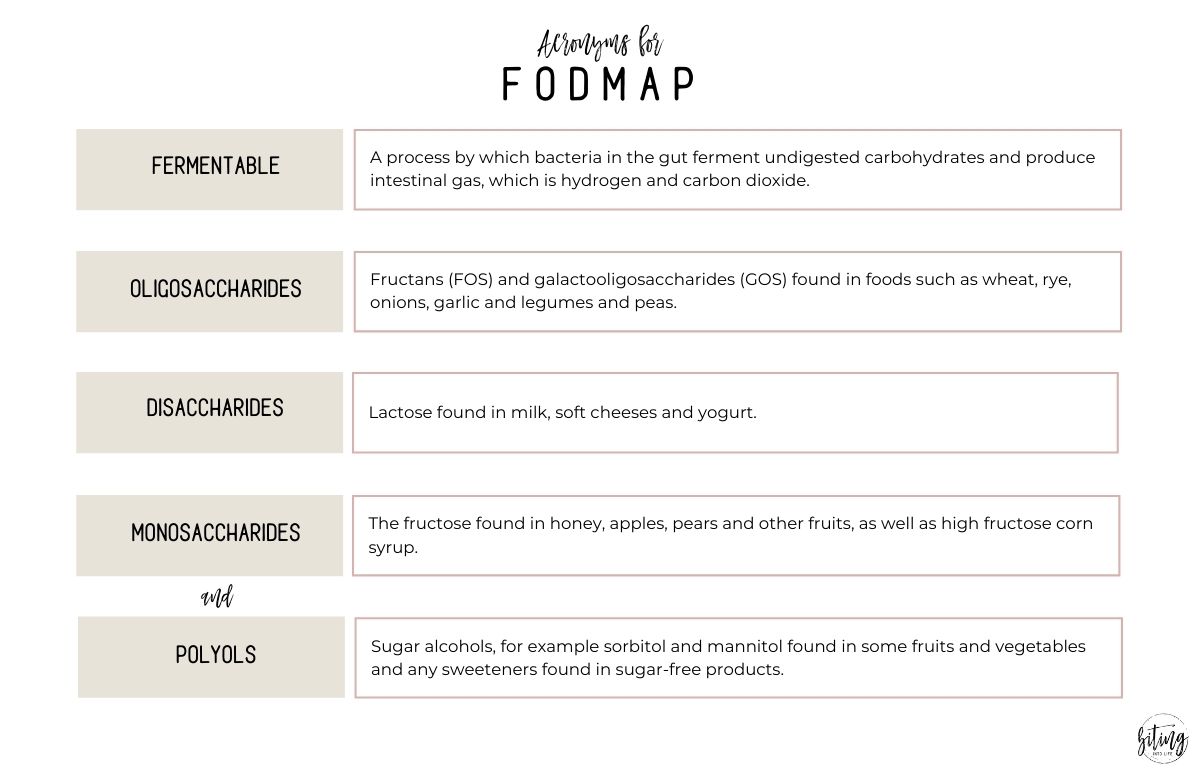
    Why this Dish is So Perfect for a Low-FODMAP Diet

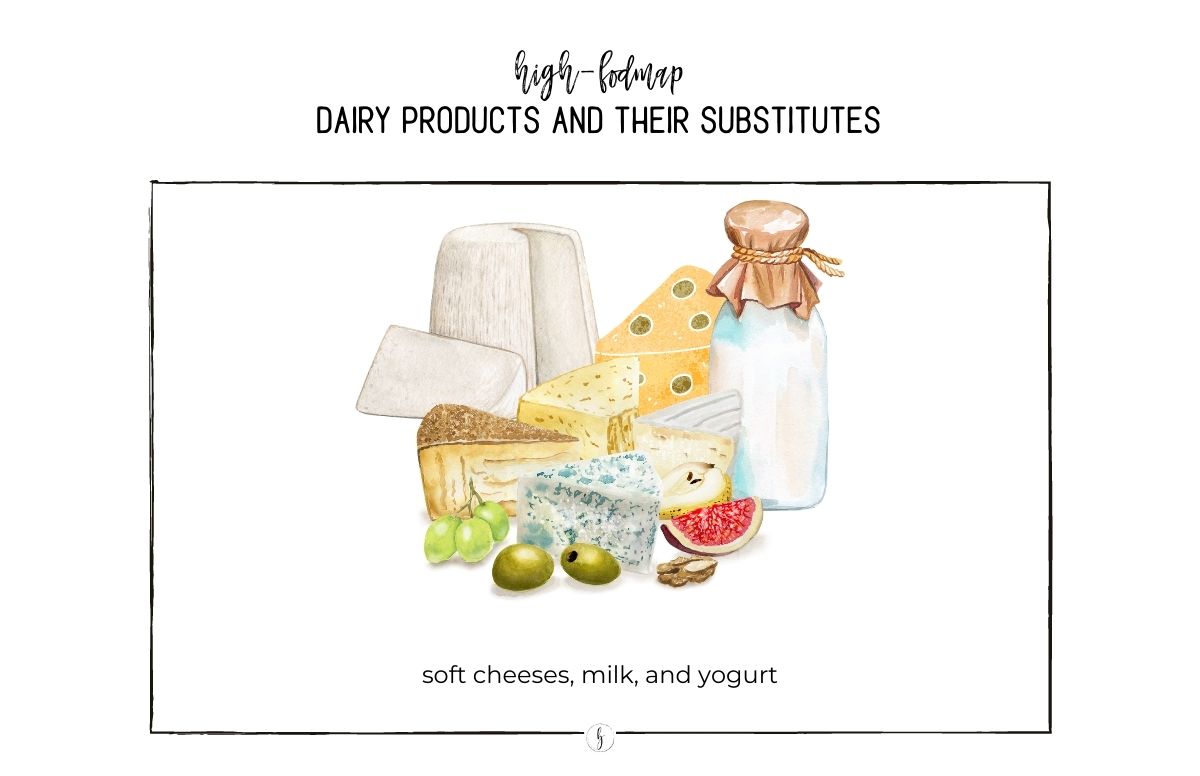
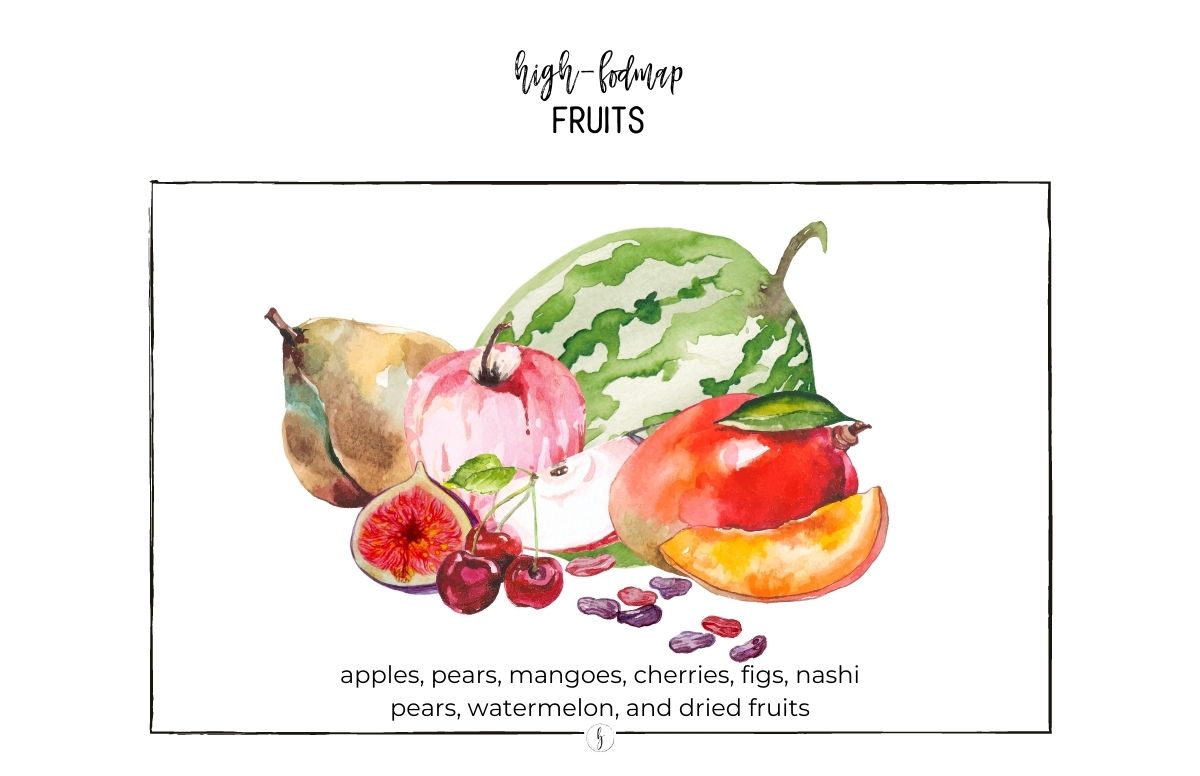
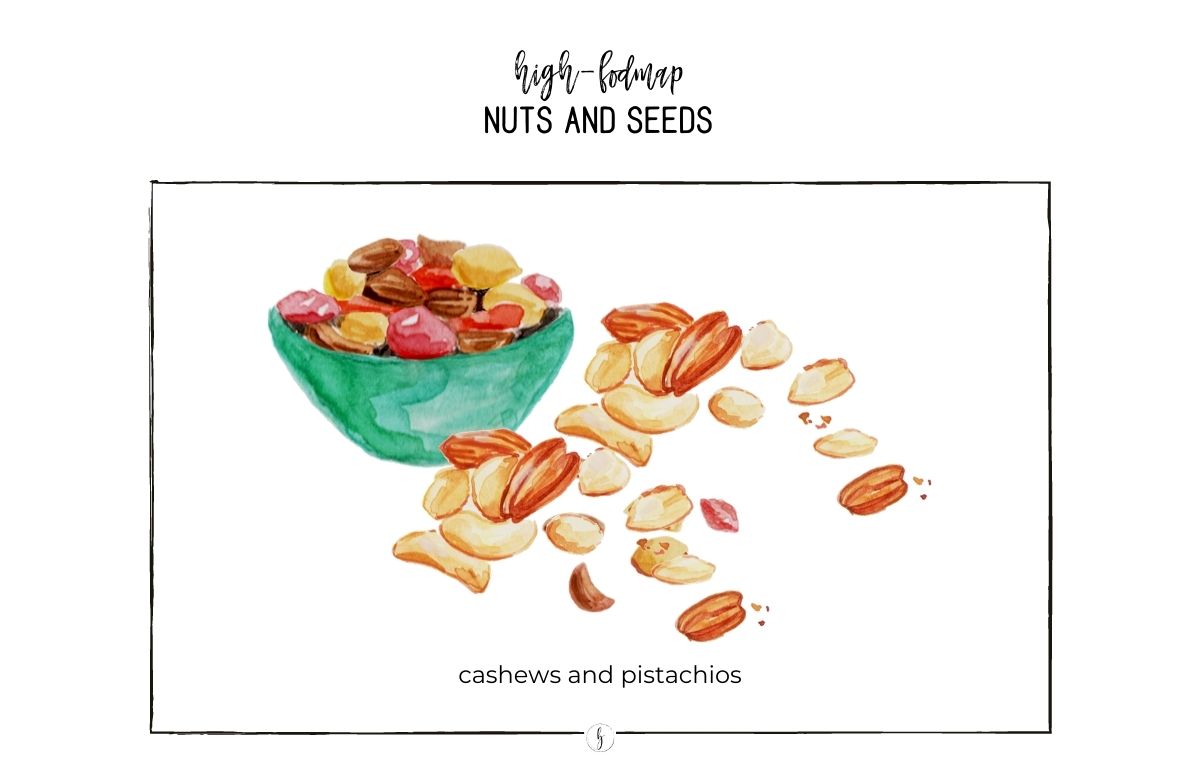
    I don't know about you, but following a low-FODMAP diet—when it's plant-based, on top of that—seems as hard as keeping track of your expenses. It's excruciating when a girl fond of tasty dishes has to omit garlic and onion to restore herself to bland concoctions, and therefore, in dreary monotony.

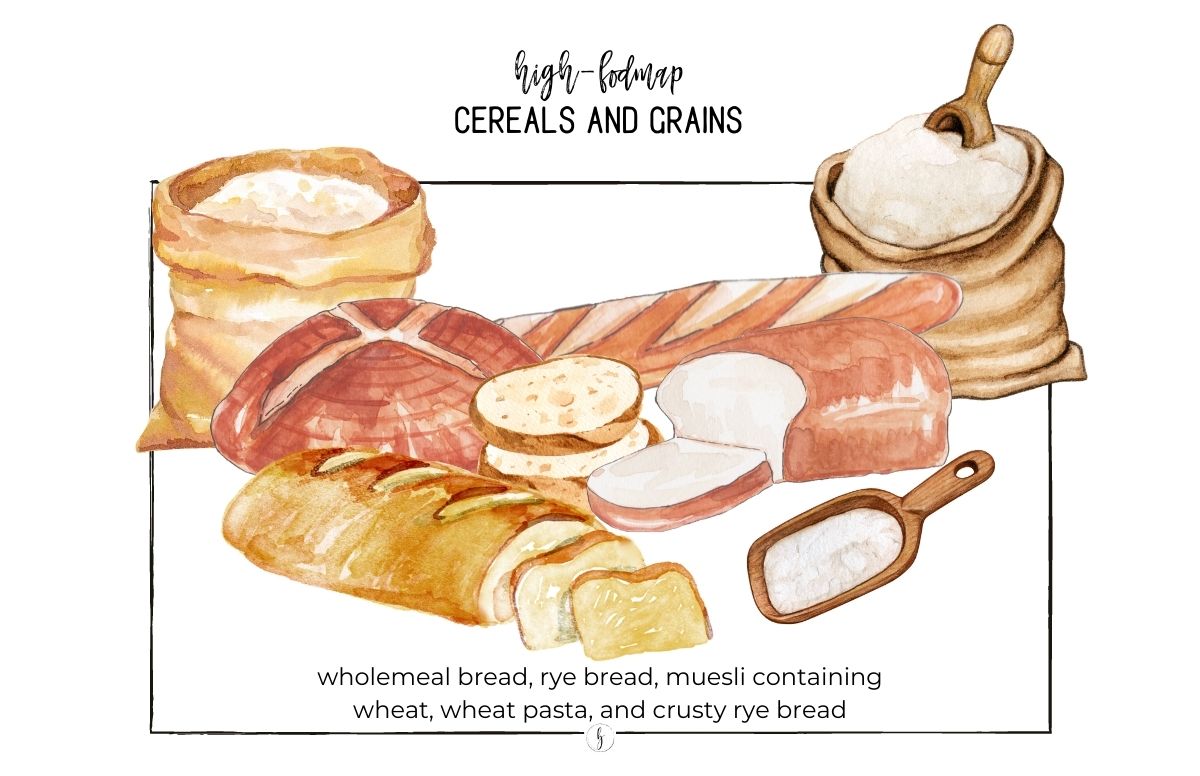
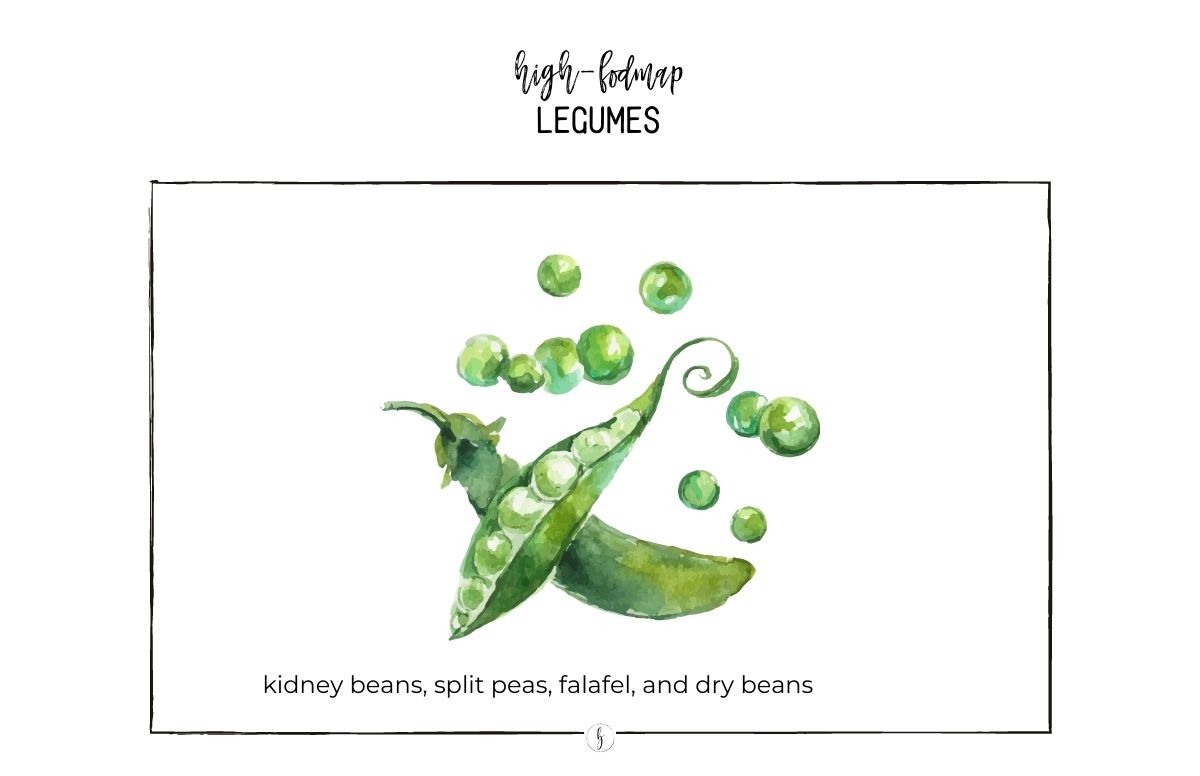
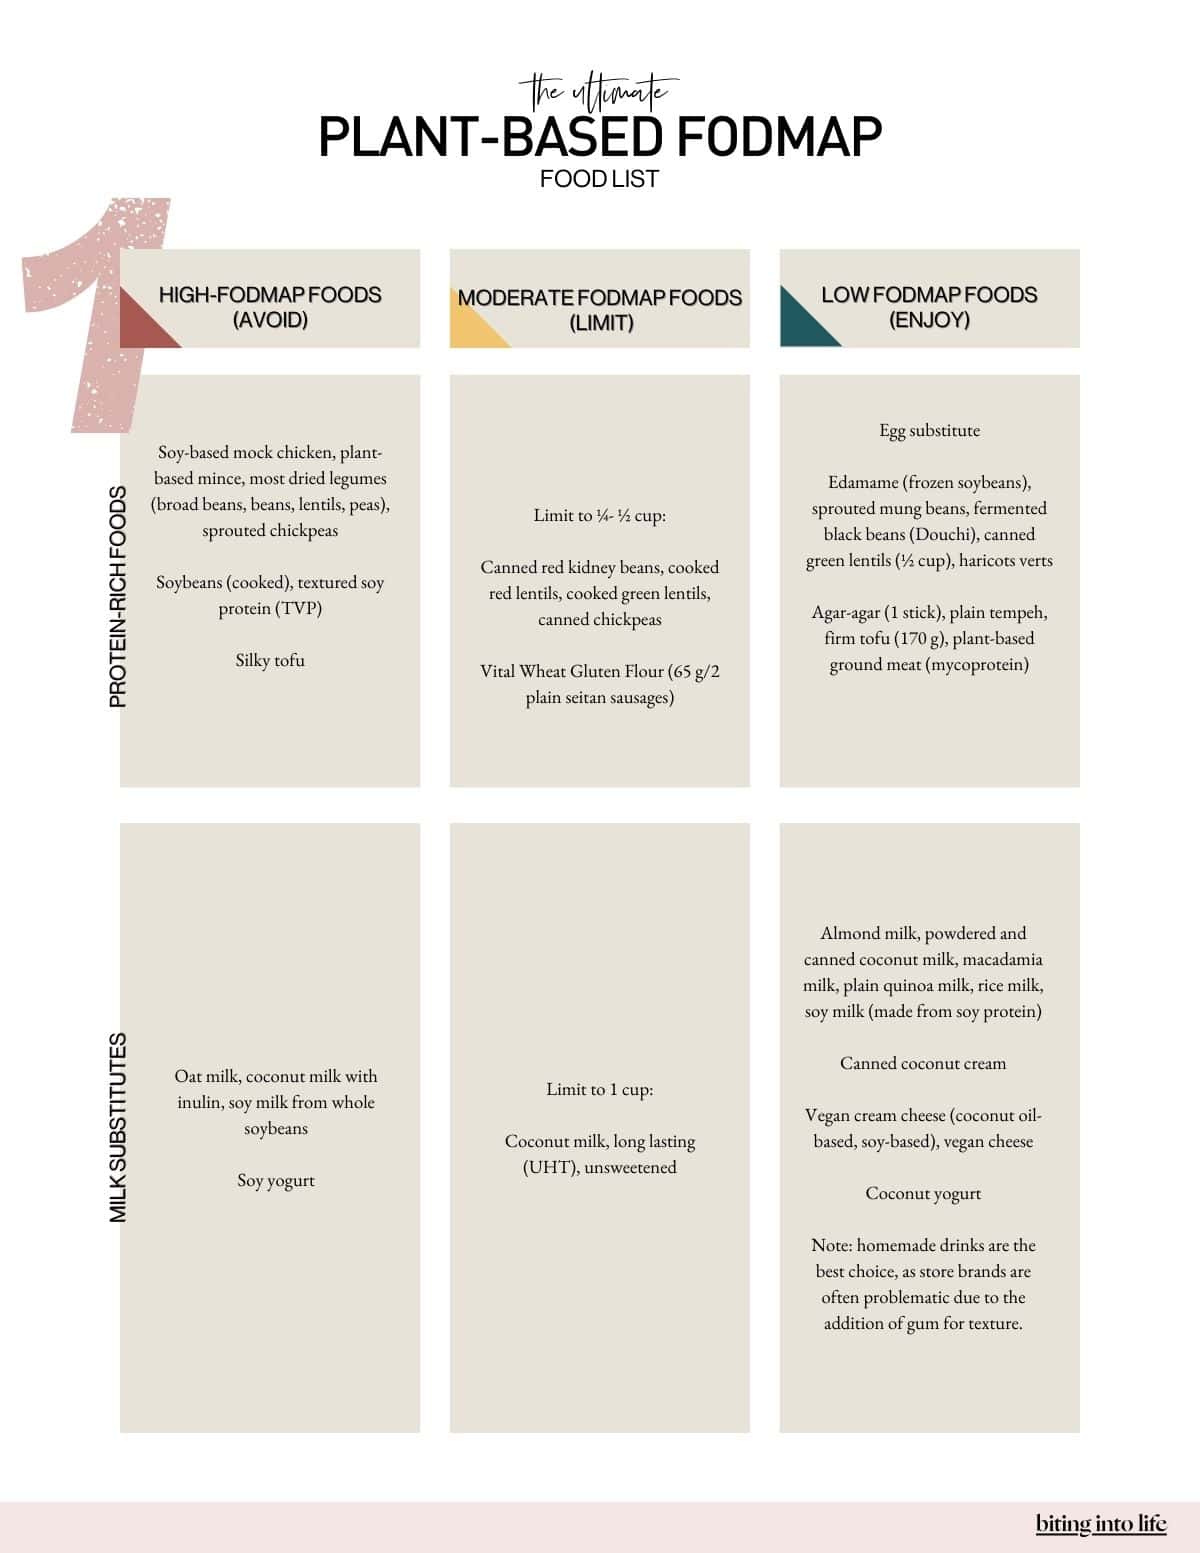
    Worst of all, since my best sources of plant protein, legumes, are unfortunately forbidden, I'm forced to turn to grain products. And not just any: they must be gluten-free. At this point, anyone of weak character would've dug their own grave.

    True, but in my case, darkness can wait. I'm inclined to believe that my reclaiming spirit cannot be overcome by these blessed constraints.

    The other day, when I dislodged my Yottam Ottolenghi Simple cookbook from on top of my fridge, a bulgur recipe presented itself to me. That evening, I was feeling a little frisky. And instead of taking out the usual quinoa Mason jar to substitute the grain that would harm my fragile gut, I thought of roasted buckwheat grains (kasha), bought a few days earlier.

    It's a sad day, I realize, when a person comes to associate the words "feeling frisky" with eating boiled pseudo-cereal grains, but I'm not ashamed to admit it. Anyway, the experience was remarkable.

    This is especially true with a sort of cream cheese, tinged with preserved lemon and mint, spread on the top.

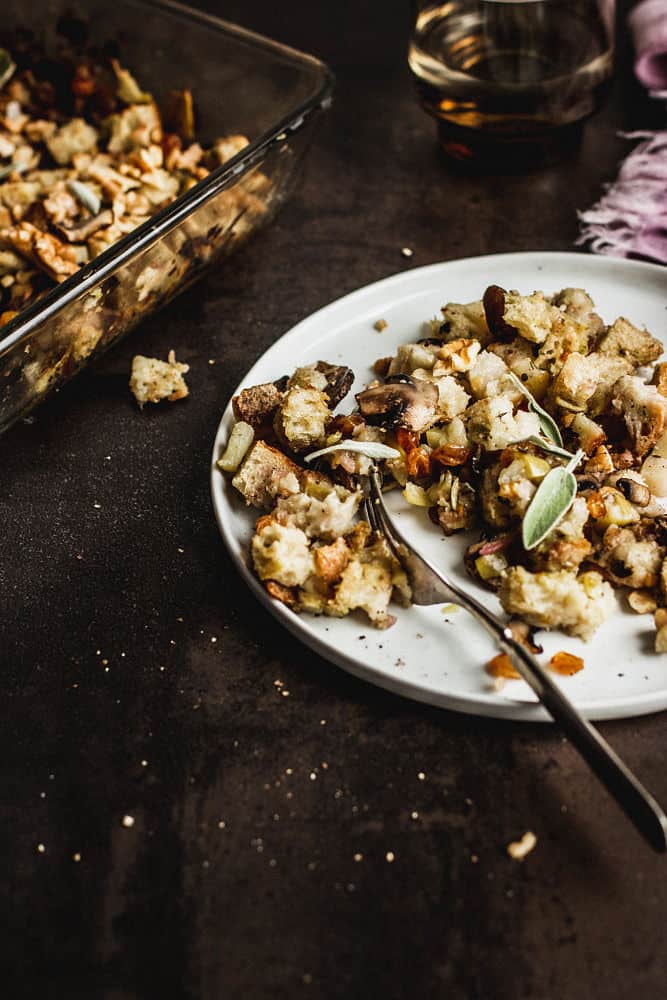
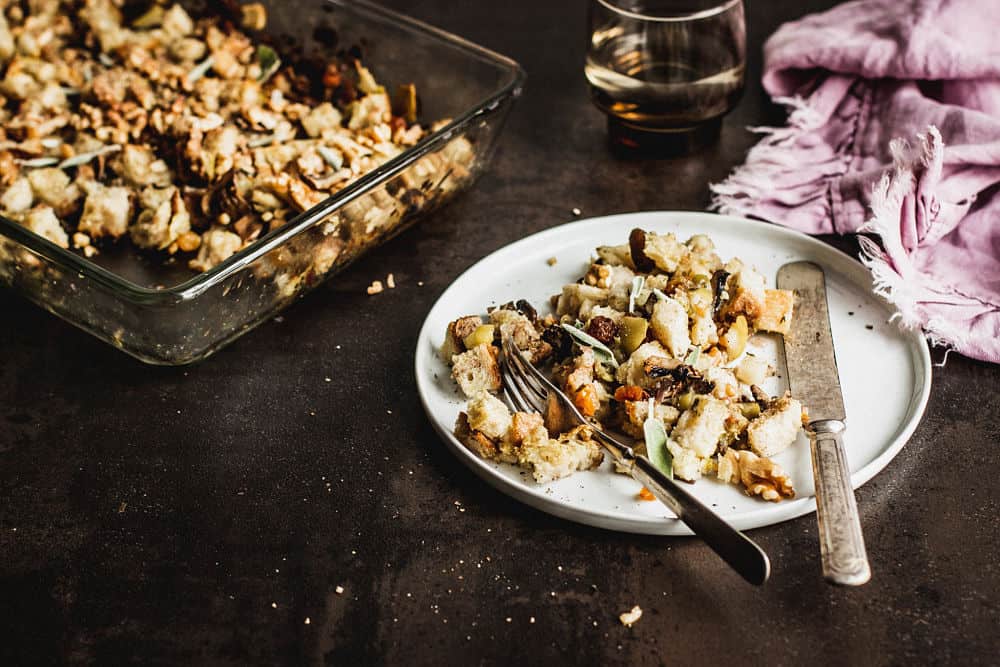
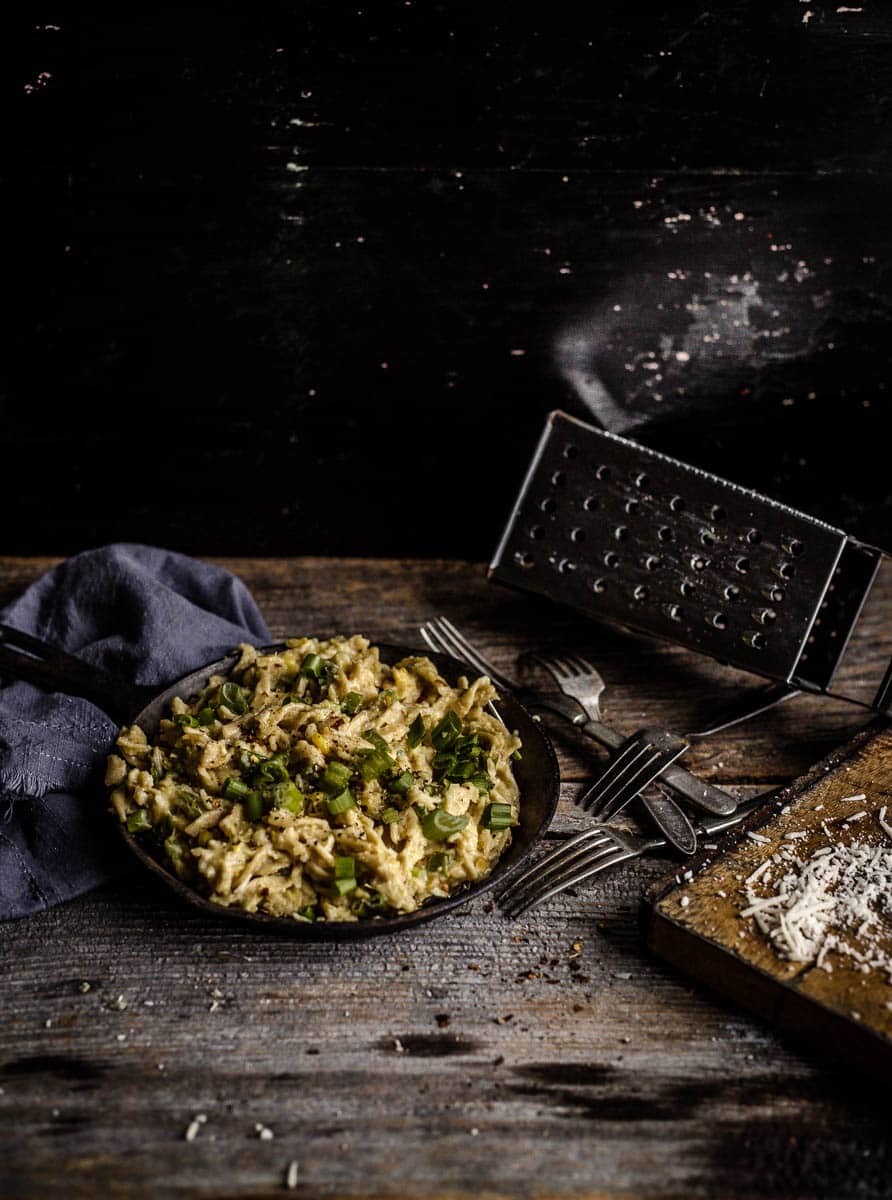
    The cooked buckwheat is soft and slightly sweet, thanks to the cherry tomatoes, and has a great nutty flavor. Then there are the tender, caramelized eggplants. Those three elements alone go well together, but seriously, with the cream cheese stuff on top, surprisingly, this dish deserves lots of superlatives.

    This grain is similar to rice, but when chewing, it has more a complex nutty flavor, it's more filling, and, to think of it, this dish erases all traces of my digestive affliction.

    Answers to Your Burning Questions

    What's kasha?

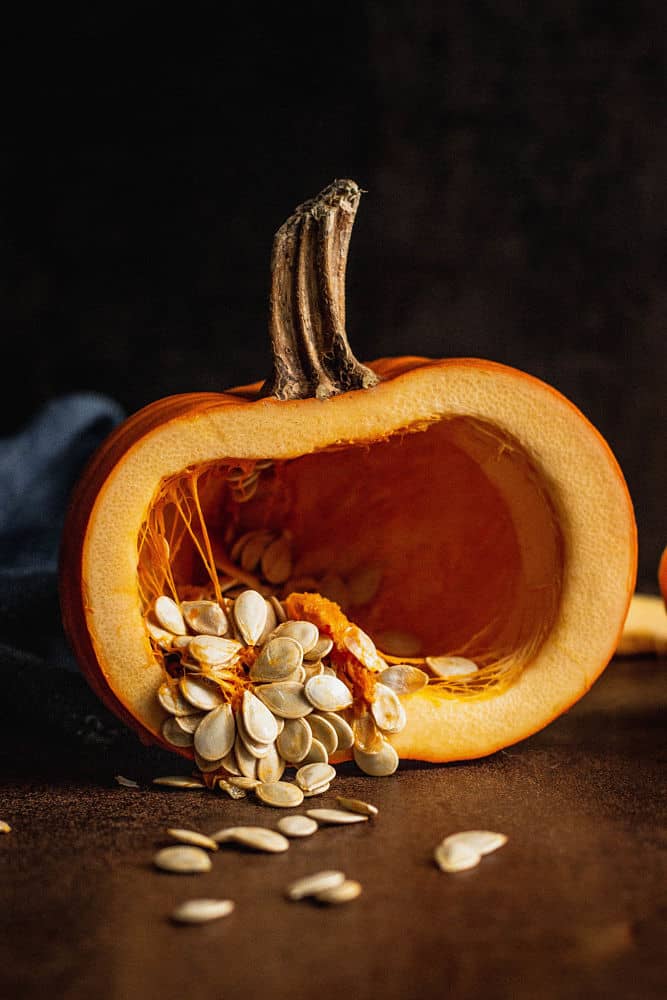
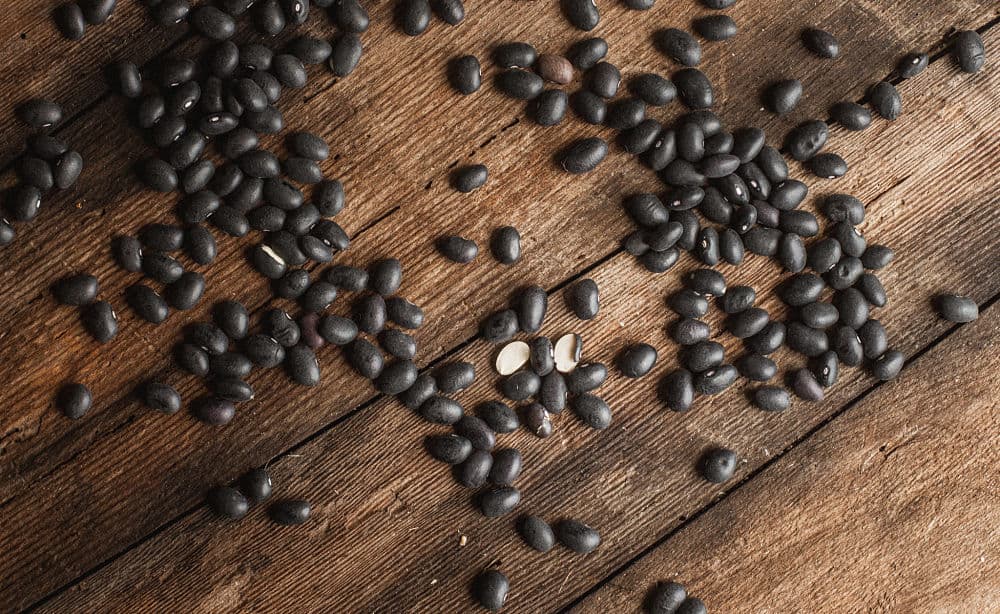
    If you haven't heard of it before, you might have known it as hulled and roasted buckwheat. It's wrongly called kasha to designate this grain, slightly reminiscent of steel-cut oats. Buckwheat grains, once roasted, release a pleasant smoky flavor.
    In Russia, it's cooked with milk to look a bit like porridge. In this case, this traditional porridge is called kacha (written with a "c" and not an "s").

    Kasha is one of the pseudo-cereals, highly prized for their lack of gluten, such as quinoa, amaranth, millet, and so on.

    Wrongly called "buckwheat," kasha does not belong to the grass family like quinoa. In this case, it is not a cereal. It's part of the same family as rhubarb and sorrel: the Polygonaceae. Thus, since it is gluten-free, it becomes particularly digestible.

    It's chewy and slightly sweet and has a nutty flavor. It can be used in both sweet and savory recipes. For example, it can be used as a base for rice or hot cereal; it can be incorporated into salads, soups, risotto imitations, and about a million other things.

    Is it good for your health?

    The benefits of buckwheat are multiple. Packed with antioxidants, an incredible source of vegetable proteins, endowed with essential amino acids, buckwheat (or kasha) is no less rich in fiber and vitamins. Like oats, it also helps to regulate bad cholesterol levels in the blood.

    It's also a good source of magnesium. This mineral relaxes blood vessels and improves blood circulation and nutrient delivery while lowering blood pressure, which is the perfect combination for a healthy cardiovascular system.

    Where can I buy it?

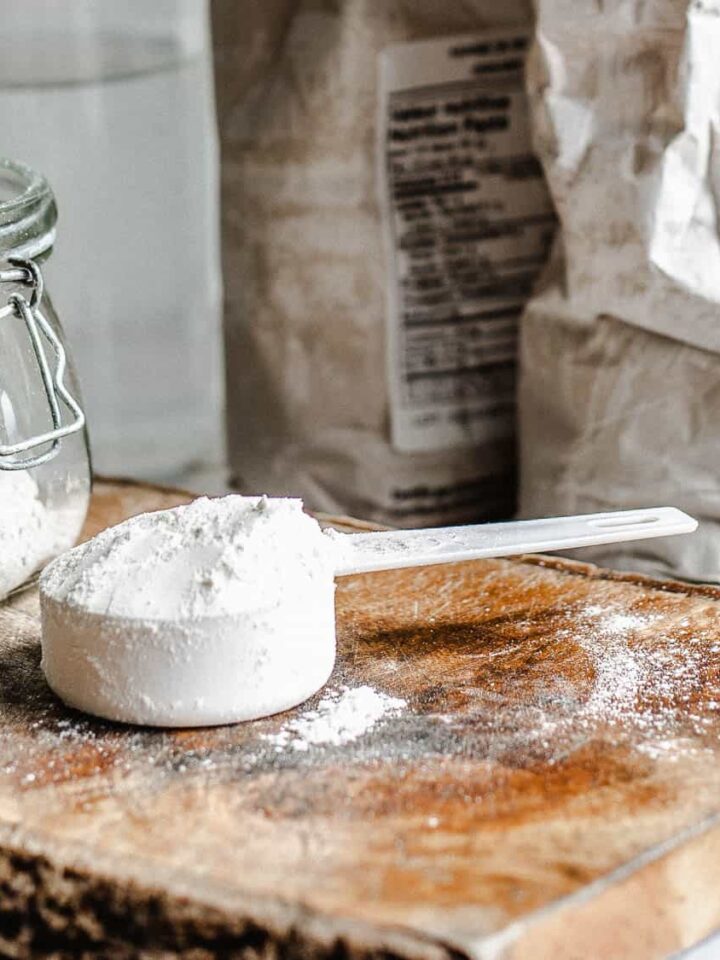
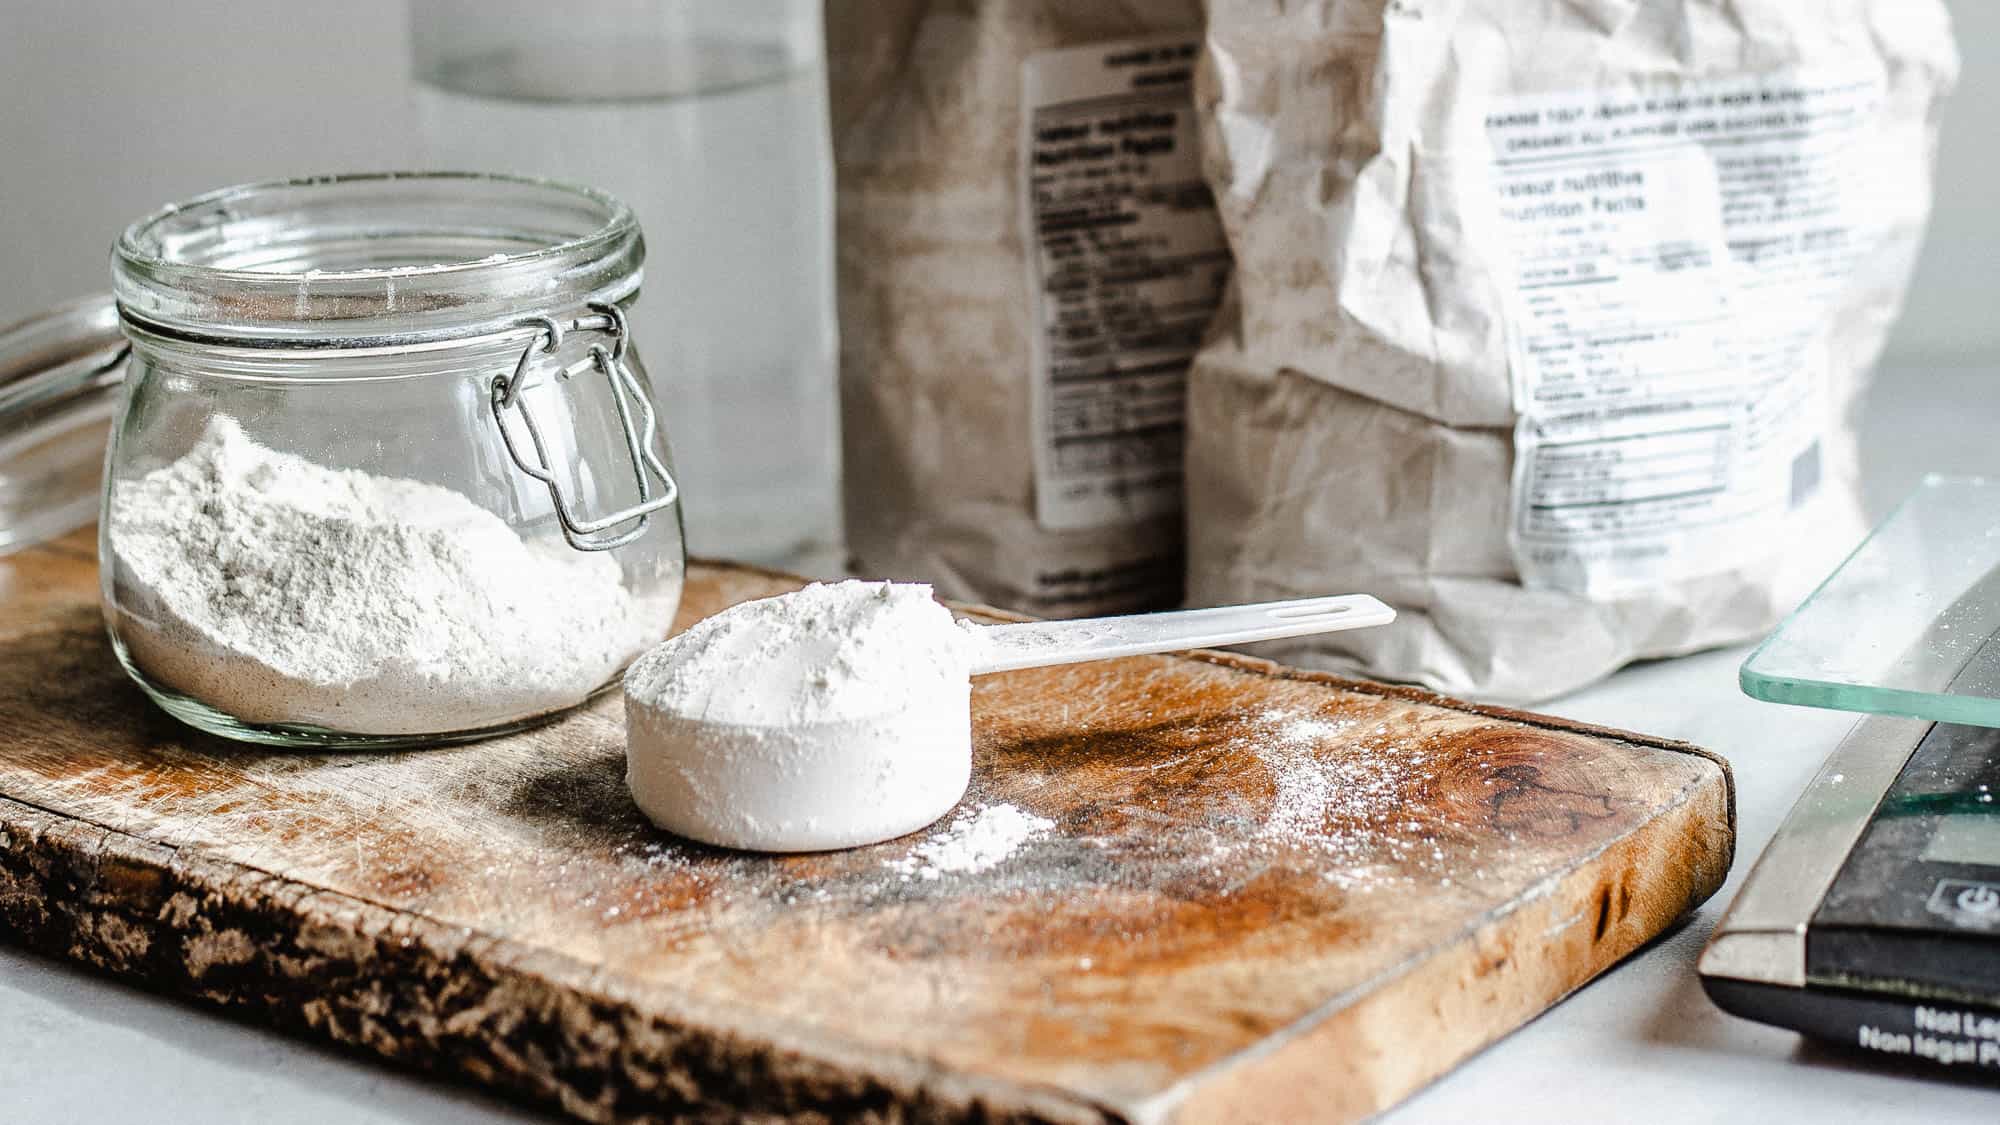
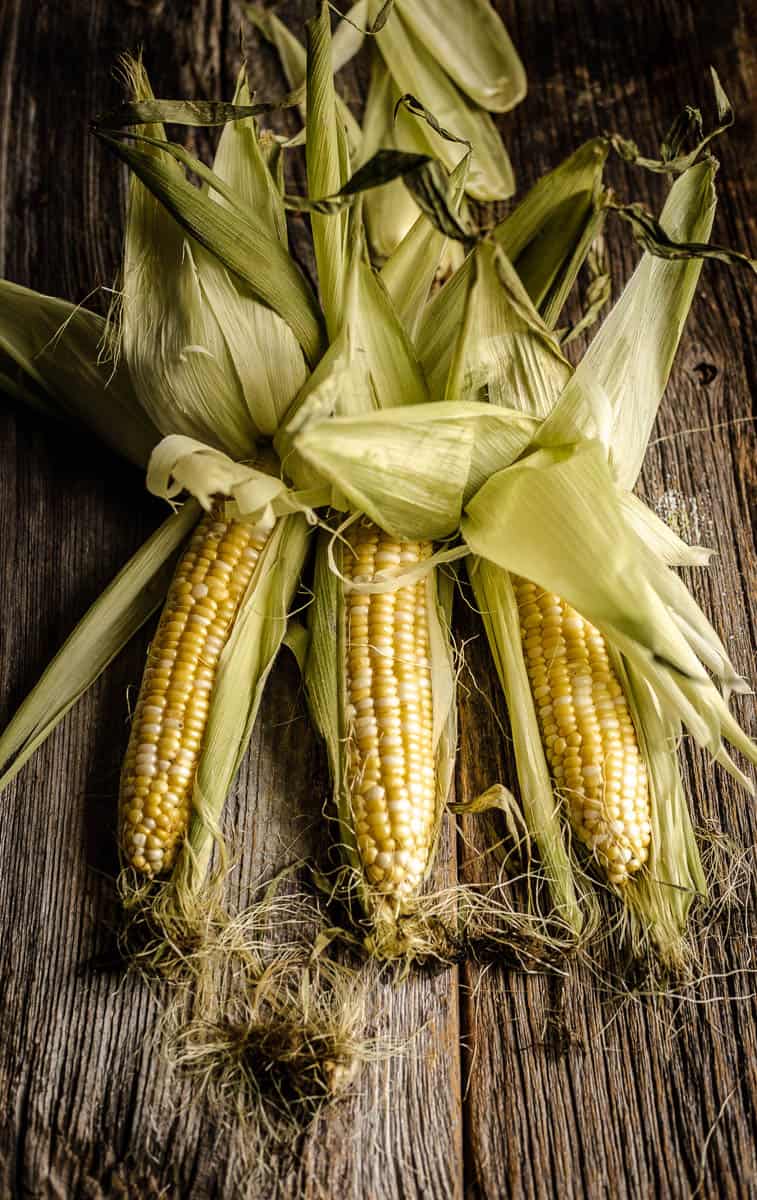
    Roasted buckwheat is sold by various brands and is mostly found in all healthy grocery stores. It's sometimes available in bulk, but as a rule, it's relatively easy to find. To buy kasha and not common buckwheat, be sure to see the words "toasted buckwheat groats."
    In Russian, European or Asian markets, it usually comes pre-roasted and is golden brown in color. Roasting is quite simple.

    Note: Organic buckwheat has a different texture than what Russians are used to. Therefore, this recipe might not work well with it.

    Can I make my own homemade kasha?

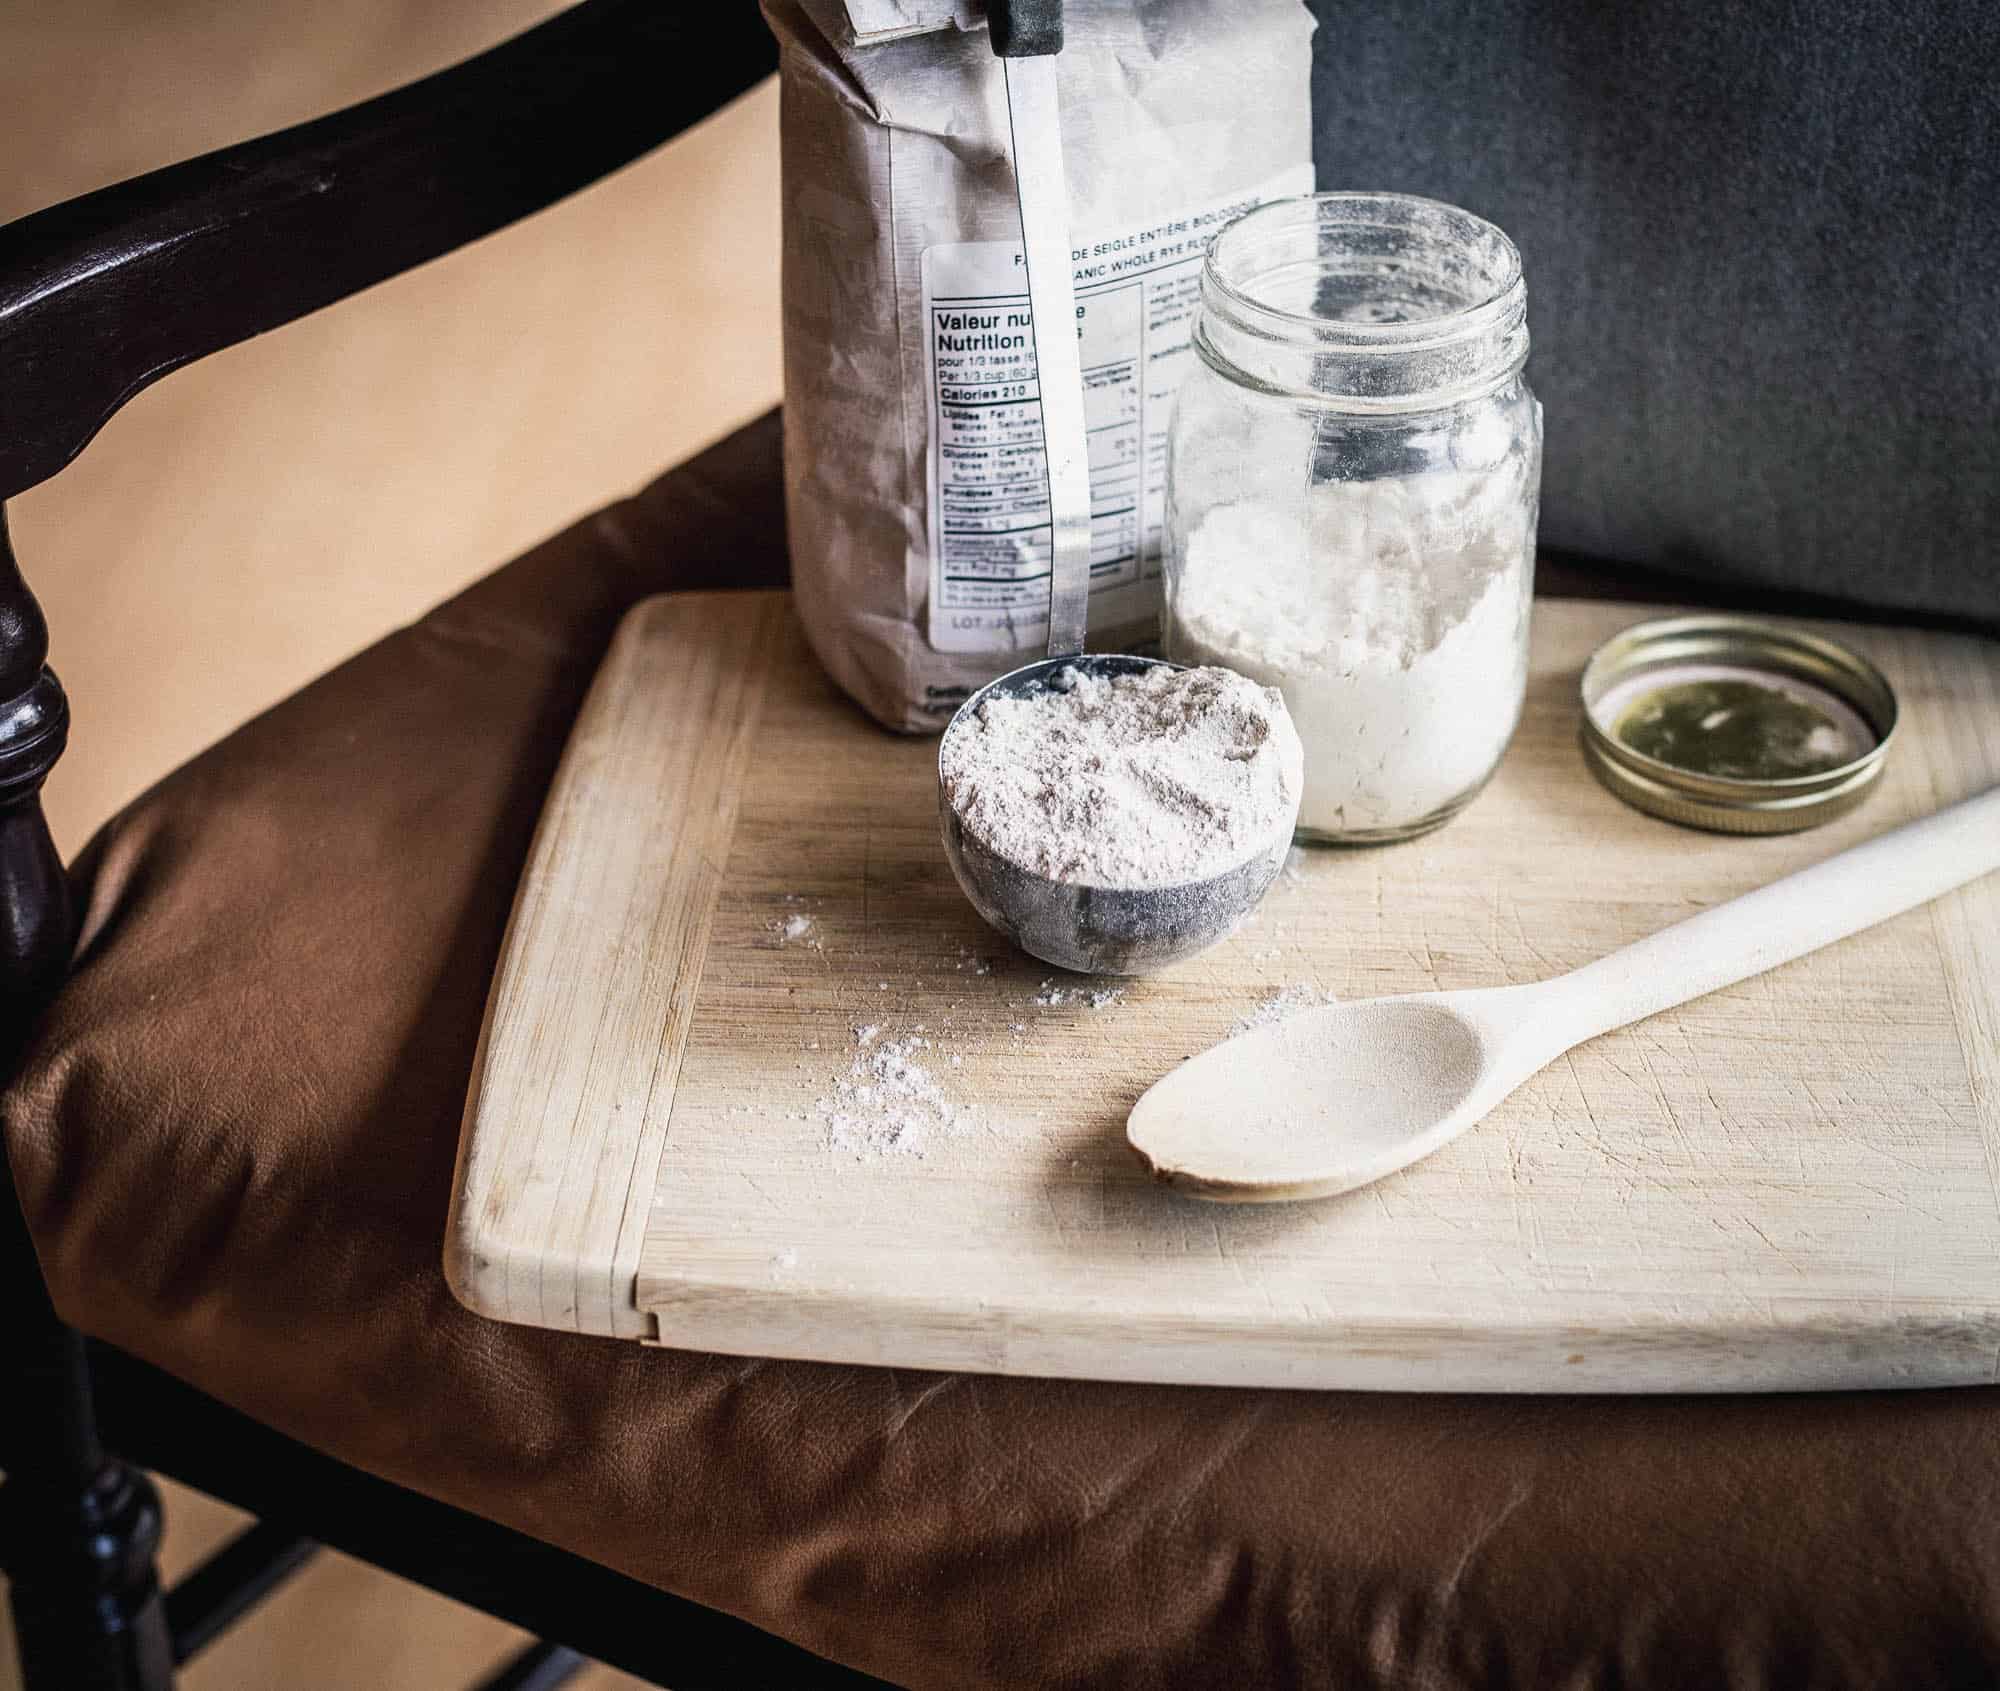
    Yes, it is child's play, even. To prepare it at home, you need hulled buckwheat seeds called "plain" (be careful to check the words "hulled").

    Take plain buckwheat and make homemade roasted buckwheat in no time.
    1 / In a pan over medium heat and without fat, toast the small seeds.
    2 / Stir constantly until the seeds reach a beautiful golden brown color.
    3 / Leave to cool and reserve your kasha in an airtight box.

    • Plain buckhweat (kasha) in a small fine sieve
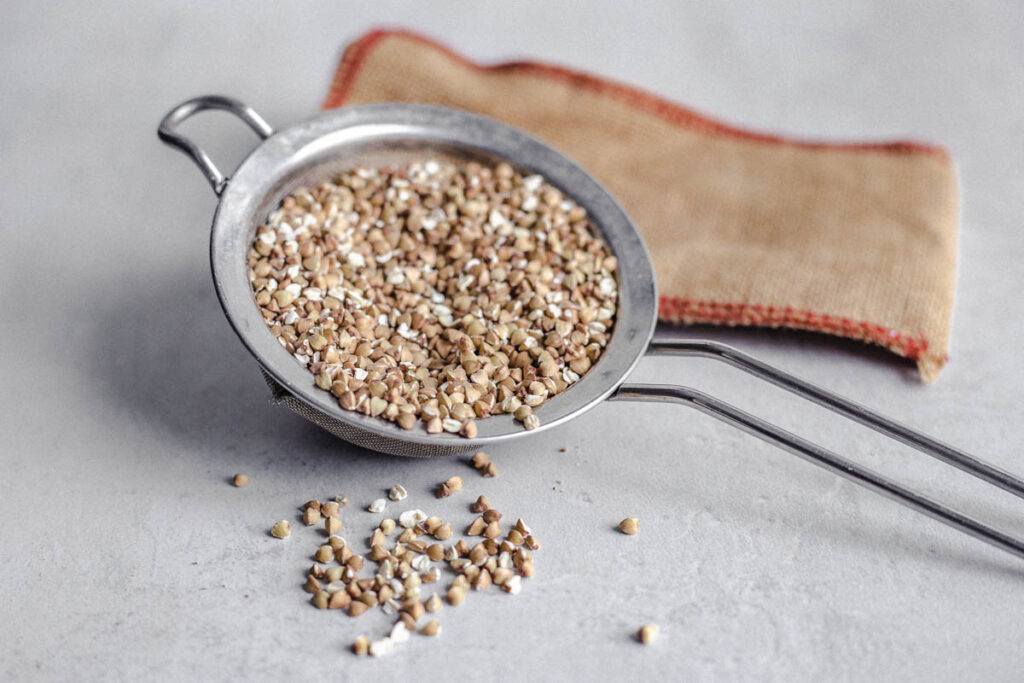
      Plain buckwheat is lighter
    • Roasted buckwheat in a fine mesh sieve
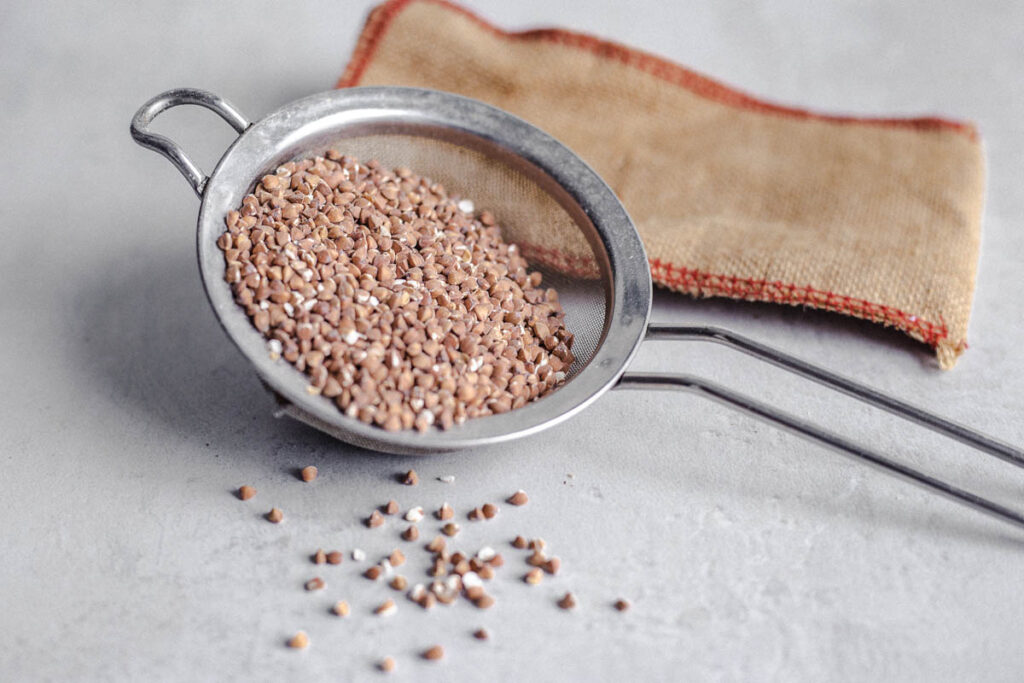
      Roasted buckwheat is darker

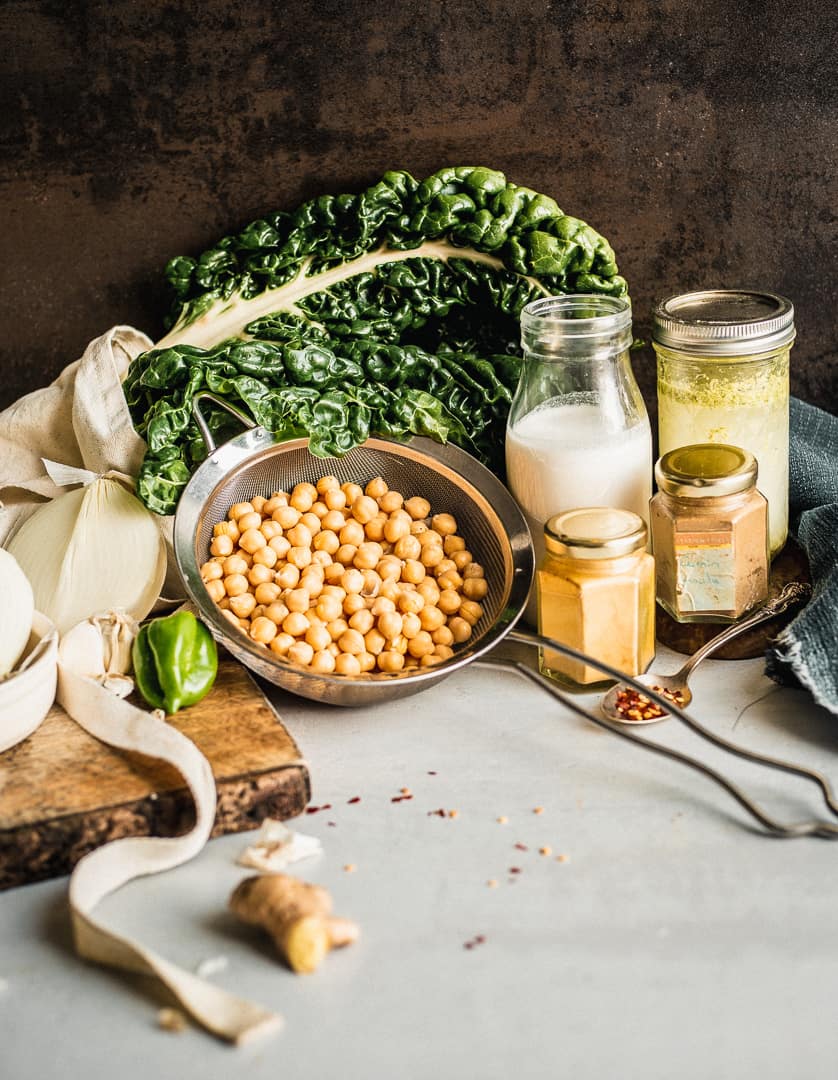
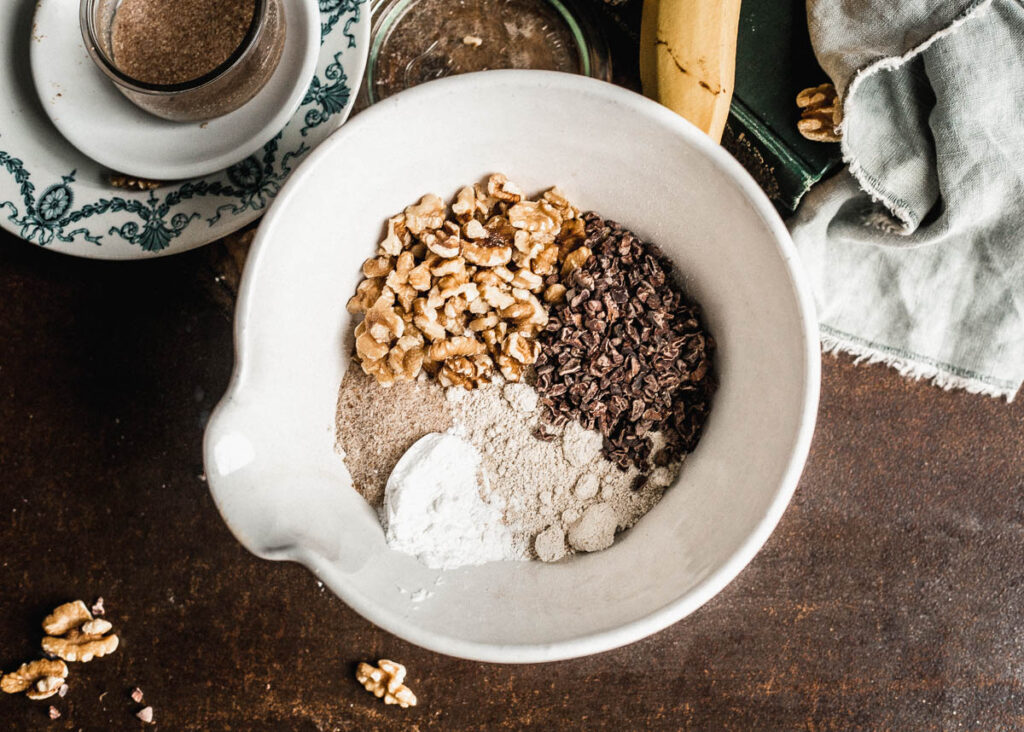
    What Do We Put in this Savory Roasted Buckwheat?
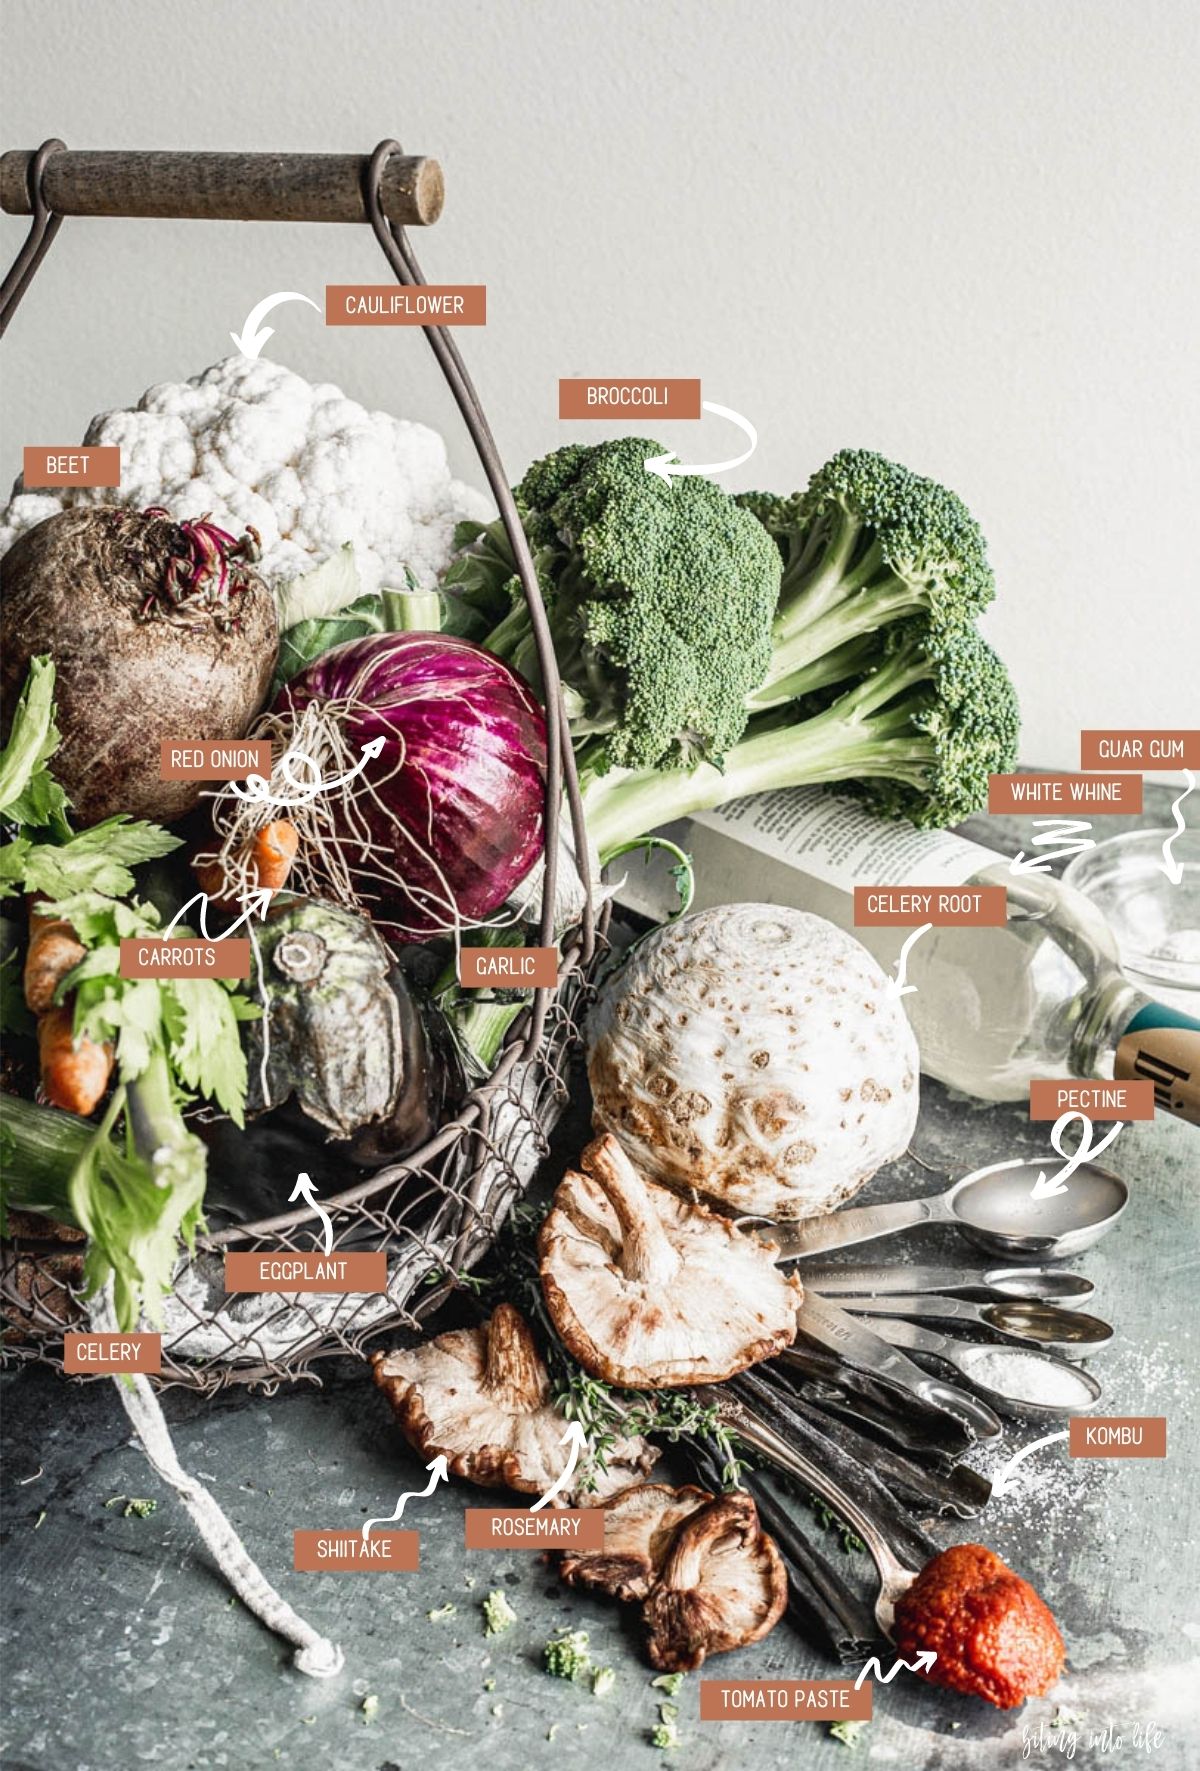
    For a savory kasha, you just need to add vegetables and good seasonings.

    Main ingredients

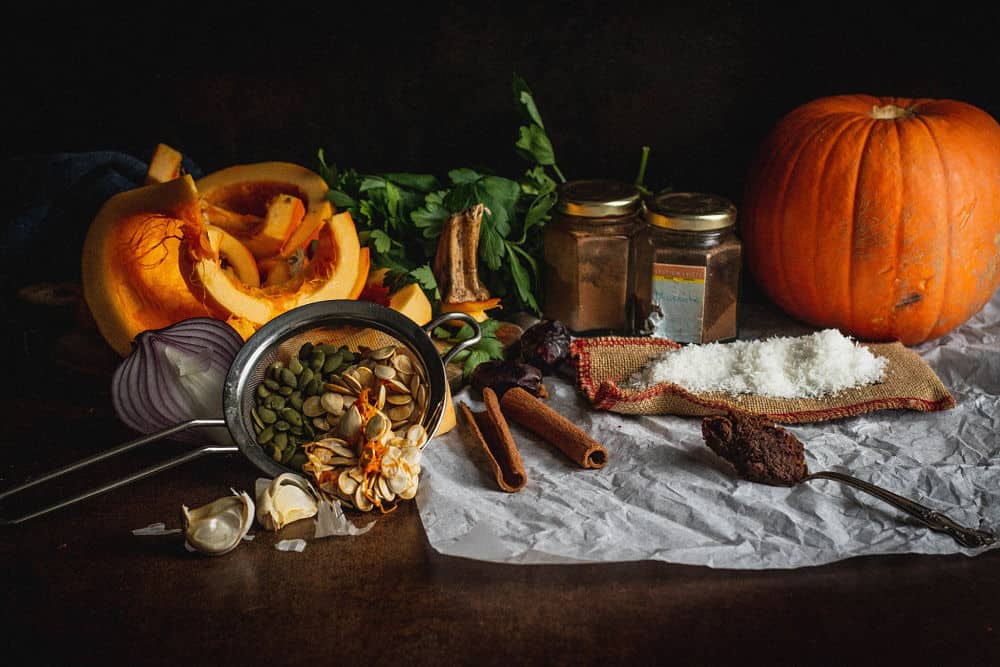
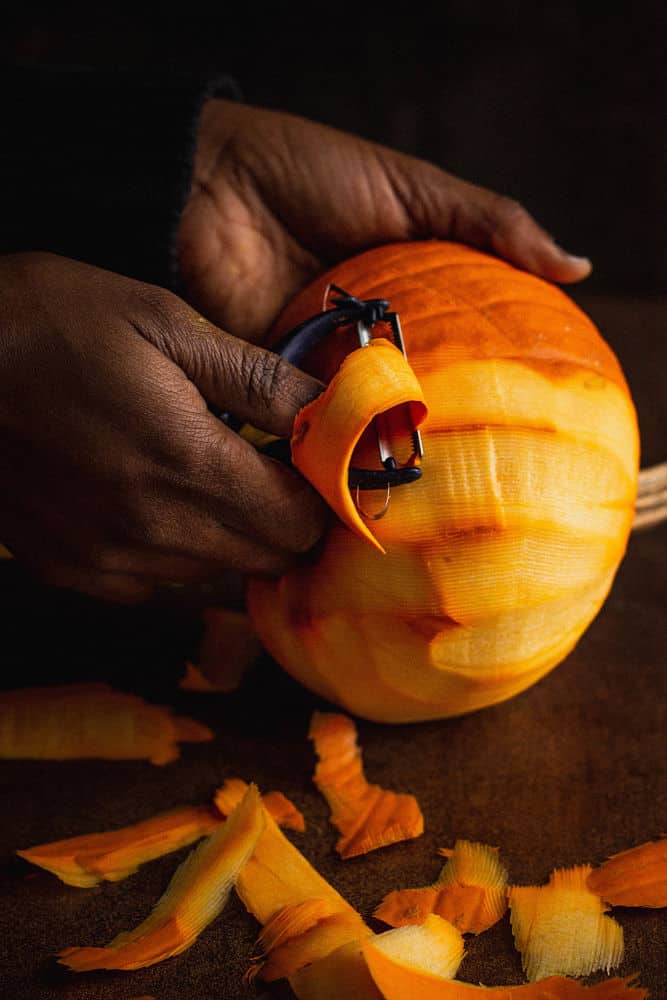
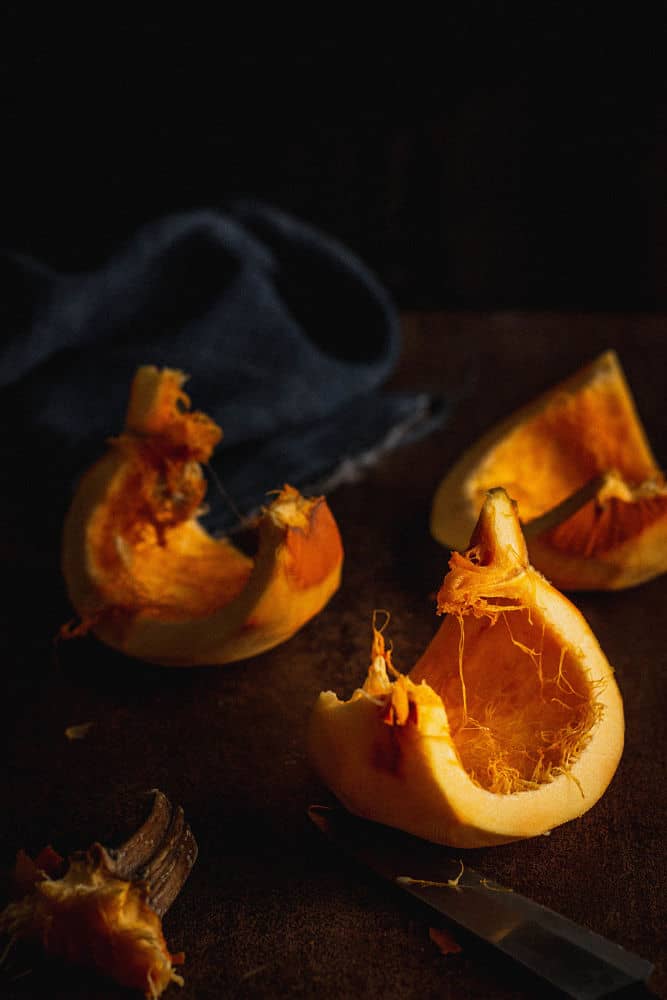
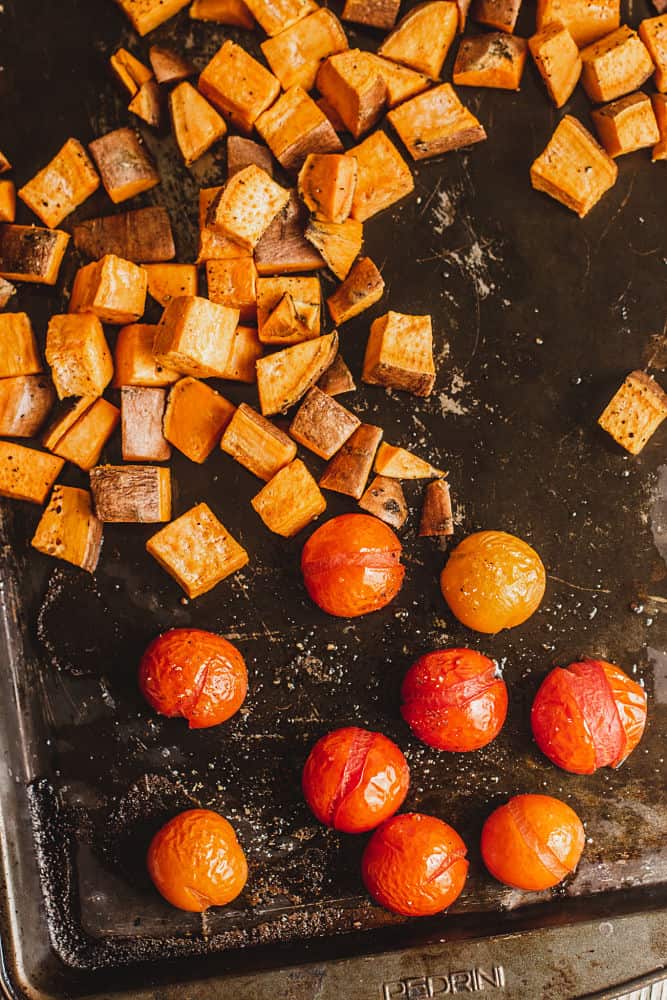
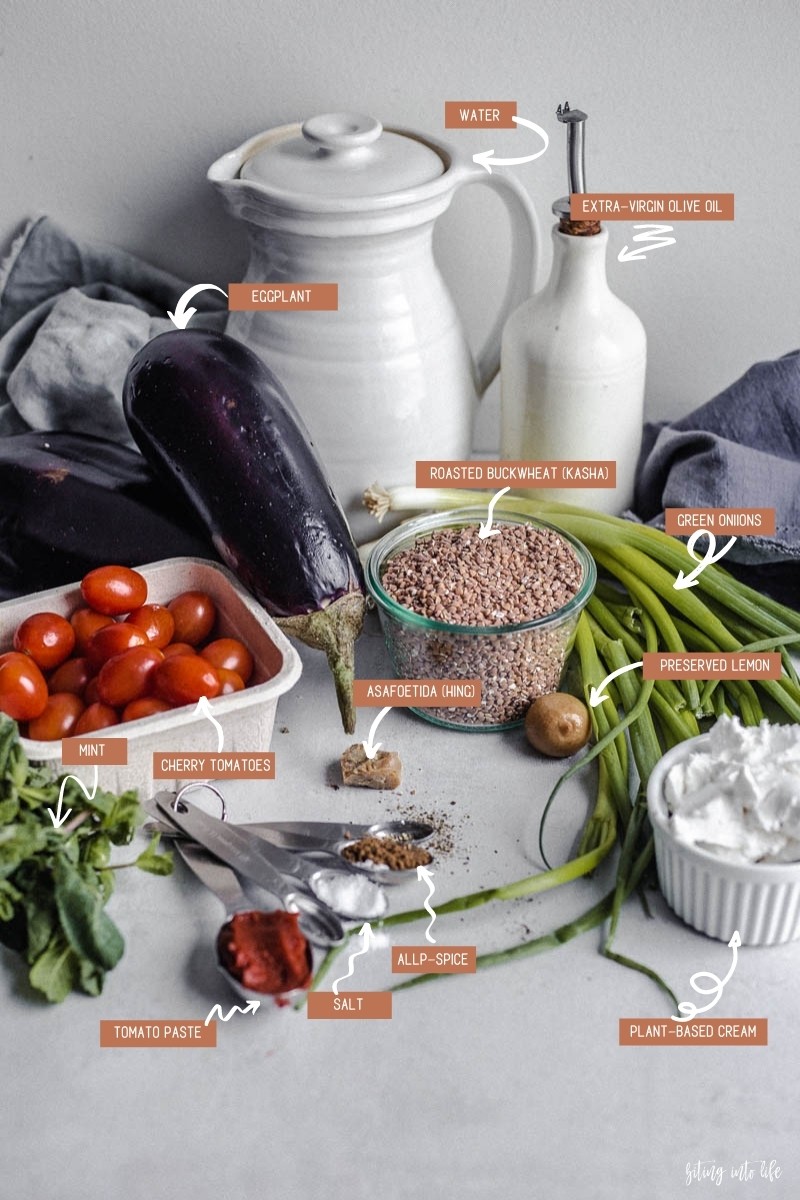
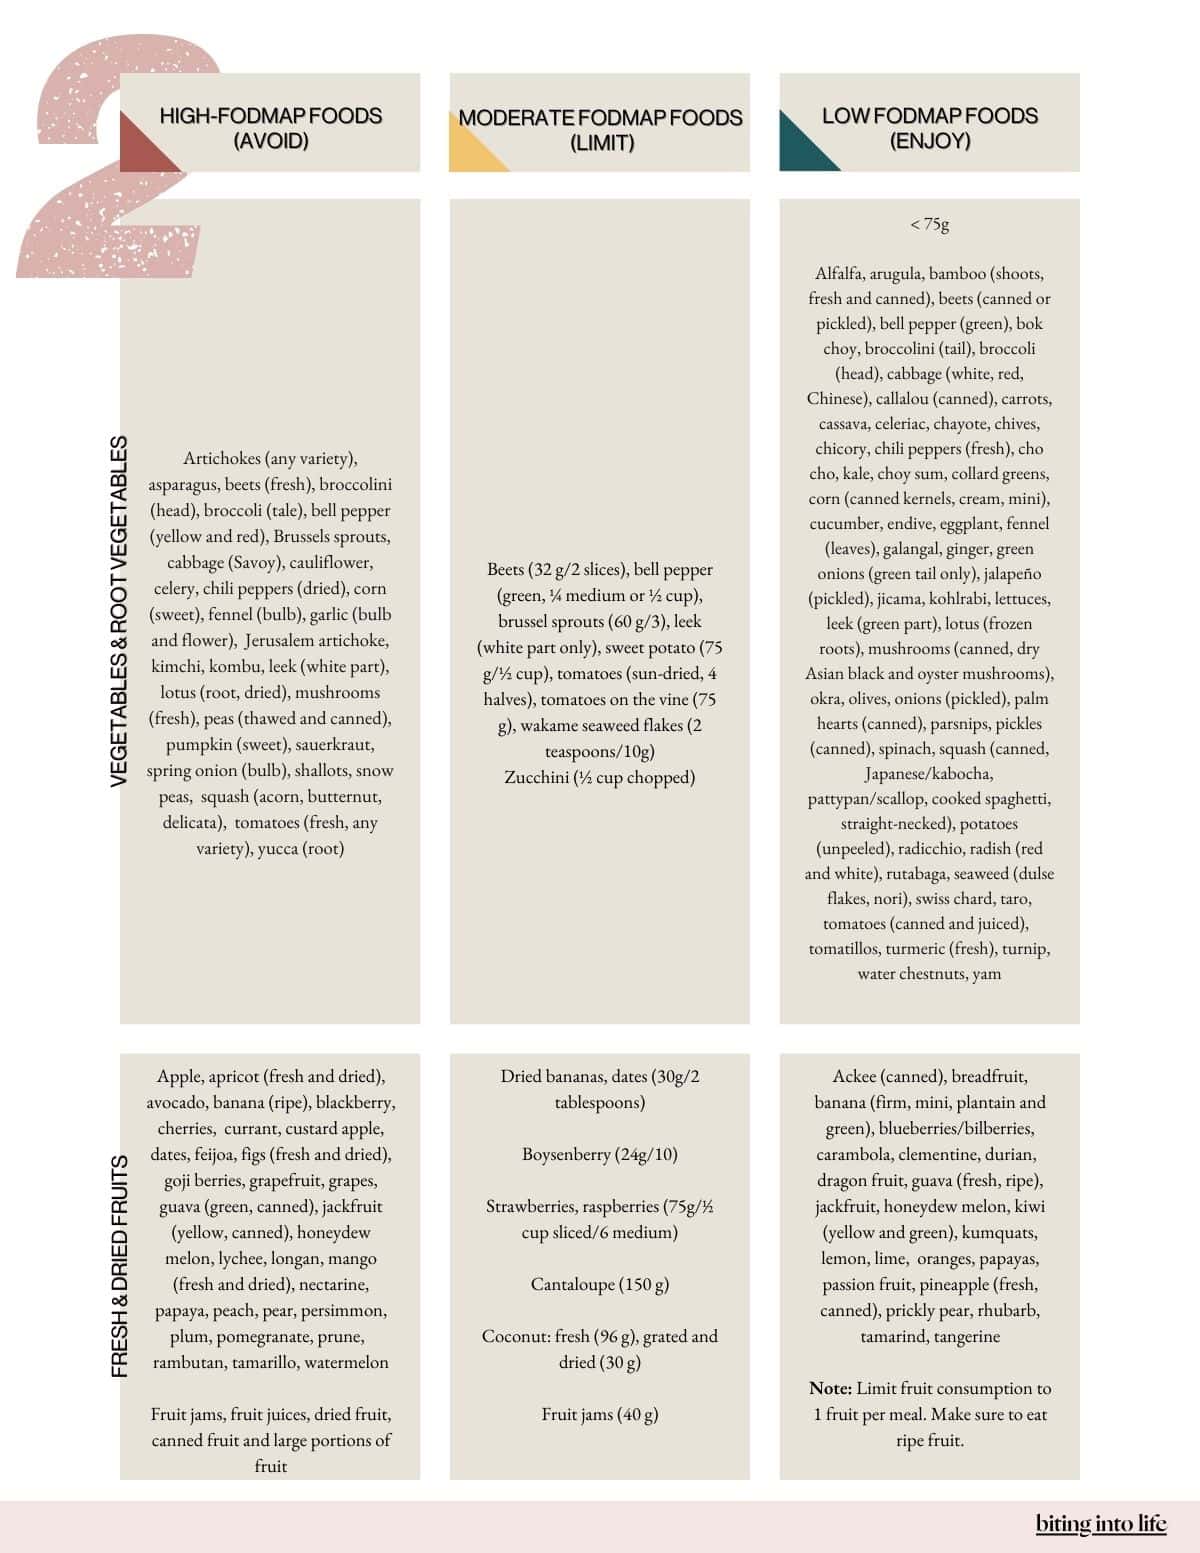
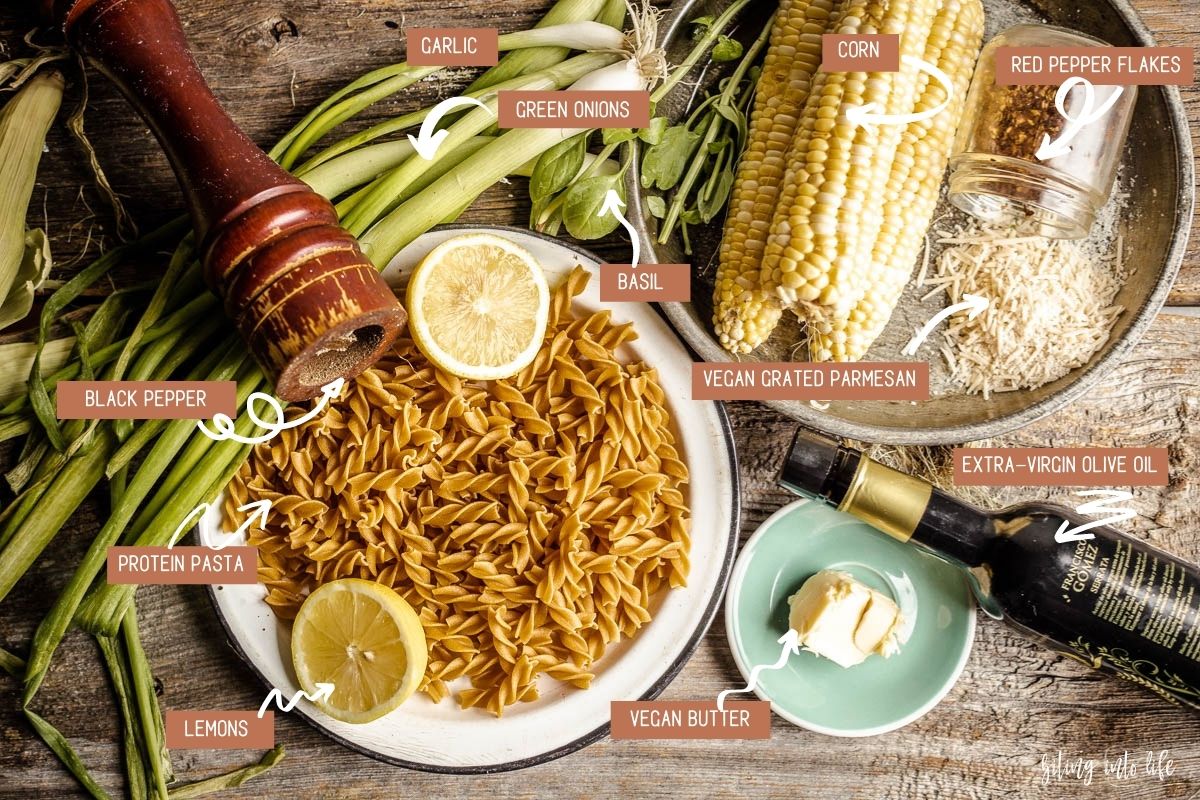
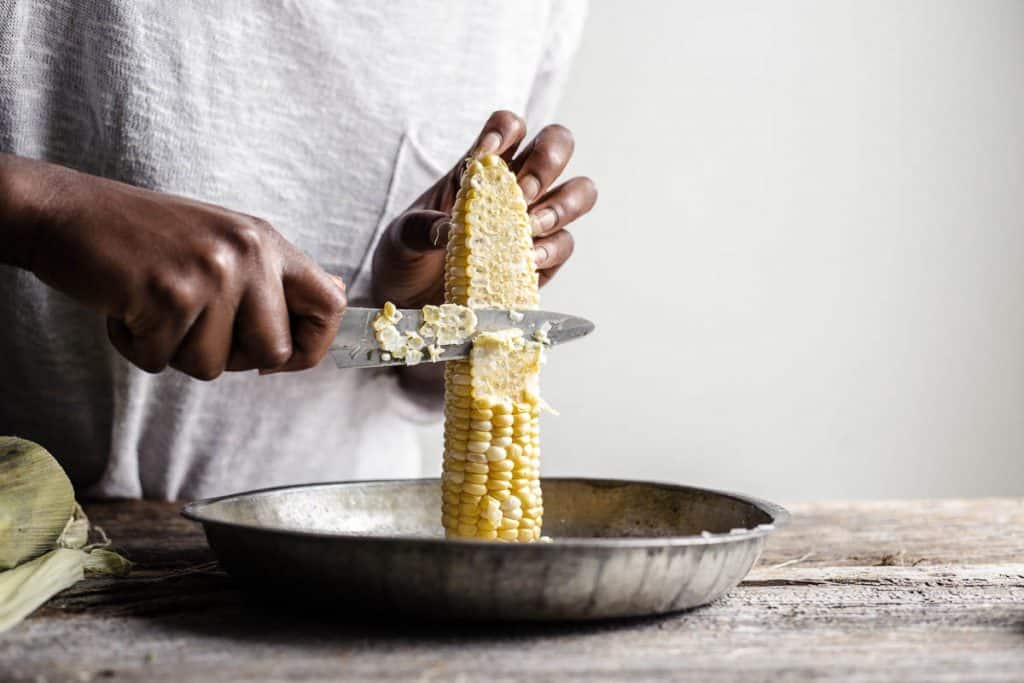
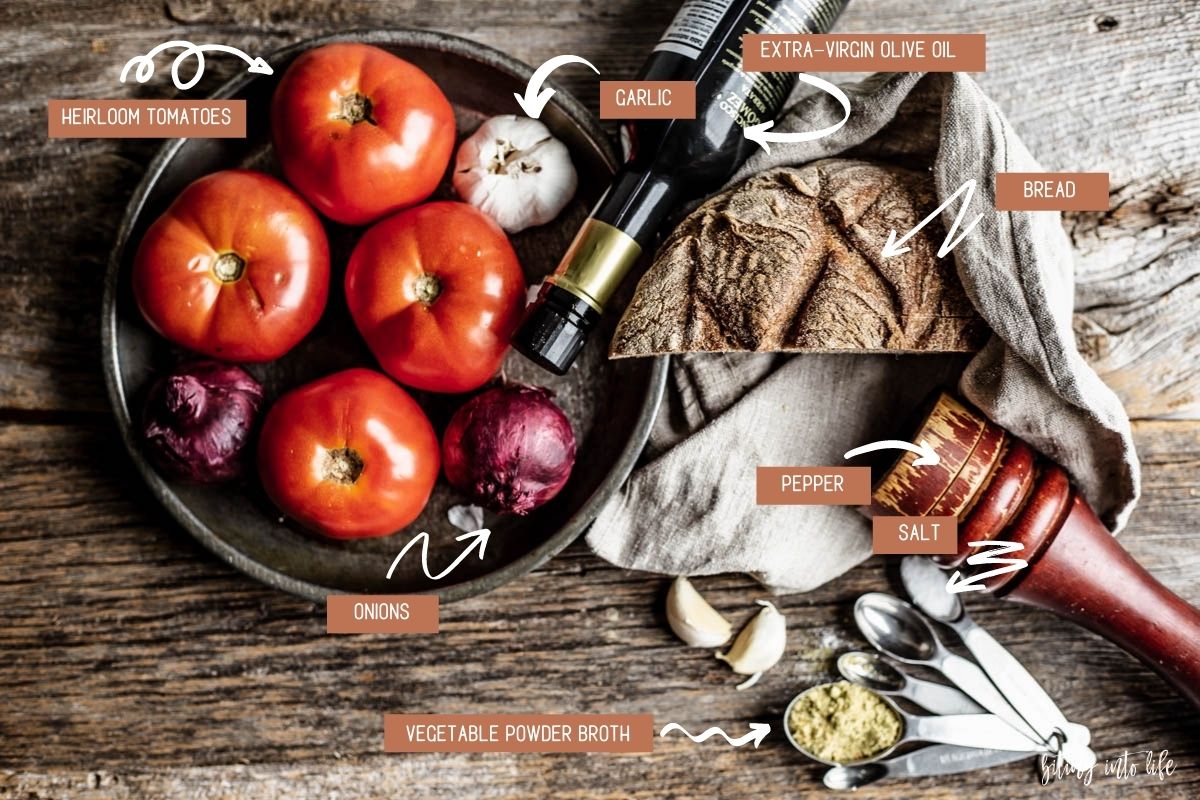
    • Eggplants – these are generally in high season in late summer, August, and September. At this time of the year, look for gleaming ones with dense, evenly firm, sweet flesh with a few seeds. Keep them in a cool place to keep them.
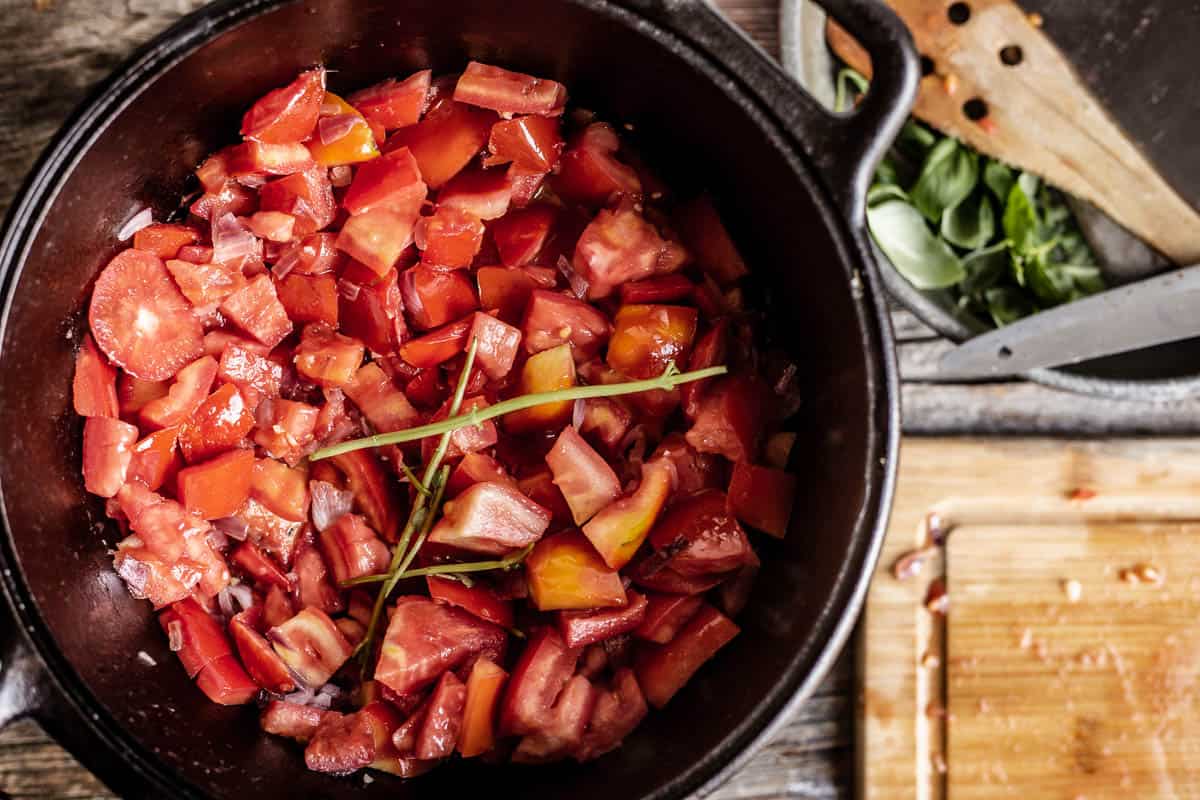
    • Cherry tomatoes – these will add some color and umami.
    • Tomato paste – concentrated umami!
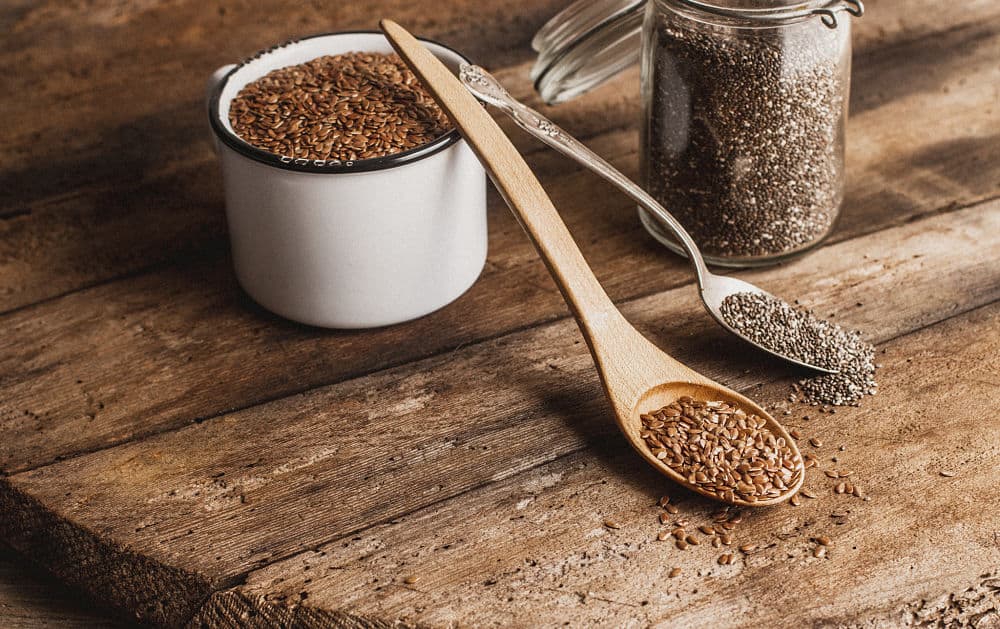
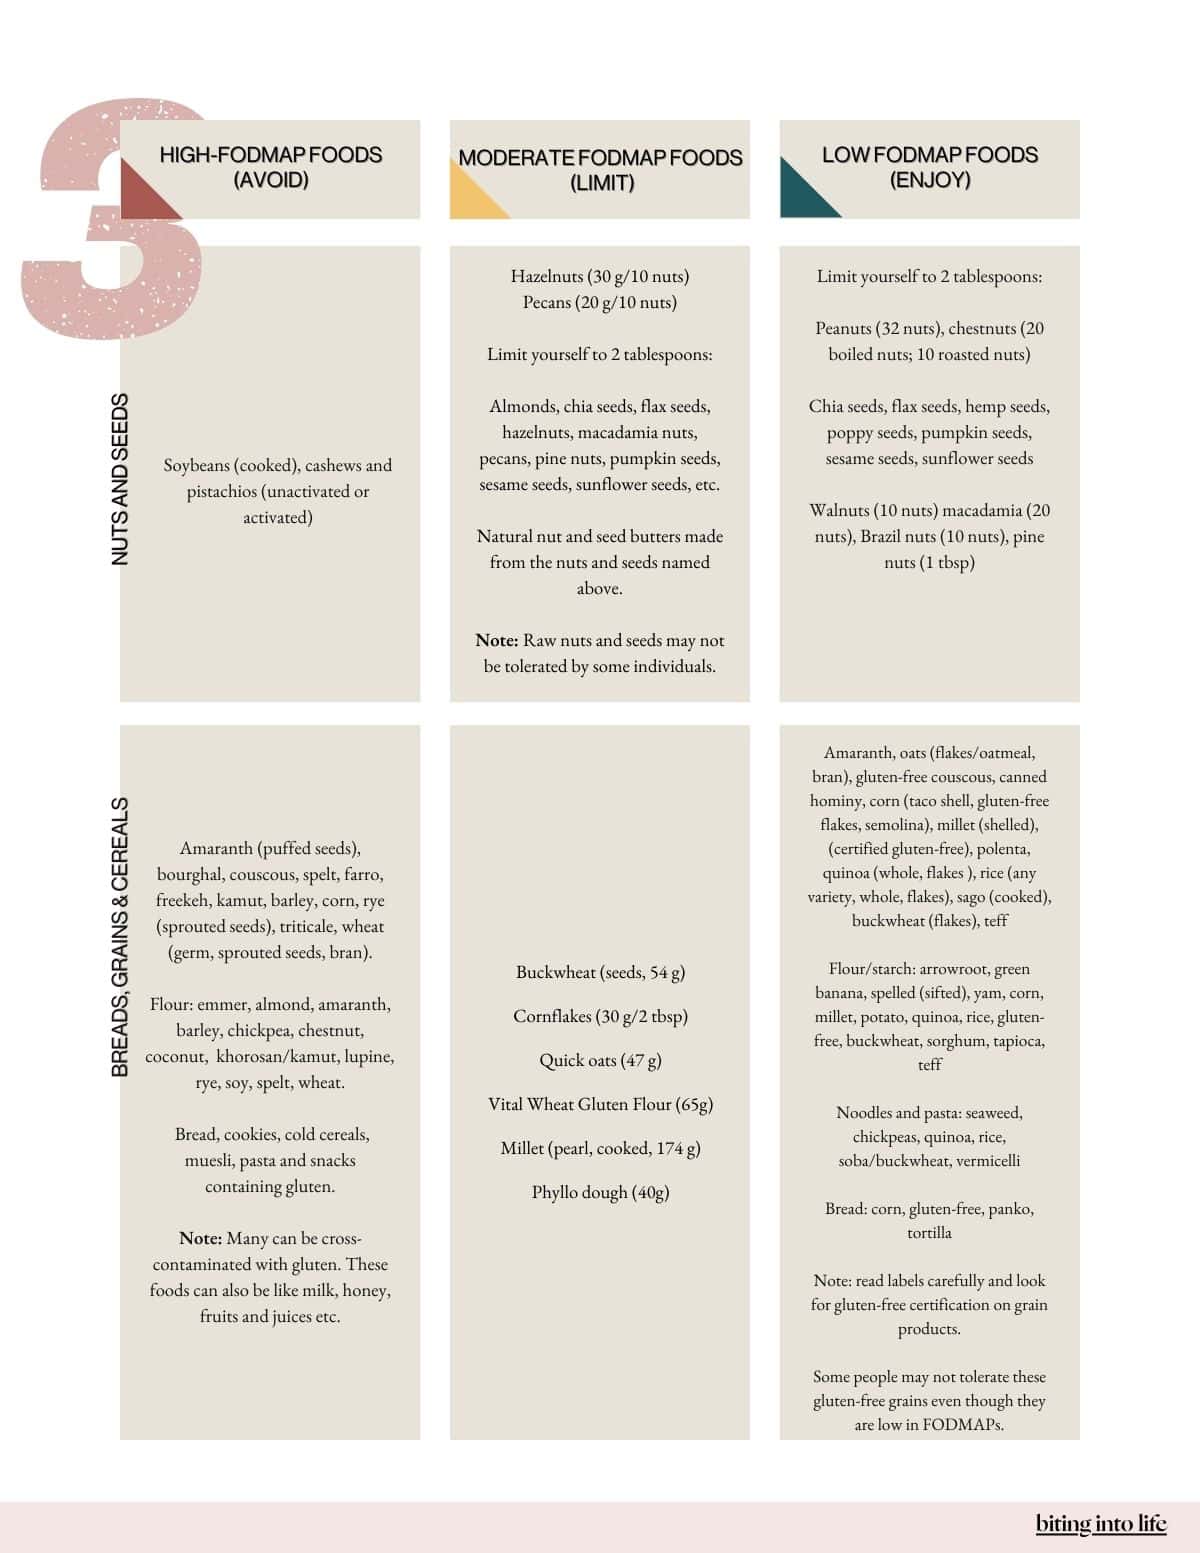
    • Roasted buckwheat – also called kasha, its taste is very close to the taste of roasted nuts. This is also what we appreciate about it when tasting it.
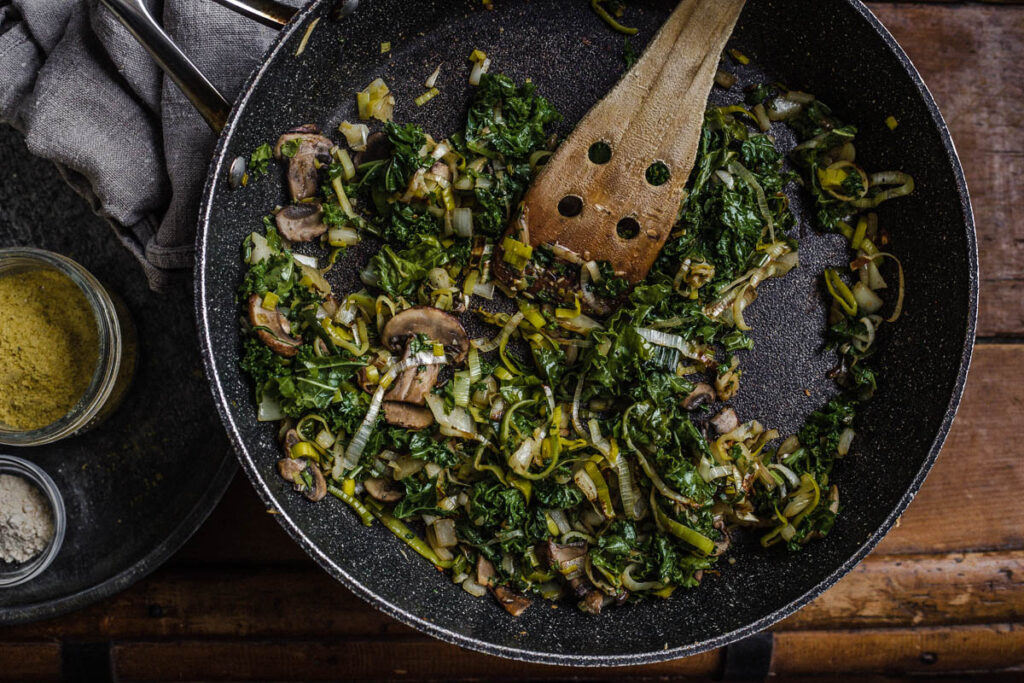
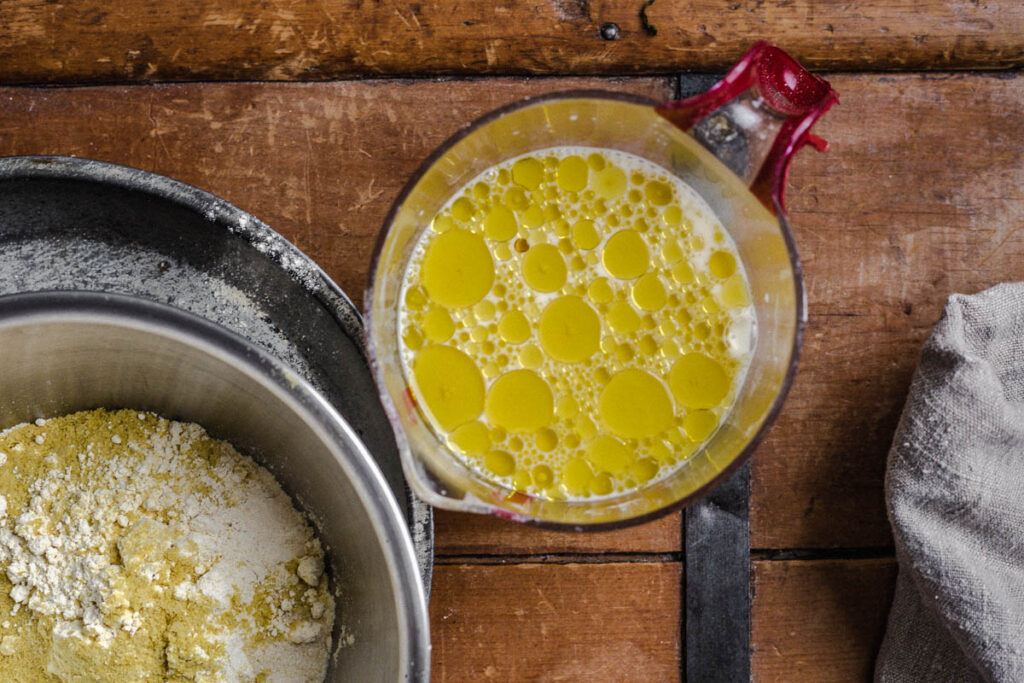
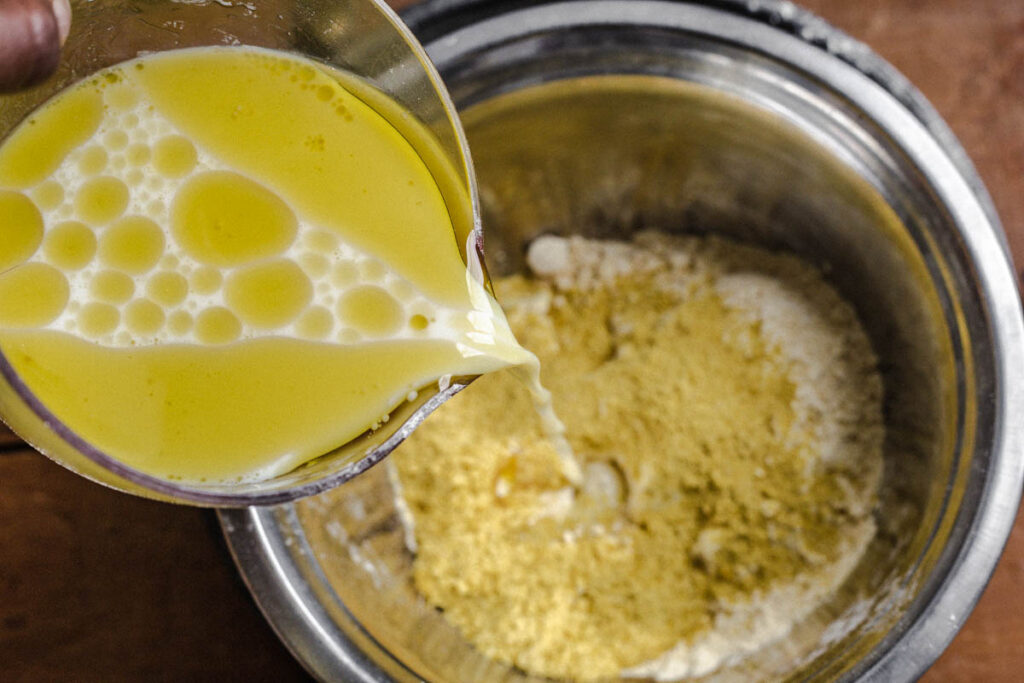
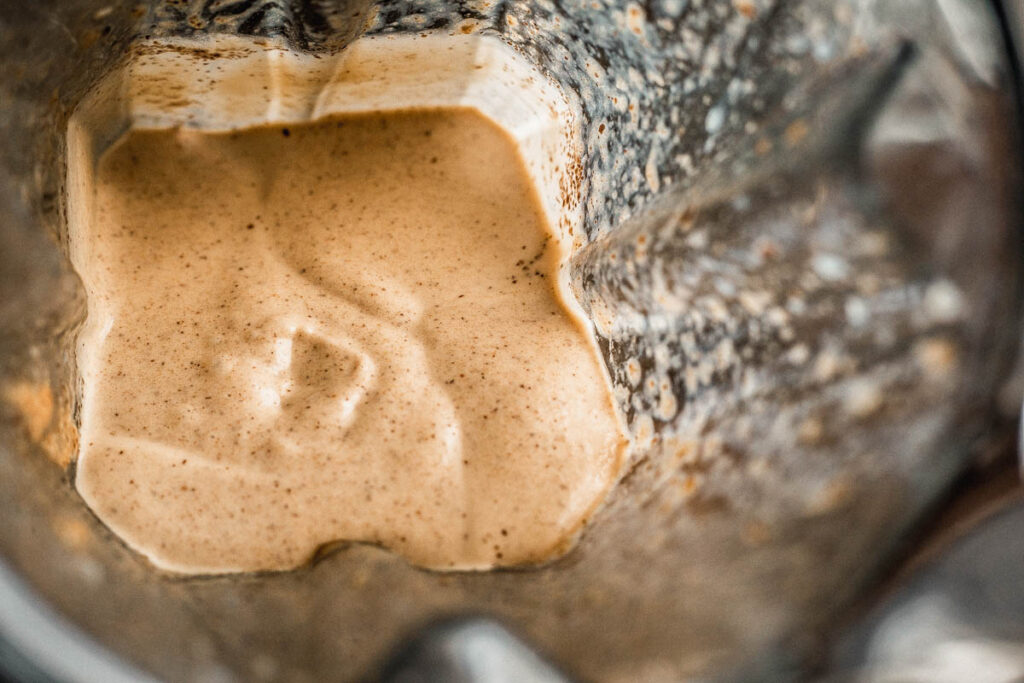
    • Plant-based cream – the original recipe called for yogurt, and I thought about coconut yogurt at first, but I wasn't sure it would do. Instead, I found a cream cheese-style creme, to which I added a little water to make it creamier.
    • Preserved lemon – these are mini-lemons dipped in brine.

    Seasonings

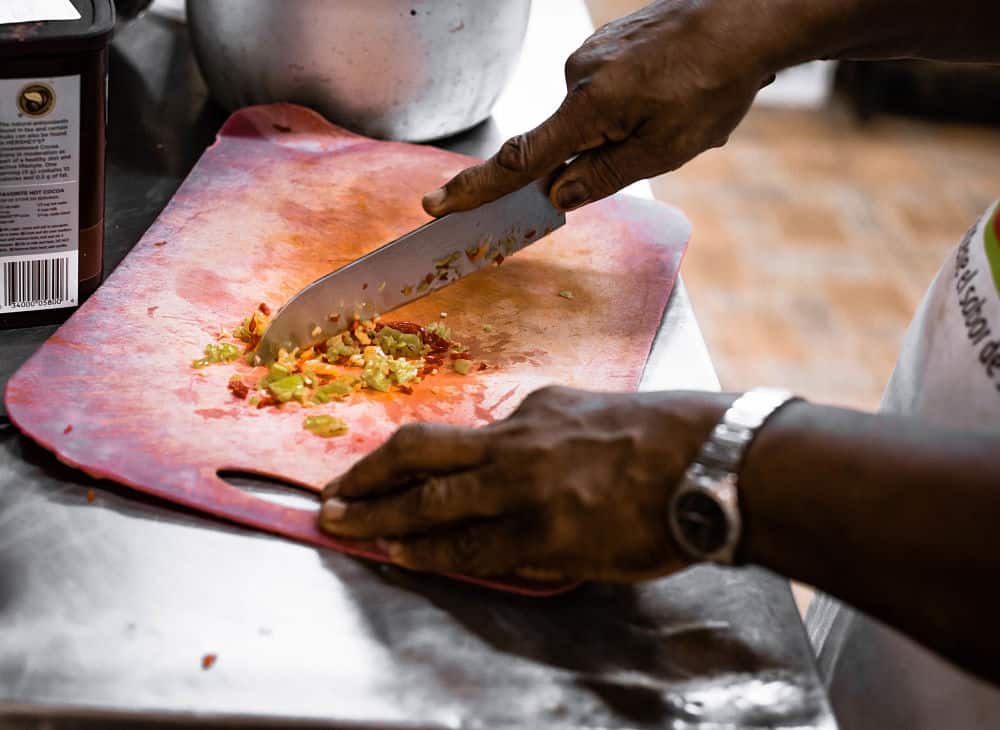
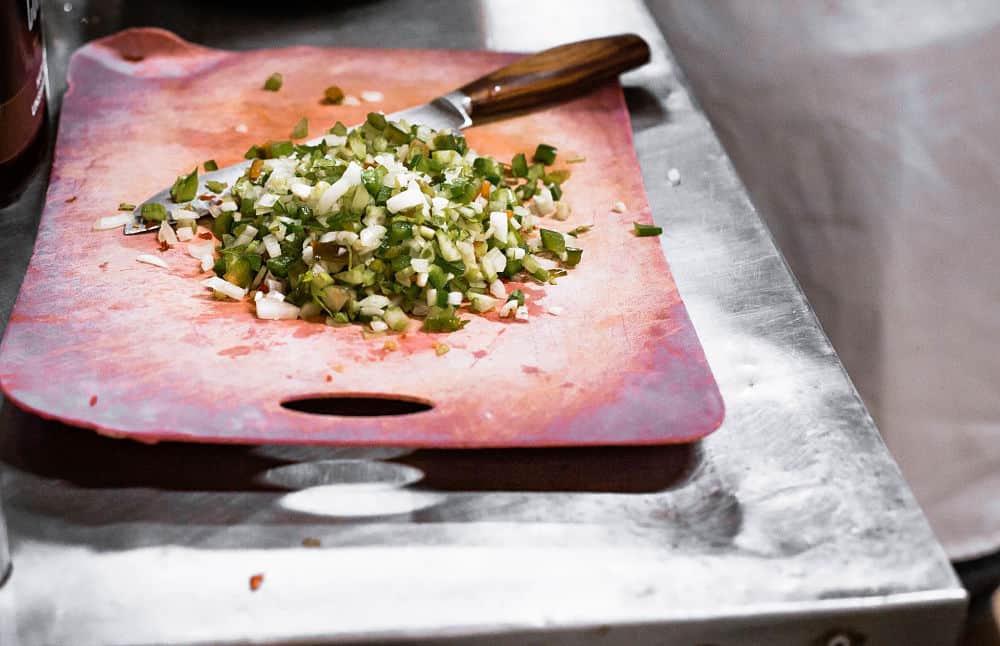
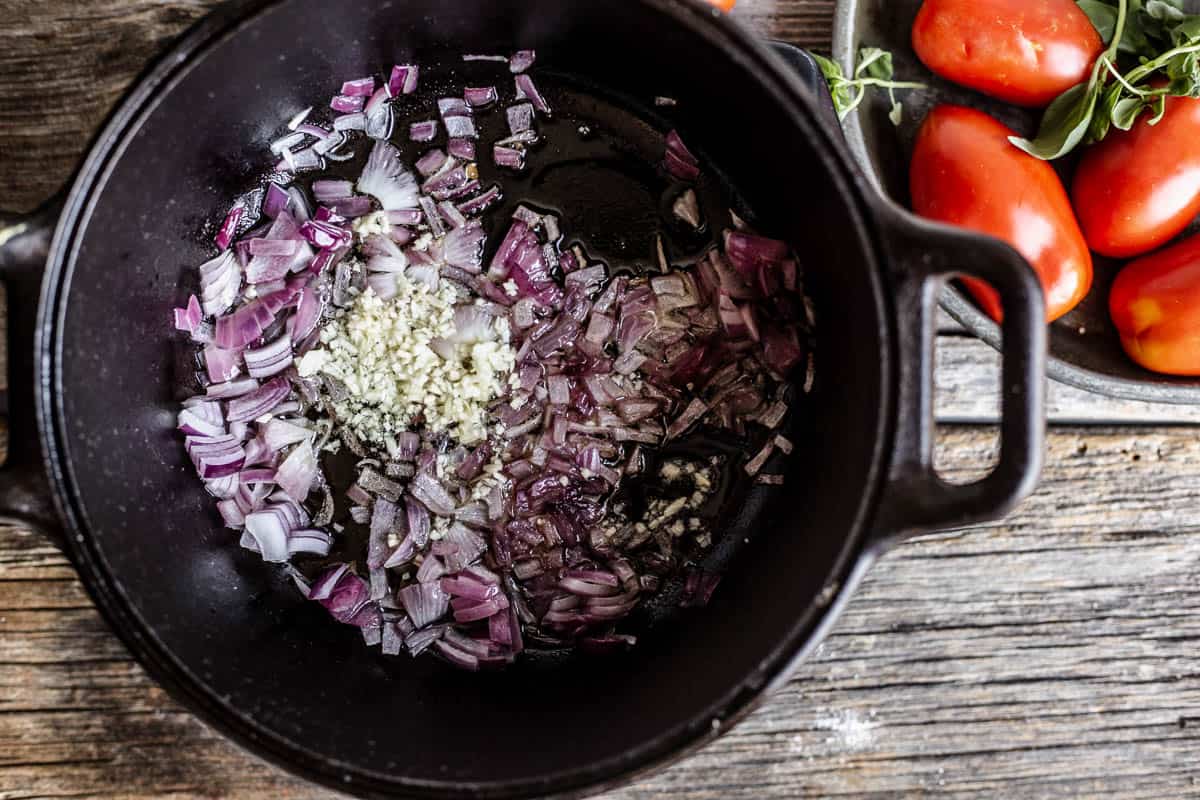
    • The green part of green onions – I couldn't help but think of another way to substitute for regular onions. And may God be praised; the green part does not cause any damage in the low-FODMAP diet. Green onions (aka scallions) have an onion-y but mild flavor that is not as intense as regular onions (the white parts contain the most intense flavor).
    • Ground allspice – this pepper evokes the taste of cinnamon. You can find it in grains and grind it when it's time to cook with it. This releases those volatile oils and makes the spice more fragrant.
    • Mint – it will serve as a garnish and refresh your palate.
    • Salt and pepper – the salt is kosher, and the pepper is freshly ground.

    Optional ingredients

    Asafoetida comes in a resin form. Just use a tiny piece as it's very potent!
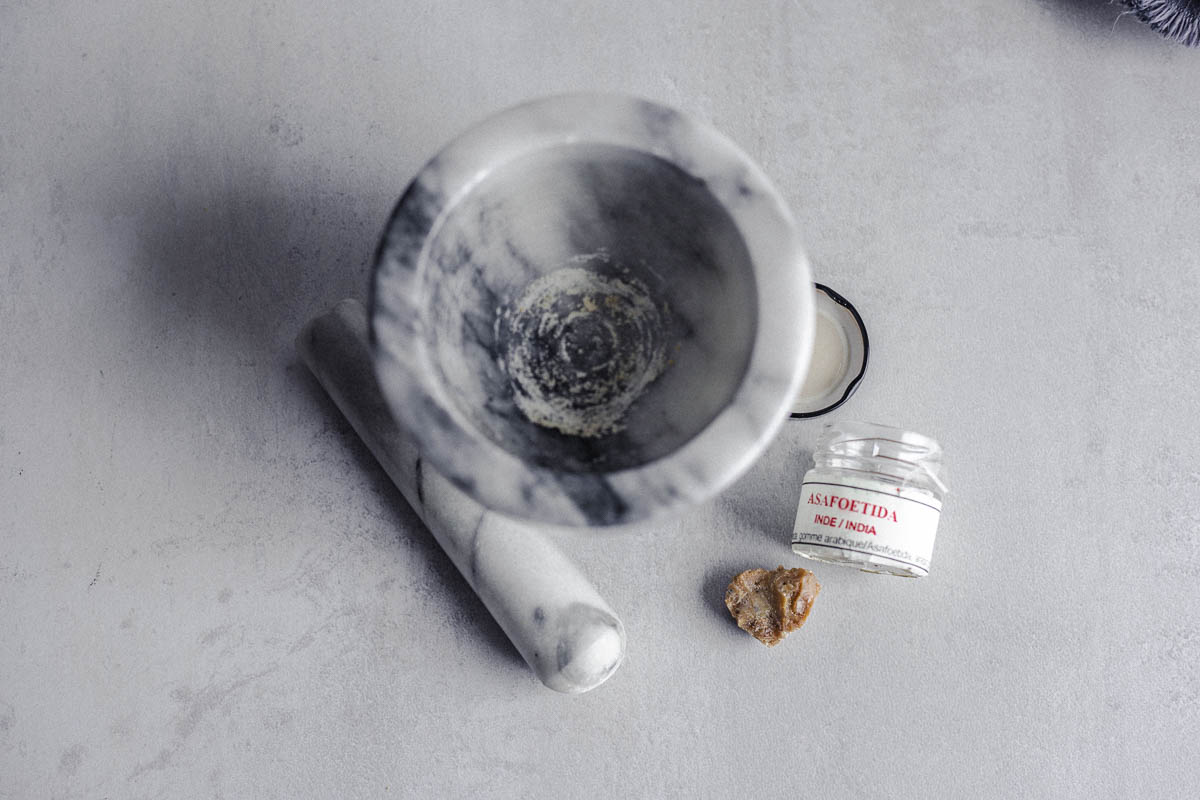
    • Asafoetida – also called hing, it's the resin of a type of giant fennel native to Central Asia. Its peculiar smell—unpleasant for many, no, I'm sorry: it smells mean like wet and moldy socks!—has earned it the name of "devil's droppings." However, it is an essential spice in Indian (Ayurvedic) cuisine, used in dishes based on lentils or vegetables.

    When cooked or browned in oil, its flavor is reminiscent of roasted garlic, and its intense scent diminishes. It promotes the digestion of legumes and limits the "side effects"! It is rarely sold pure. I bought some from a specialty spice store, mixed with gum arabic only, therefore containing no flour.

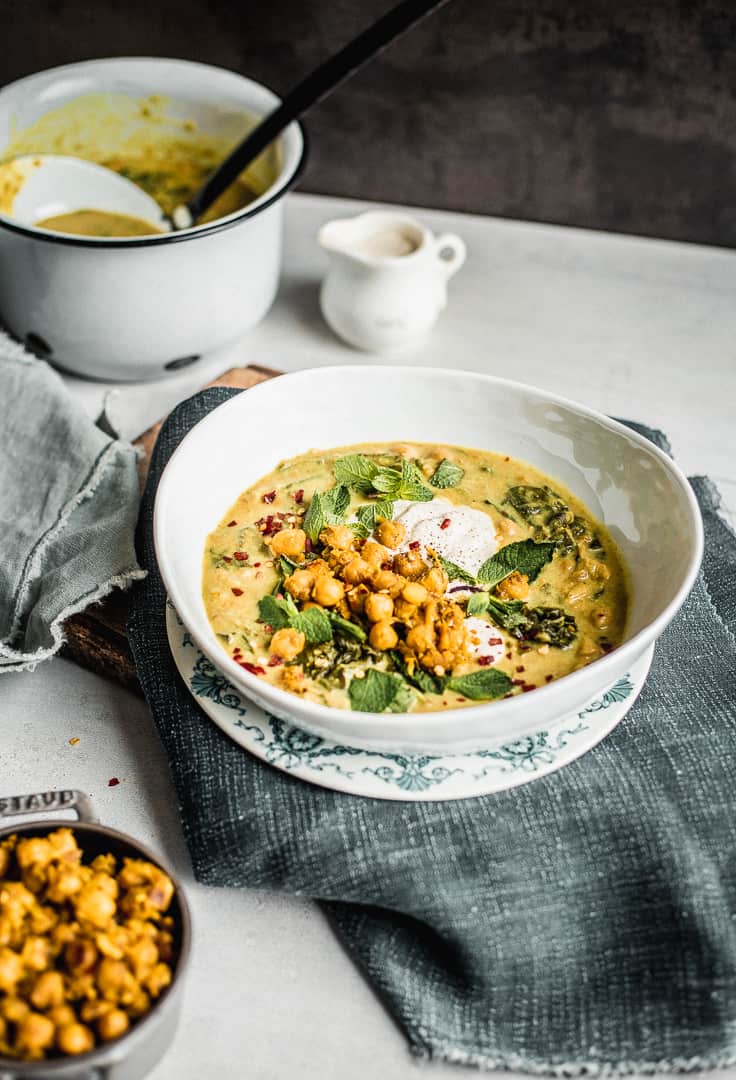
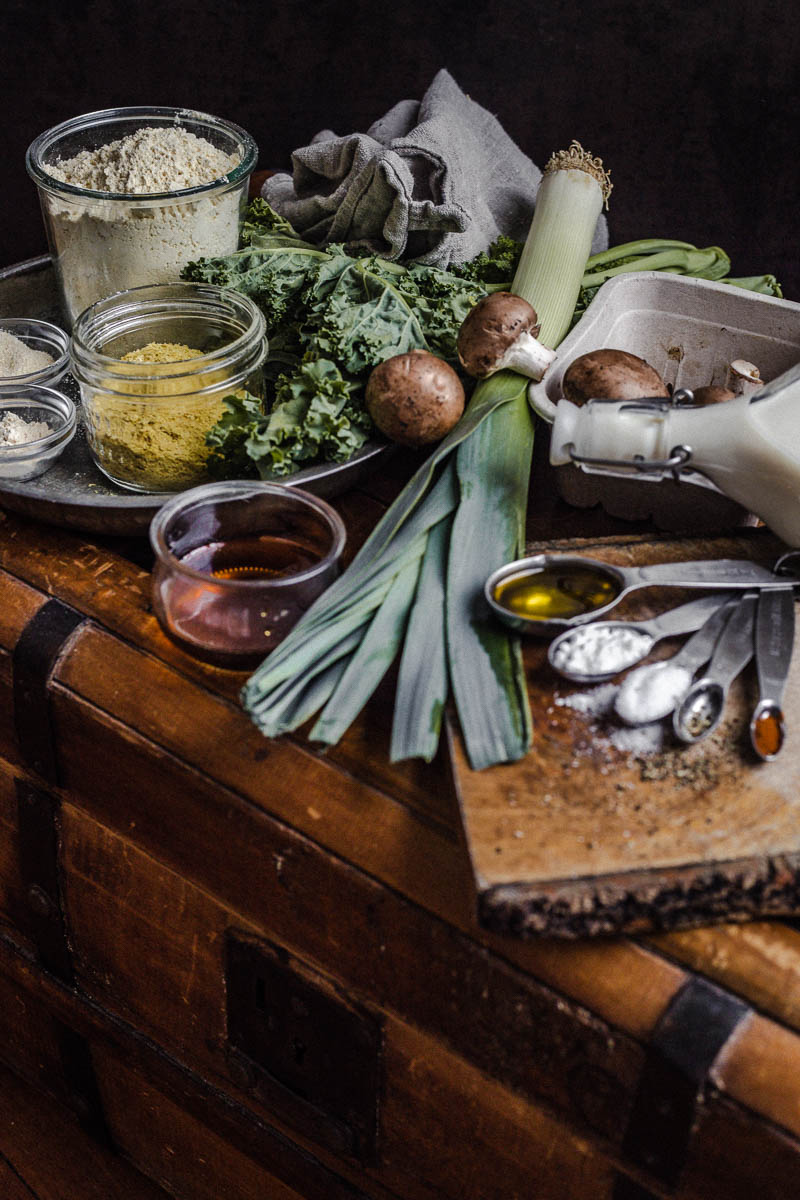
    How to Make Savory Kasha Step by Step

    Once cooked, kasha is delicious and can be accompanied with sautéd vegetables.

    Once cooked, kasha is delicious to accompany sautéed vegetables.

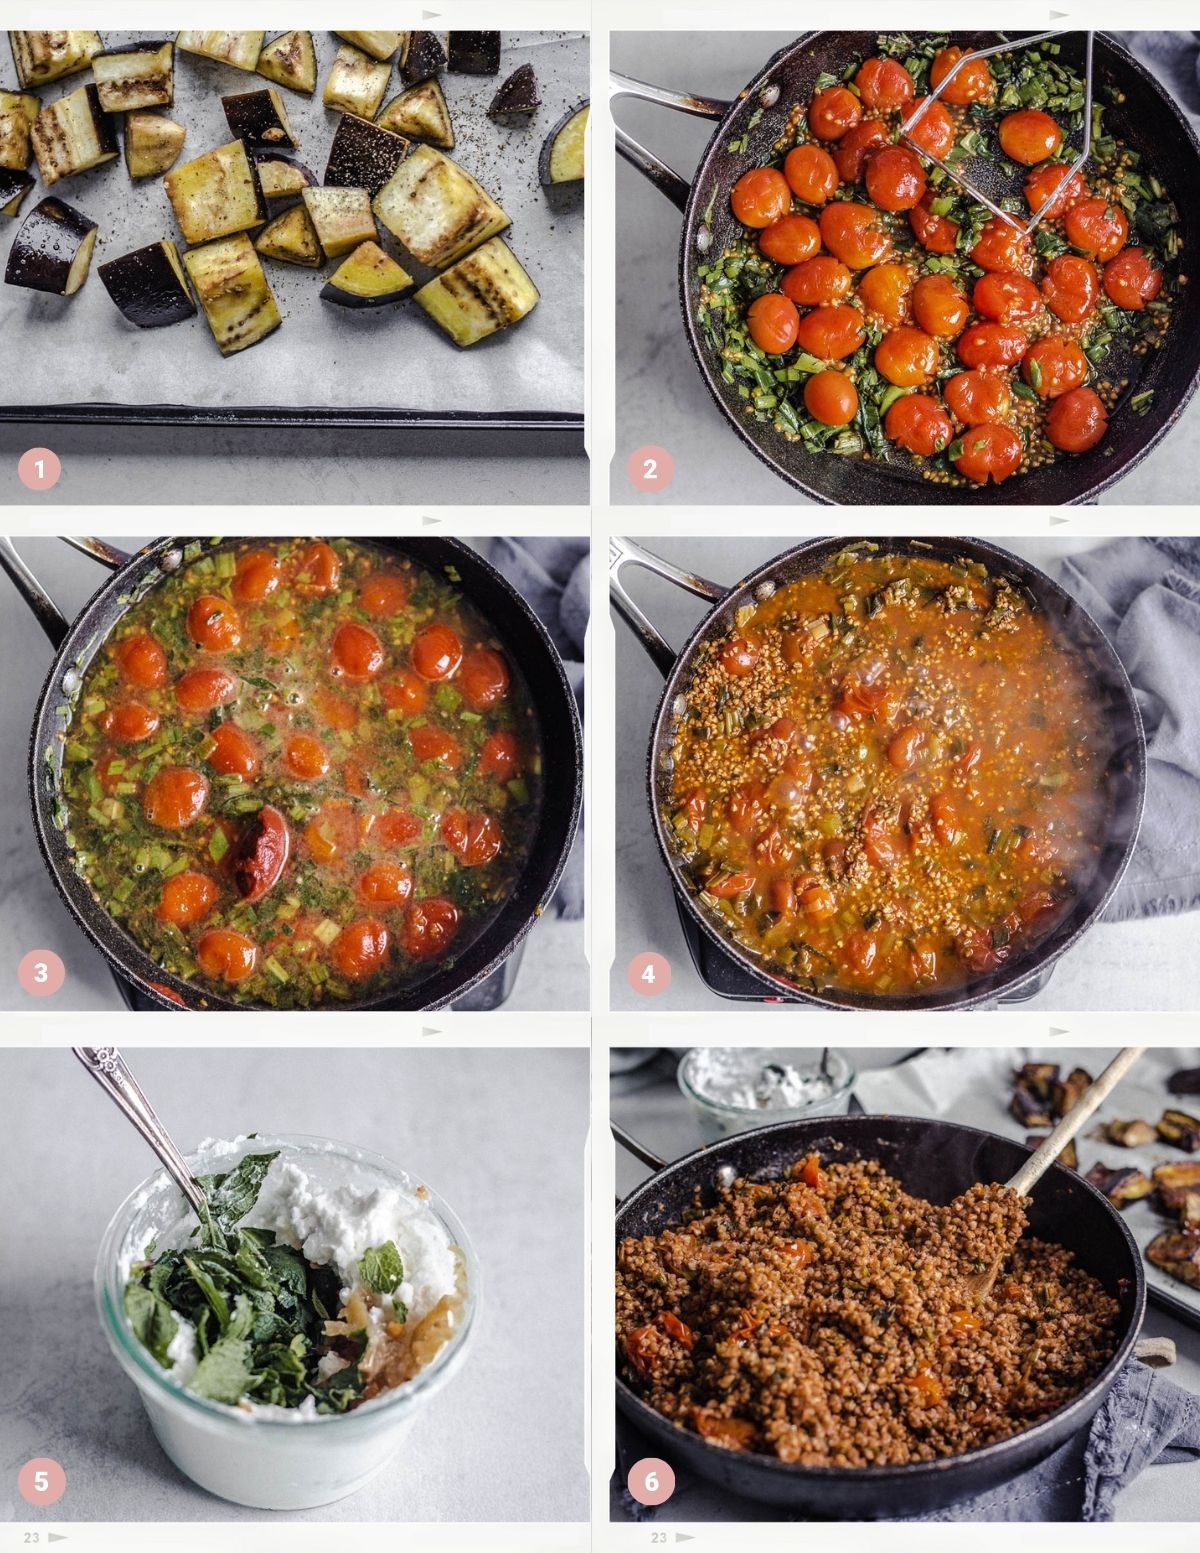
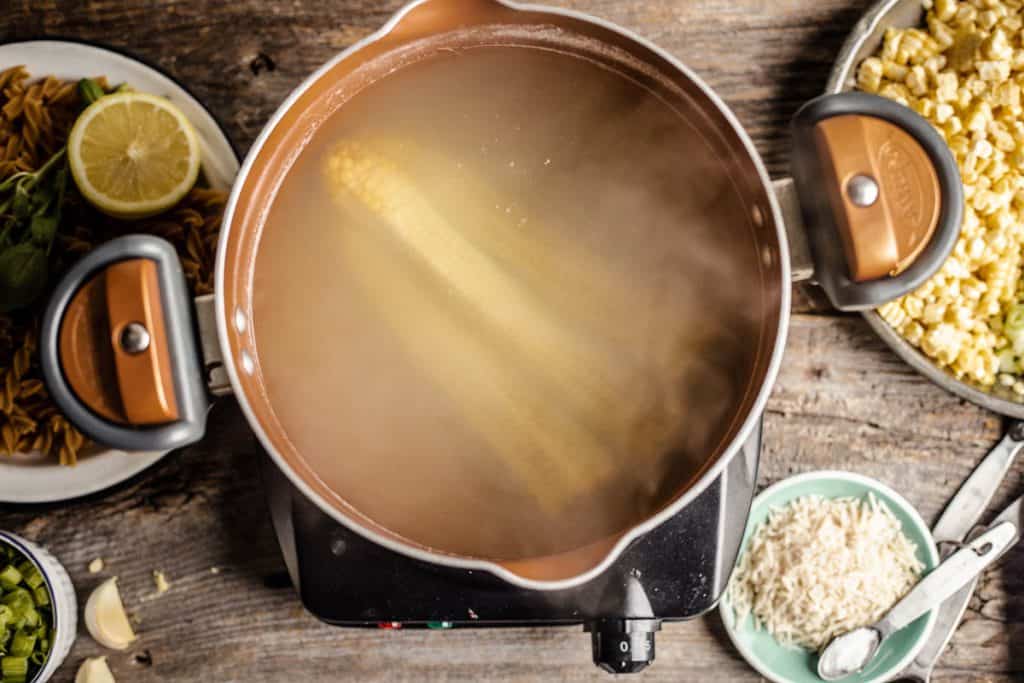
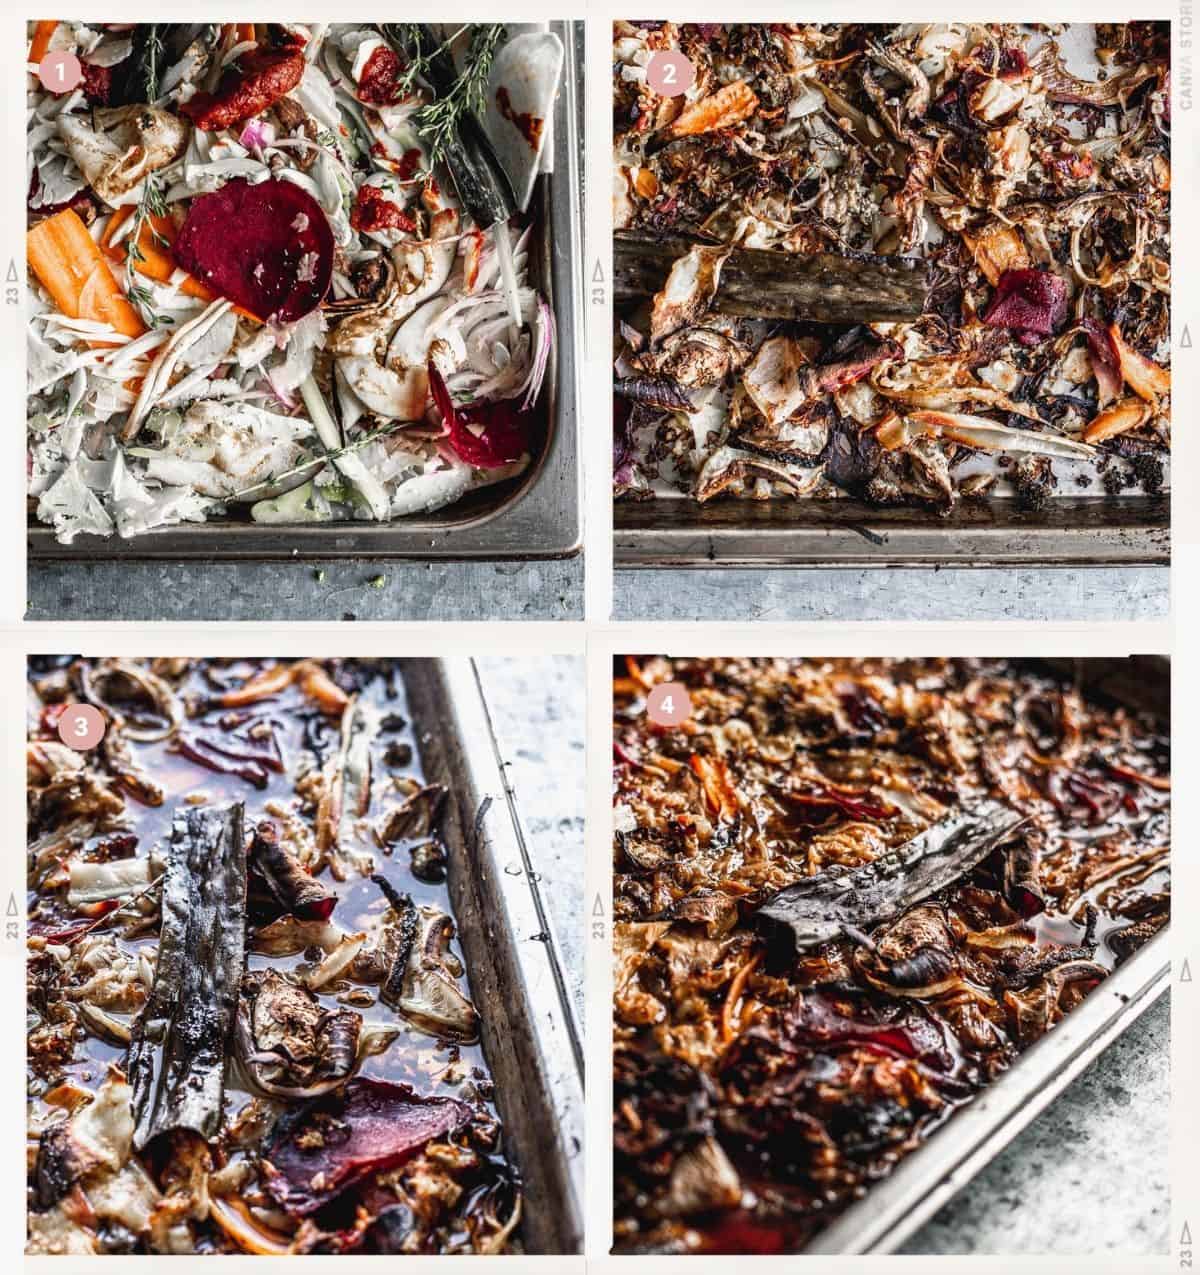
    1 / Roast the eggplants.

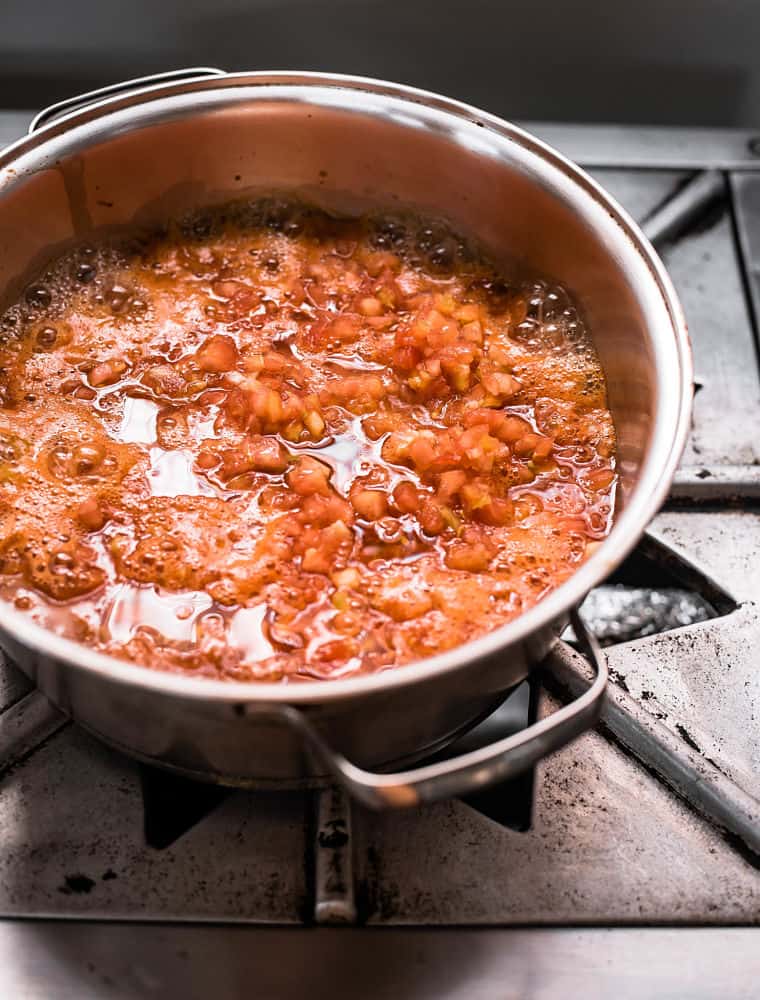
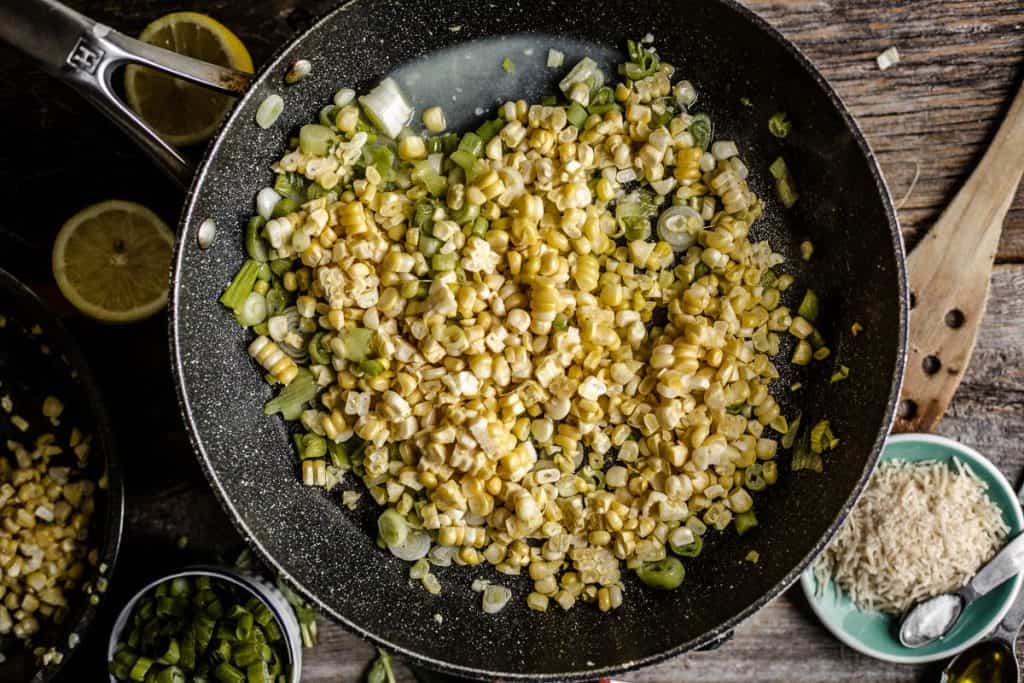
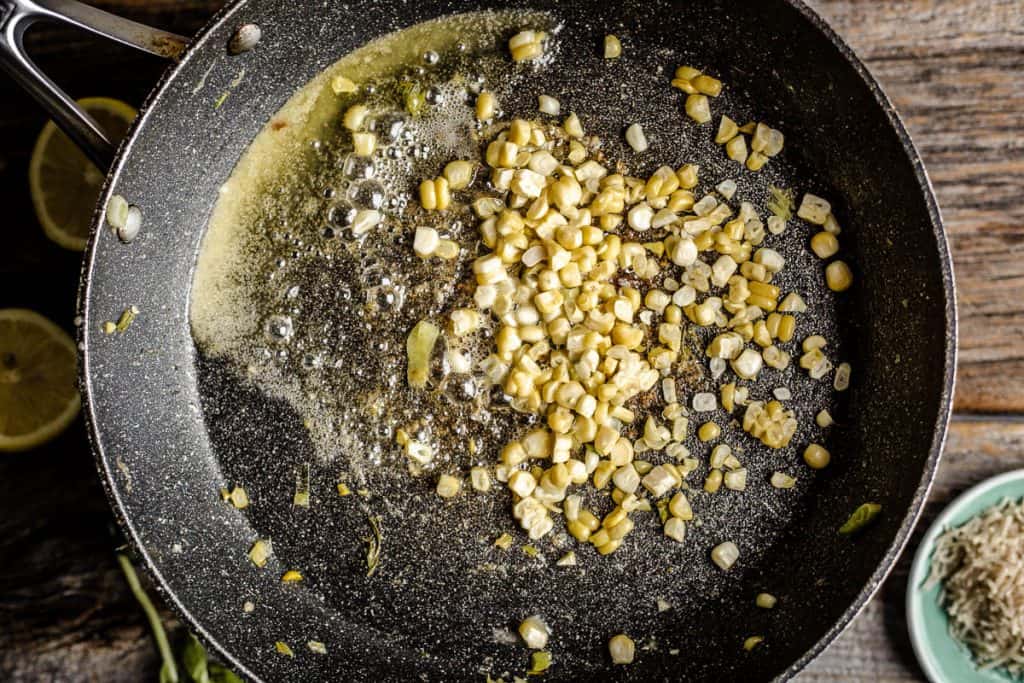
    2 / Sauté the green parts of the green onions with the allspice and the crushed cherry tomatoes.

    3 / Add the tomato paste, water, salt and bring to a boil.

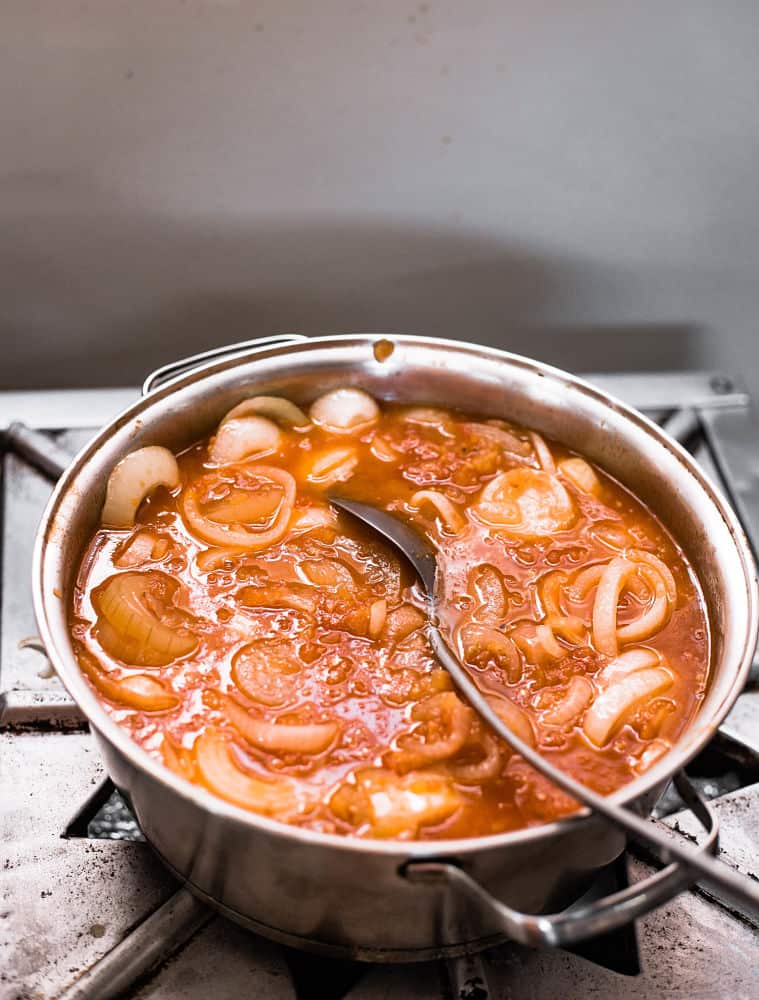
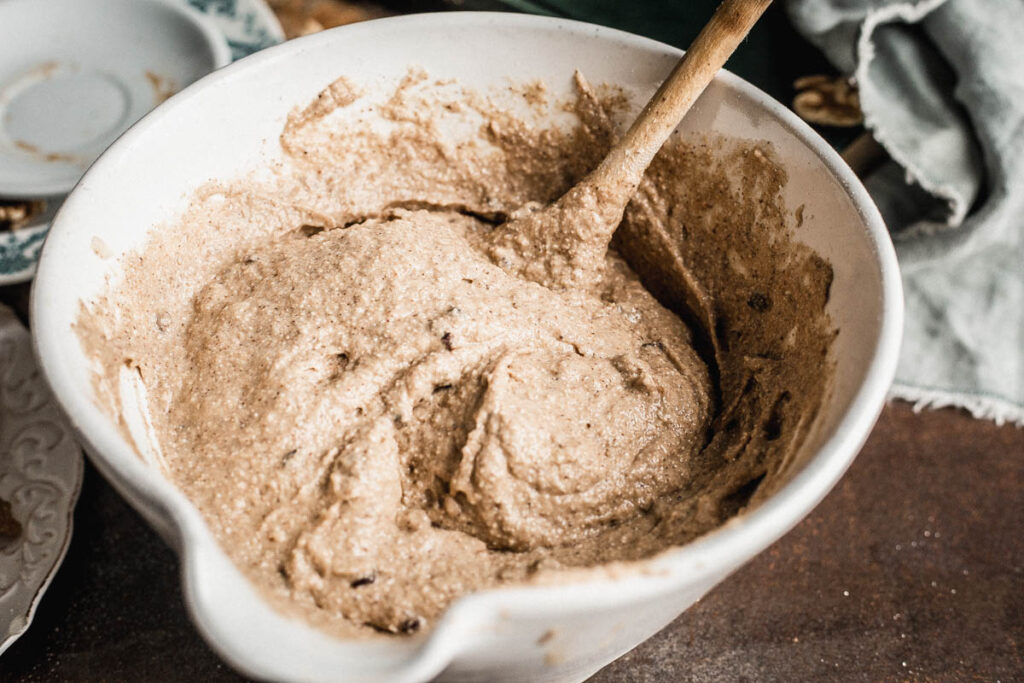
    4 / Add the kasha, stir well and cook.

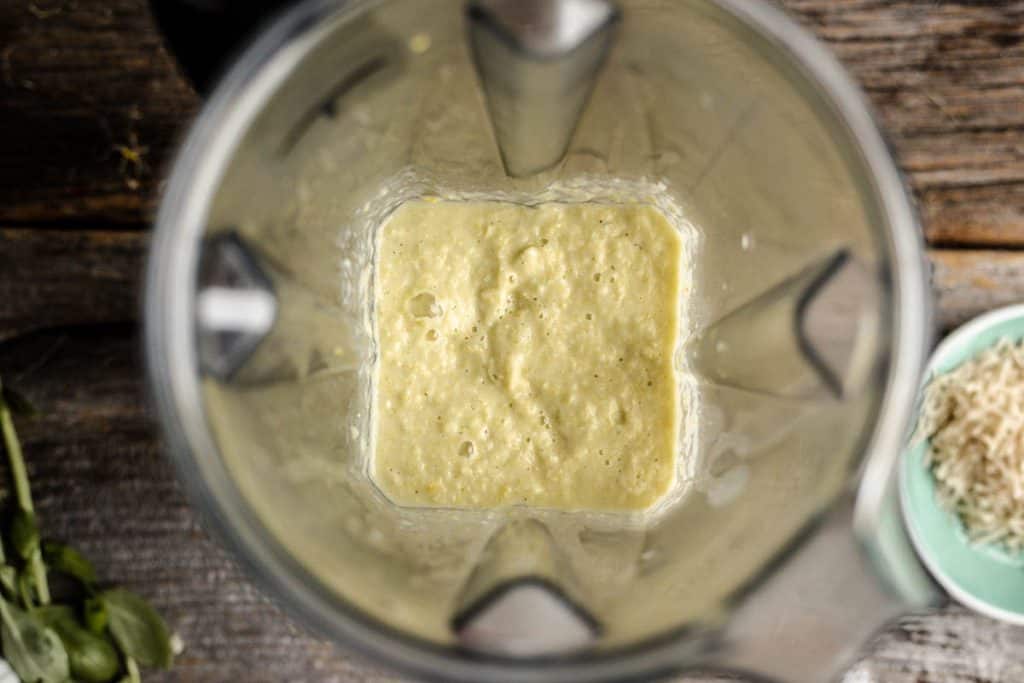
    5 / Make the preserved lemon cream.

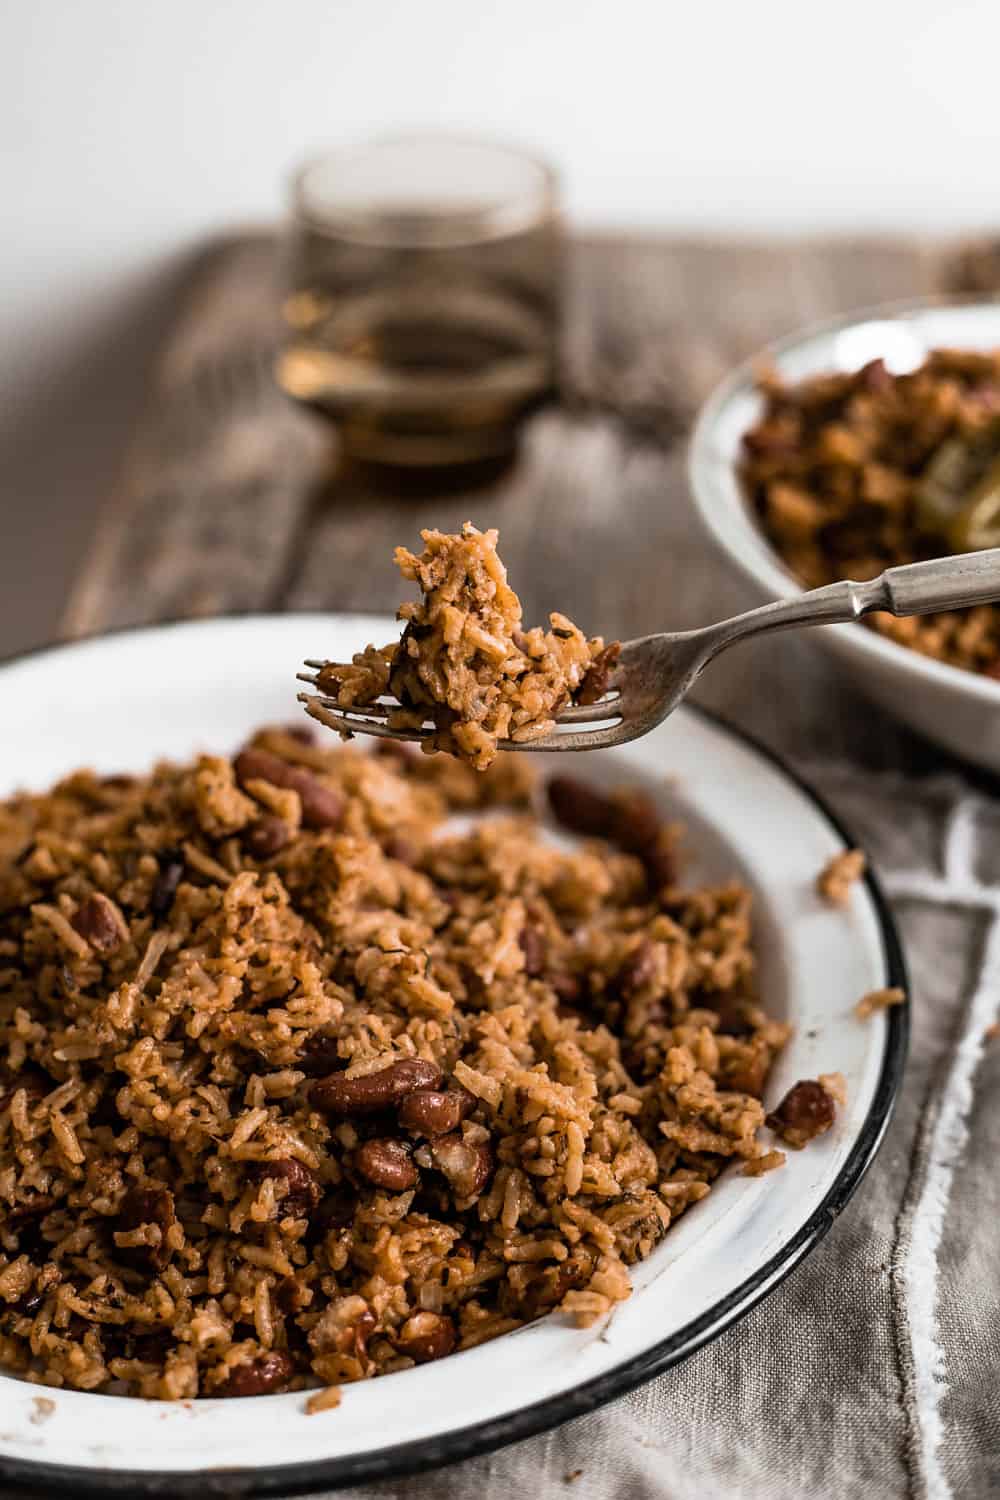
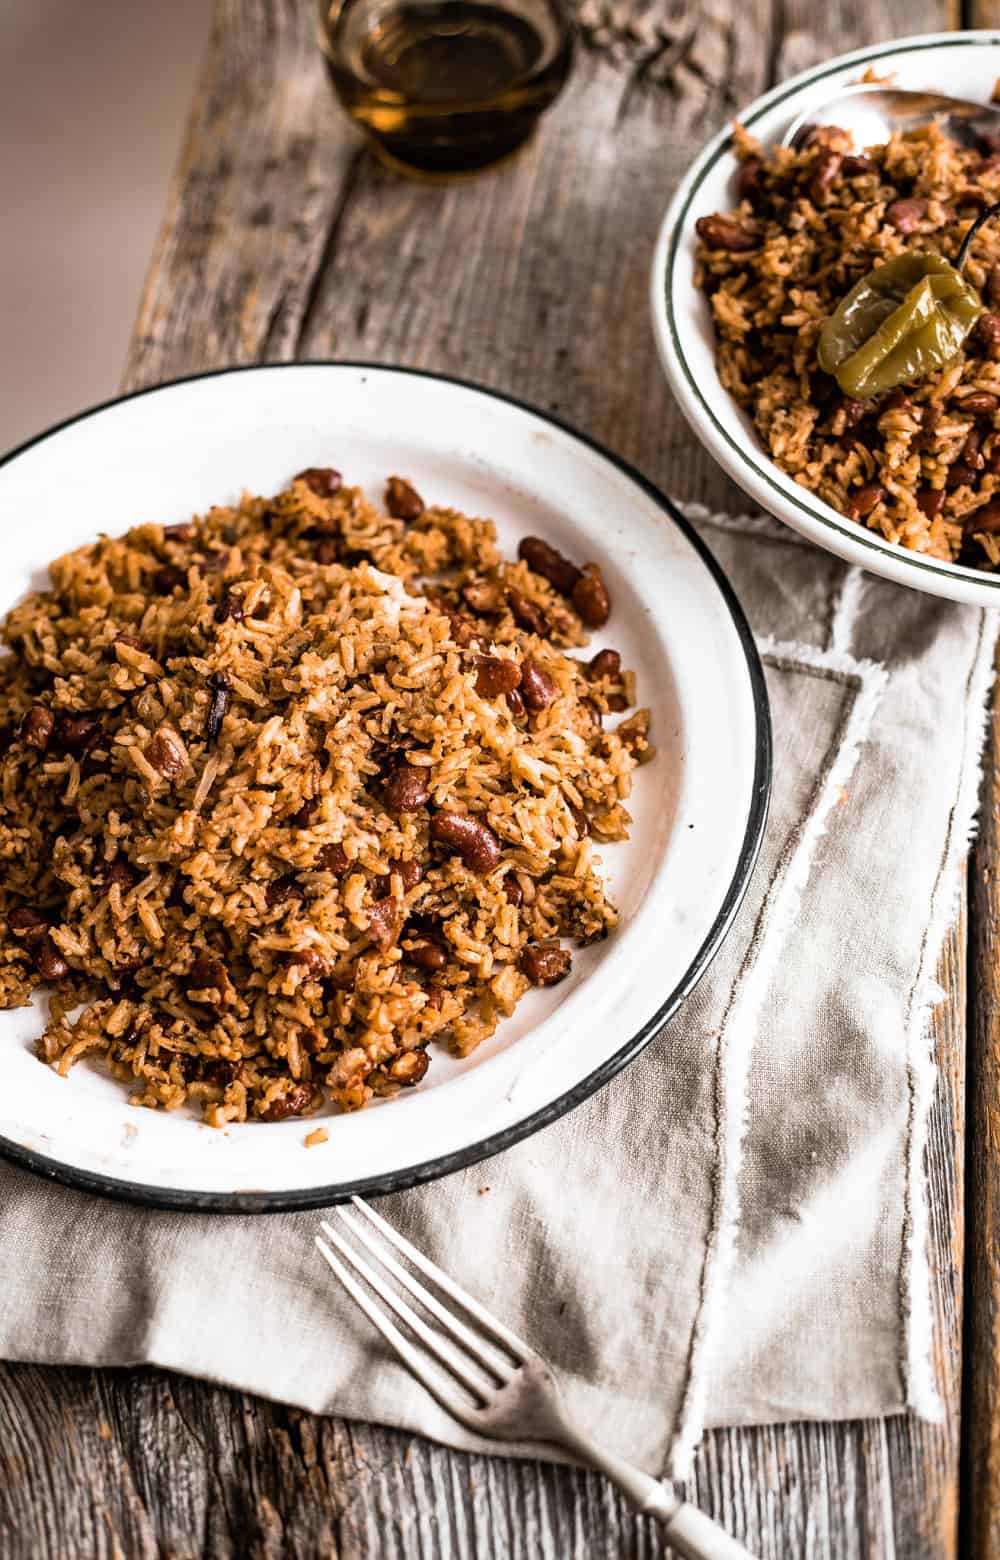
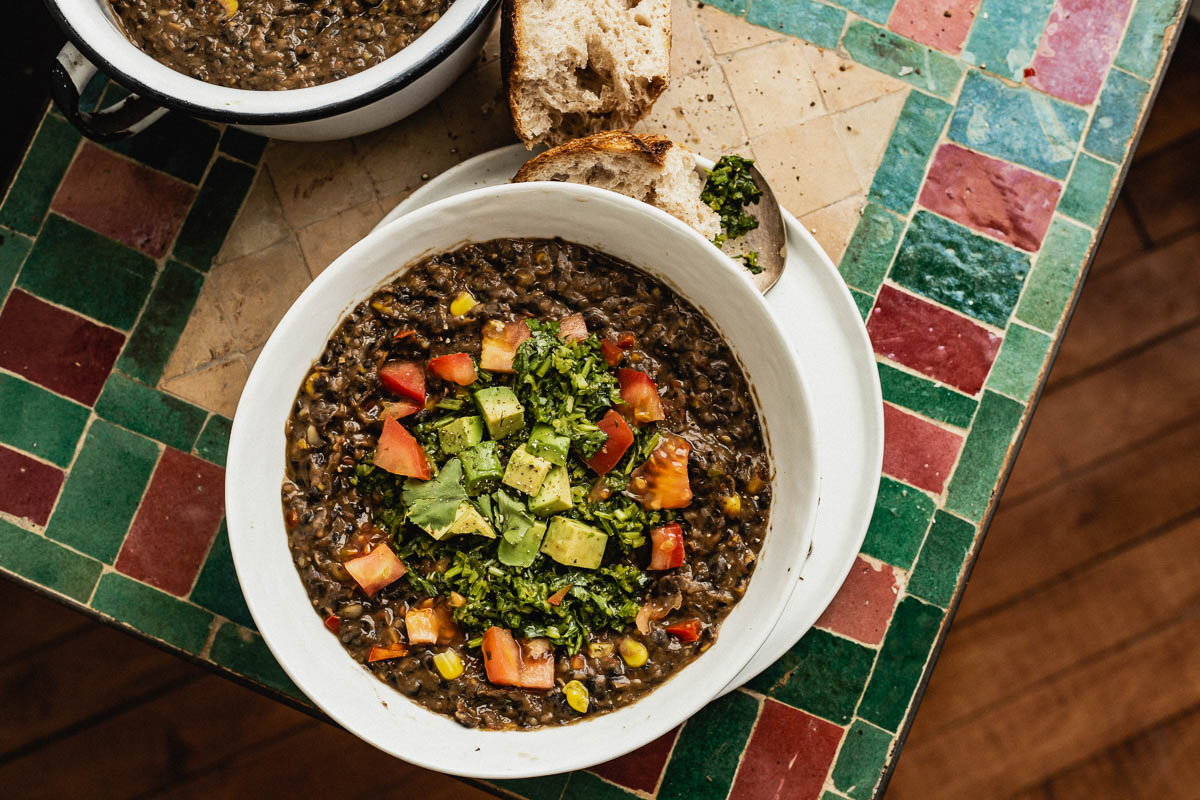
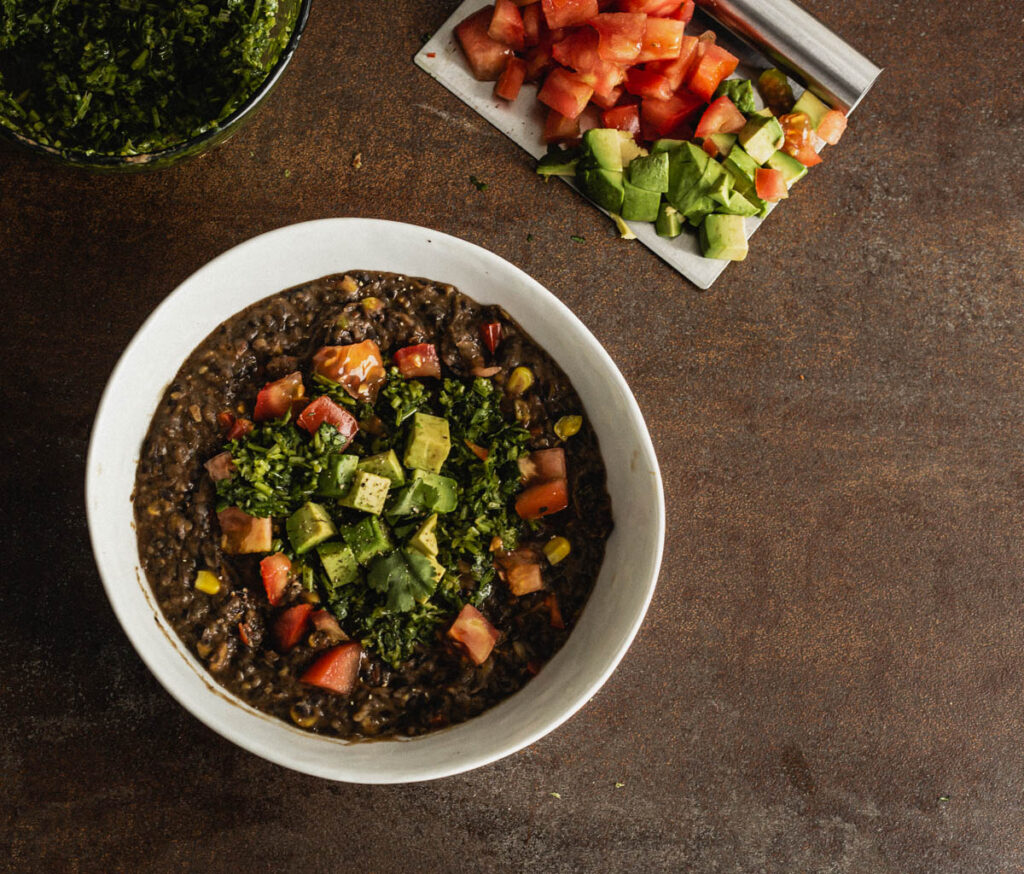
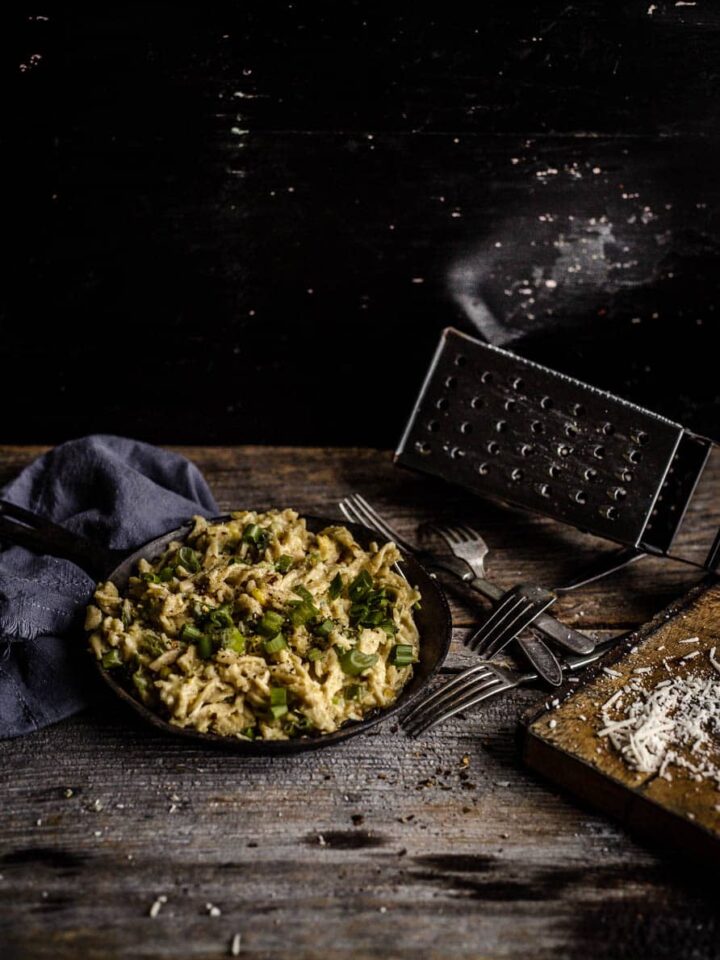
    6 / Serve the kasha with cherry tomatoes topped with plant-based cream, eggplant, and mint.

    The Keys to Success: My Top Tips

    For the best texture, go straight to the source

    Do your best to buy buckwheat in an Eastern European market. The texture of buckwheat from these sources is denser and prevents it from overcooking by avoiding mushy results.

    Still, it's not bad at all and tastes delicious anyway. Another benefit is that it will be easier for toddlers to bite and chew it.

    Cook the kasha to perfection

    A single watchword, do not drown your grains in too much water.

    Put one volume of these roasted seeds for two volumes of water. Be careful, roasted buckwheat cooks easily, but you still have to watch it for fear of turning it into a porridge. As soon as the fire starts to simmer, lower the heat. This is how it will turn out perfect.

    For the adventurer in you! Don't be heavy-handed with asafoetida

    This resin has a powerful, rather foul odor, and so is its flavor. Fortunately, it becomes pleasant when used in small quantities. And when I say that, I mean to take only a small pinch, namely 1/16 teaspoon, and grind it into powder it with a pestle mortar.

    Other Creative Variations

    Replace kasha with other pseudo-grains. This list included quinoa, millet, and amaranth, but my go-to choice is the former.

    If you don't have gluten sensitivity, replace it with bulgur. To do this, after bringing the water to a boil, add the bulgur, stir it so that it is well covered with the reddish liquid, and remove it from the heat. After that, set aside for 20 minutes, while it absorbs all the liquid.

    How to Serve this Dish

    I eat it as a main course, but it makes a nice side dish. You can skip the addition of eggplant and preserved lemon, but honestly, you'd be missing out. By the way, roasted buckwheat alone with the cherry tomatoes may be dry in the mouth.

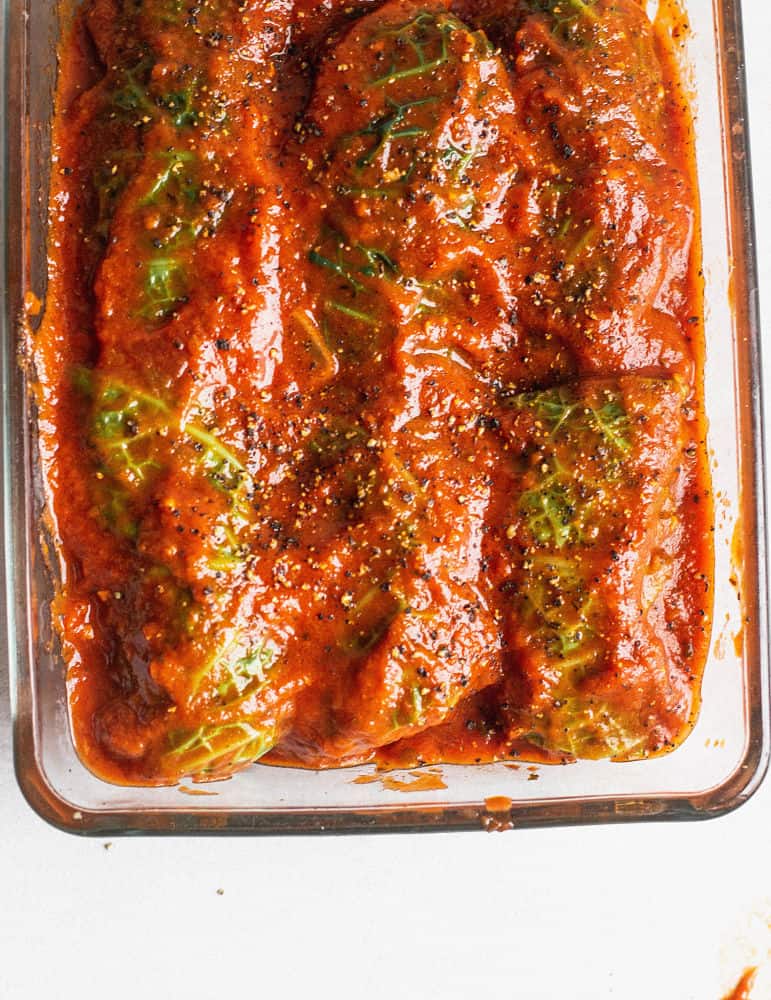
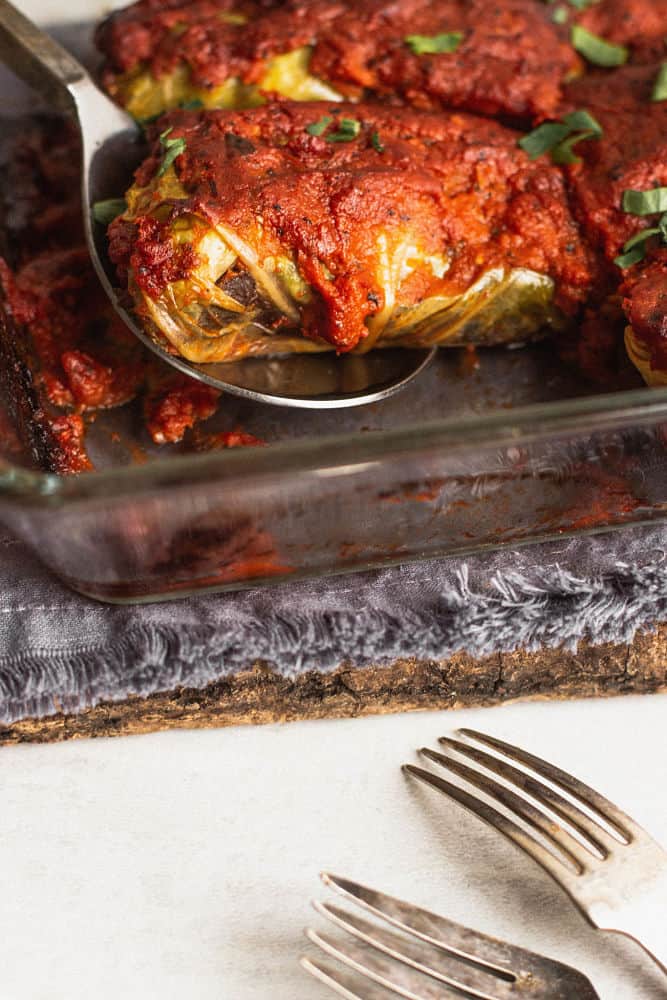
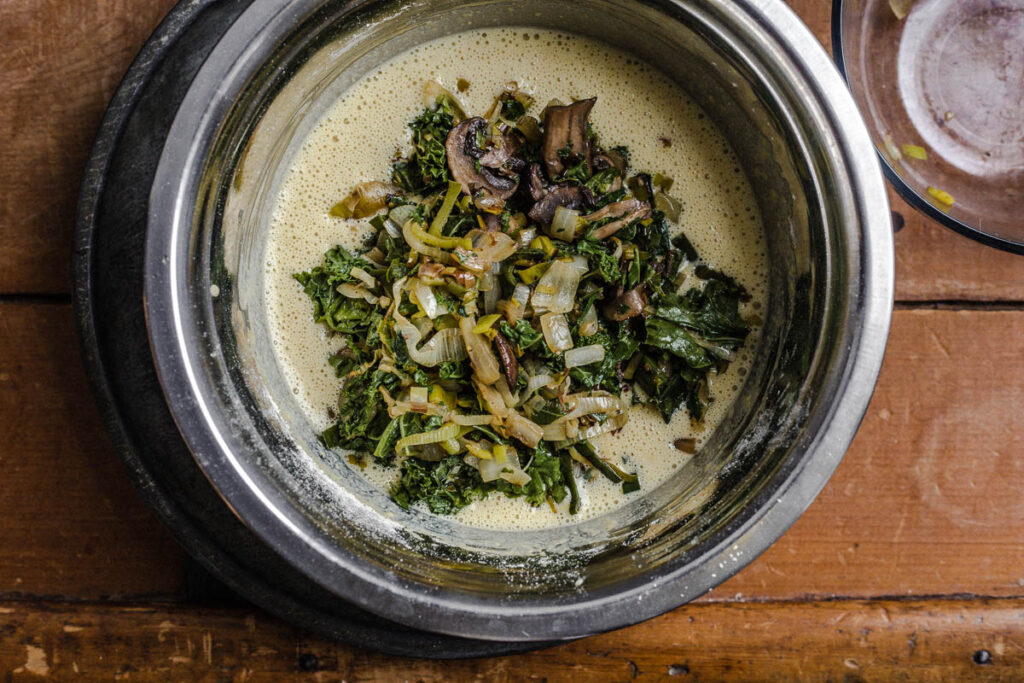
    It's also delicious with a little cooked kale or mixed Swiss chard. Just boil the green vegetables in well-salted water for about 5-7 minutes, until they are tender but not mushy; then drain them, squeeze out all the water, roughly chop them and add it to the buckwheat mixture.

    Make this Meal Now

    Following a plant-based low-FODMAP diet can be very restrictive, especially if you're looking for tasty dishes.

    But if you have a few tricks up your sleeve, it's possible to get by. Pseudo-grains are appealing to this diet, so why not think outside the box with a less well-known grain than quinoa, like hulled and roasted buckwheat?

    It's perfect for warming your heart and energizing you in those winter moments. You can prepare it as many times as you like. Especially since it is much less expensive than quinoa.

    You will rejoice at the first bite, the next day, and again and again.

    Inspired by Yottam Ottolenghi

    If you try this recipe, I want to know about it! I always appreciate your feedback. Leave a star rating in the recipe card right below and/or a review in the comment section further down the page. You can also follow me on Pinterest, Facebook, or Instagram. Sign up for my email list, too!

    Kasha with cherry tomatoes, roasted eggplant, cream cheese style cream, mint on a plate
    Print Recipe
    5 from 17 votes

    Low-FODMAP Savory Buckwheat with Cherry Tomatoes, Eggplant and Lemon Cream

    You can make only the buckwheat with the tomatoes if you wish (i.e. without the eggplant and the preserved lemon cream) and as a side dish. But when you add these two elements, it makes a delightful dish. You can prepare the different parts one day before, either a Sunday or a weekday evening when you have more time to officiate in front of the stoves. Just keep them separate in the fridge, reheat, and assemble before serving. When you're on a low-FODMAP diet, you don't always want to worry about what to cook.
    Prep Time10 minutes mins
    Cook Time35 minutes mins
    Course: Main
    Cuisine: Indian, Mediterranean, Russian
    Keyword: tomato paste
    Servings: 4
    Calories: 25kcal
    Author: Naïby

    Ingredients

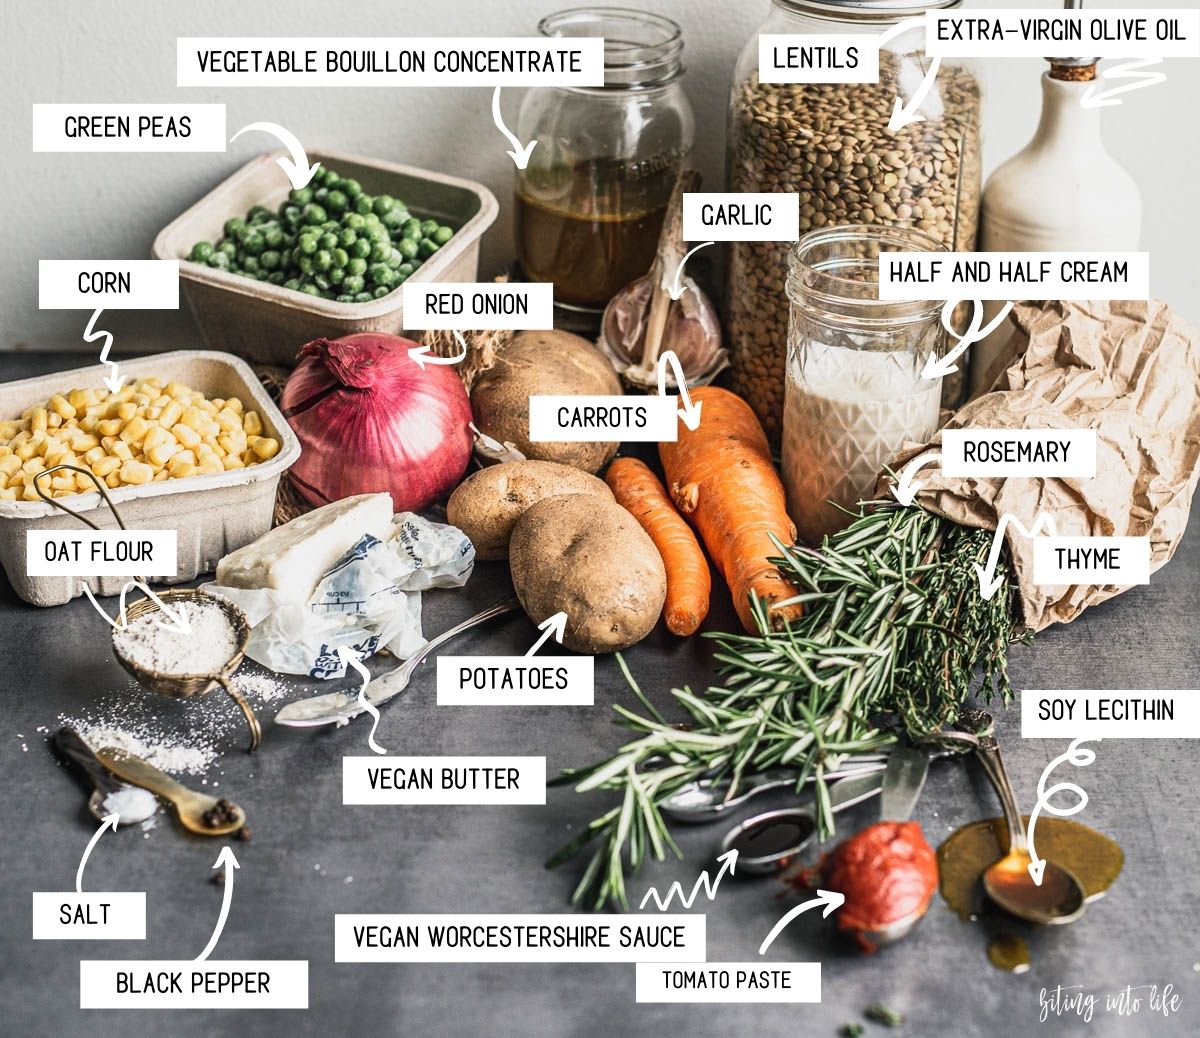
    • 2 small eggplants cut into 3 cm/1 ¼-inch pieces (6 cups/500 g)
    • 7 tablespoons olive oil plus 1 teaspoon
    • Salt and pepper
    • 3 cups green onions green part, minced (Note)
    • 1 pinch asafoetida powder (about 1/16 teaspoon) (optional)
    • 1 teaspoon ground allspice
    • 14 oz cherry tomatoes (400 g)
    • 1 tablespoon tomato paste
    • Or 2 ½ 3 cups of water
    • 1 ½ cup roasted buckwheat (kasha)
    • ⅔ cup plant-based cream or cream cheese-like cream
    • 1 small preserved lemon seed removed, skin and flesh finely chopped (about 2 tablespoons)
    • ½ cup mint leaves minced (10 g)
    Get Recipe Ingredients

    Instructions

    • Preheat the oven to 425 °F.
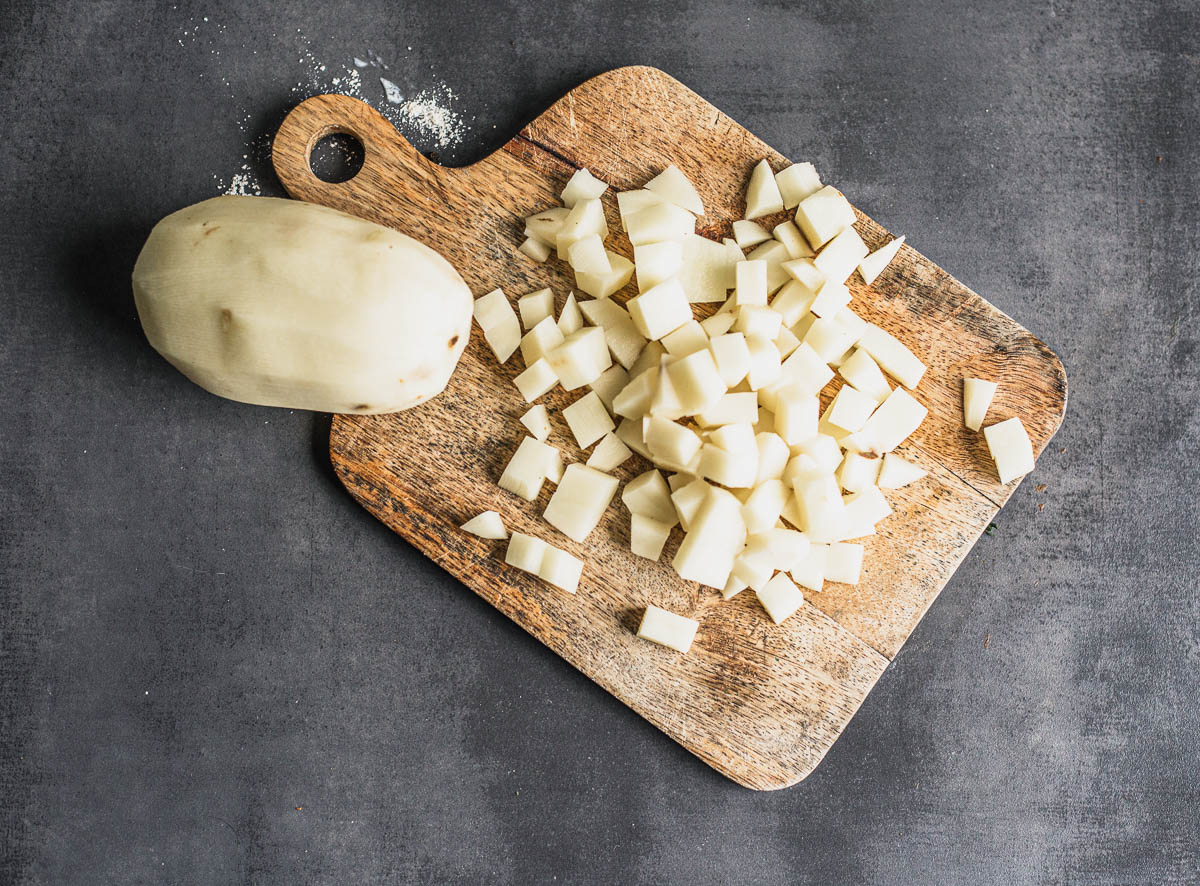
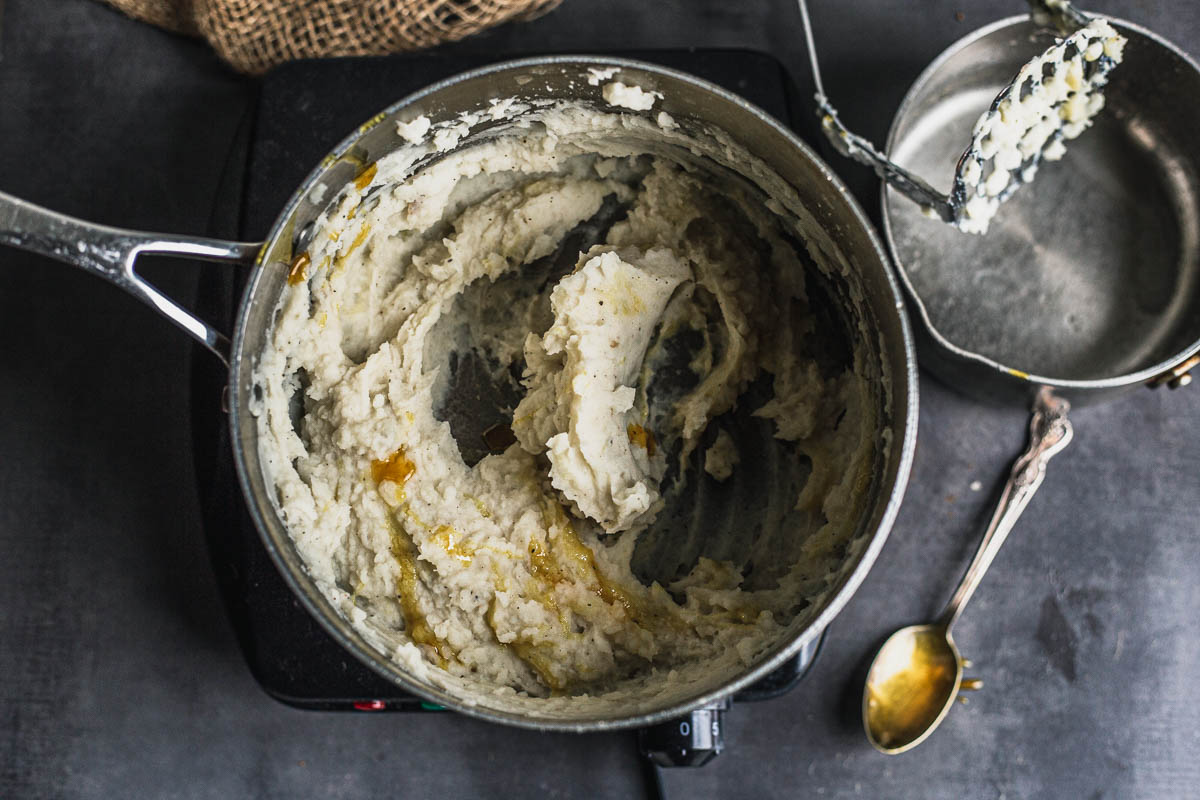
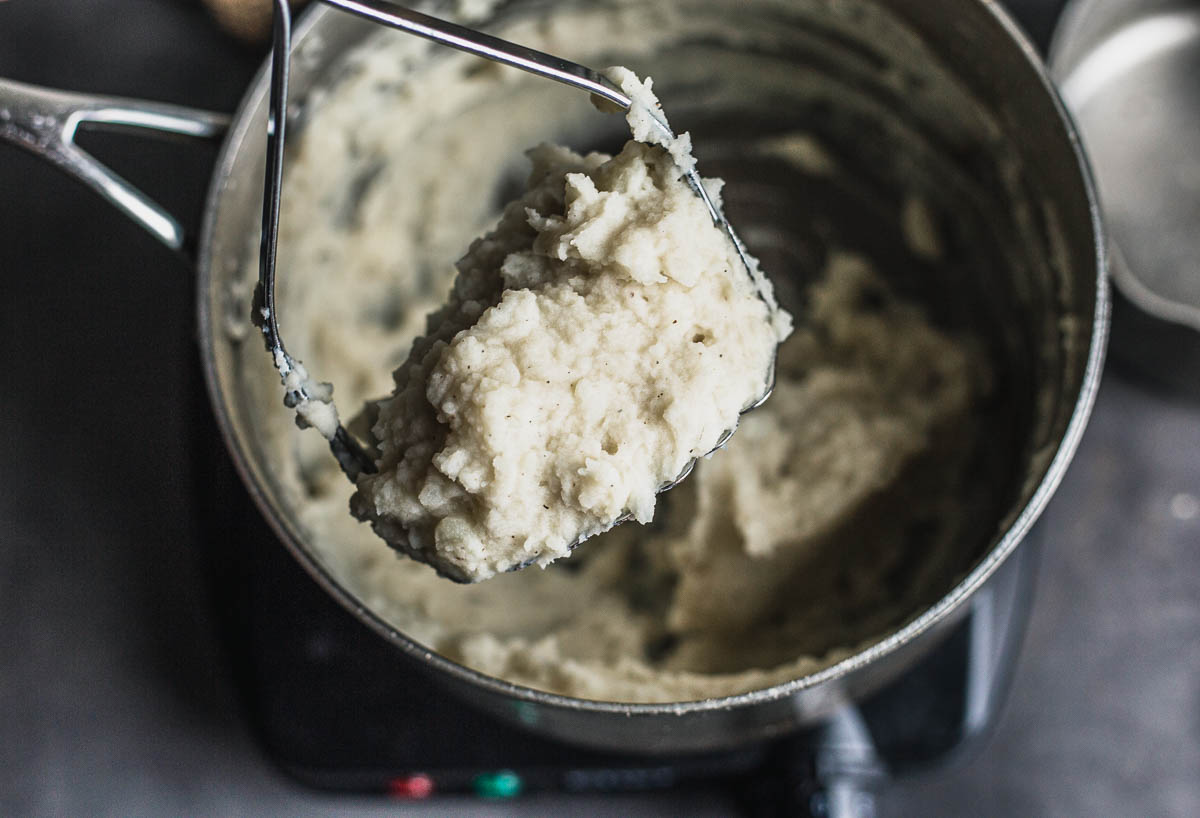
    • Place the eggplant in a large bowl with 4 tablespoons of oil, ½ teaspoon of salt, and a good grind of pepper. Mix well and spread on a baking sheet lined with parchment paper. Roast, 35 to 40 minutes, stirring halfway through, until the eggplant is caramelized and softened. Remove from the oven and set aside.
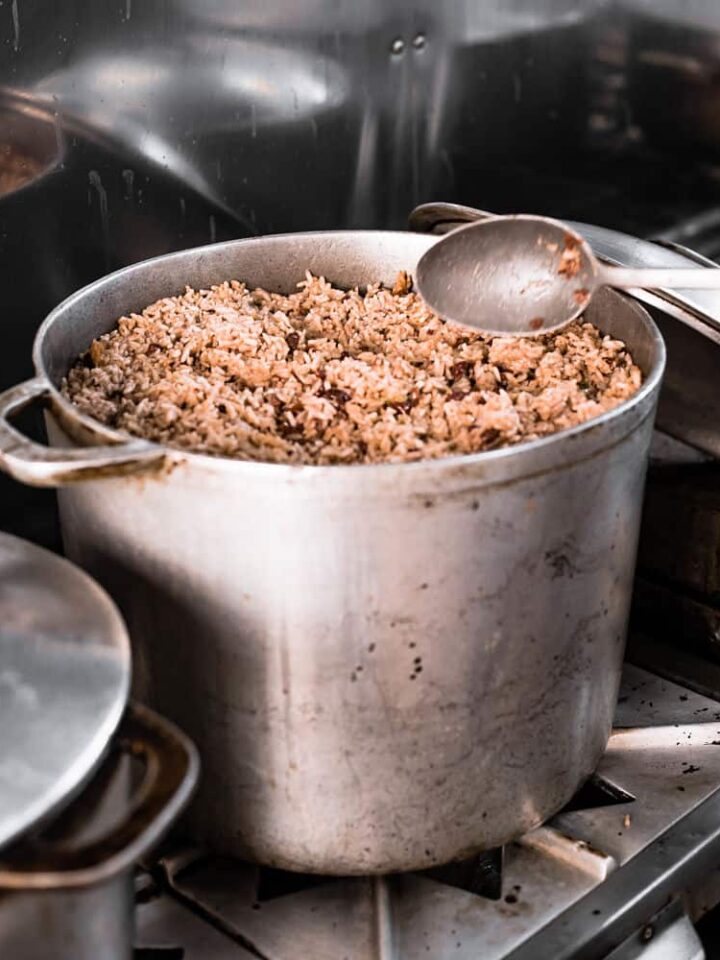
    • Add the remaining 3 tablespoons plus a teaspoon oil to a large sauté pan with a lid and place on medium-high heat. When hot, add the green parts of green onions and the optional asafoetida and fry for 1 minute, stirring a few times. Add allspice and fry for a minute. Add the cherry tomatoes, crushing them with a potato crusher to burst them (be careful: they might squirt everywhere). Stir in the tomato paste, water, and 1 teaspoon salt. Bring to a boil, reduce the heat to medium-low and add the buckwheat. Stir until completely covered and cook for 18 to 20 minutes.
    • In a medium-sized bowl, mix the plant-based cream (add to 2 or 3 tablespoons of water if the cream is very thick and mix well until homogeneous) with the preserved lemon, half the mint, and ⅛ teaspoon of salt.
    • Divide the buckwheat among four dishes. Serve with the cream and eggplant on top and sprinkle with the remaining mint.

    Notes

    • Green onions: make sure you only take the green parts.
    • Asafœtida (hing): This resin has a powerful, rather foul odor. Its flavor is just as good, but fortunately pleasant when used in small quantities. And when I say that, I mean just take a tiny pinch which is 1/16 tablespoon, and grind into powder with a pestle mortar.
    • Kasha:
      • Do your best to buy buckwheat in an Eastern European market. The texture of buckwheat from these sources is denser and prevents it from overcooking by avoiding pasty results.
      • Do not drown your grains in too much water. One volume of its roasted seeds for two volumes of water.
     

    Variant

    You can replace the kasha with the same amount of quinoa.

    Conservation

    Placed in an airtight container, this savory kasha will keep for five days in the refrigerator. 

    Nutrition

    Calories: 25kcal | Carbohydrates: 6g | Protein: 1g | Fat: 1g | Saturated Fat: 1g | Sodium: 44mg | Potassium: 271mg | Fiber: 1g | Sugar: 3g | Vitamin A: 554IU | Vitamin C: 24mg | Calcium: 22mg | Iron: 1mg

    Get Your Free Plant-Based Eating Toolkit and More

    Subscribe to my newsletter and unlock my plant-based course, nutrition charts, recipe secrets, and exclusive updates to prepare wholesome, varied & balanced meals effortlessly. All you need is a good appetite. Subscribe!

    Smiling girl with big afro sitting cross-legged on a sofa

    Hi there!

    I'm on a mission to help you get nutrient-dense, easy, and mouthwatering plant-based recipe ideas so you can feel stimulated, well-equipped, and confident to eat and cook better.

    Learn more about me →

    The Ultimate Guide to the Low-FODMAP Diet

    Apr 18, 2021 · Leave a Comment

    Disclaimer: all the information provided below is taken from the Monash University website. Please seek professional help if you're looking to follow the following diet.

    I'm not ashamed to say this: food has been vigorously upsetting my stomach for some time now. I know; it's not the ideal situation since my hobbies are based on my passion for cooking and good food.

    It was really bothersome. Three bites of my prepared dishes were enough to make my stomach expand as hastily as an airbag escaping from a car steering wheel.

    Fortunately, only the bloating was present. Flatulence, alternating constipation, diarrhea, or even extra-digestive symptoms like fatigue or difficulty concentrating, are sometimes part of the gang. The source of this unpleasantness? Small intestine bacterial overgrowth (SIBO).

    My digestive problems have haunted me since the beginning of my long diet journey in 2006, and I wanted to put an end to it. Last fall, I sought the help of a functional medicine practitioner. I was ordered to have a breathing test to analyze my intestinal gases.

    After this, I learned that an excess of hydrogen and methane was nonchalantly pumping air into my gut. Fascinating.

    This is how I was prescribed this special but quite effective diet to calm all this intestinal turbulence: the low-FODMAP diet.

    And the start of a new food era had just begun.

    → Subscribe and Download Now: Free FODMAP Food List and so Much More!

    [feast_advanced_jump_to]

    CHAPTER 1 - INTRODUCTION

    What are FODMAPs?

    FODMAPs are a group of sugars that are not fully digested or absorbed in our intestines. When they reach the small intestine, they move slowly, attracting water. And when they pass through the large intestine, they are fermented by intestinal bacteria, thus producing intestinal gas.

    The extra gas and water cause the intestinal wall to stretch and expand. As people with irritable bowel syndrome (IBS) have a very sensitive bowel, this causes exaggerated sensations of pain and discomfort.

    Info: What is irritable bowel syndrome (IBS)?

    It is characterized by recurring chronic symptoms, including lower abdominal pain and discomfort, bloating, gas, distension, and altered bowel habits (ranging from diarrhea to constipation) but without abnormal pathology. One in seven adults suffers from IBS.

    What is the low-FODMAP diet?

    It is an emerging therapeutic eating plan that may help manage gastrointestinal disorders like irritable bowel syndrome. Preliminary research also suggests that this dietary approach could benefit people with inflammatory bowel disease (e.g., Crohn's disease) and small intestine bacteria overgrowth (SIBO).

    This diet relieves the SIBO symptoms but does not eliminate them. It is best to do this diet short-term only since it is very low in fiber.

    Who invented it?

    Sue Shepherd created a highly successful form of the fructose malabsorption diet in 1999 in her private diet practice. After this, she became a research team member who developed the low-FODMAP diet. Her doctoral research and other studies in which she participated have proven that foods high in FODMAP can trigger irritable bowel syndrome symptoms (IBS).

    Therefore, limiting these foods is an effective treatment for people with symptoms of IBS.

    The low-FODMAP diet has been published in international medical journals. It is now accepted and recommended as one of the most effective dietary therapies for IBS.

    What does the acronym FODMAP stand for?

    This is what this acronym refers to:

    • F for fermentable
    • O for oligosaccharides
    • D for disaccharides
    • M for monosaccharides
    • A for "and" 
    • P for polyols

    These are complex names for a collection of molecules found in food, which may be poorly absorbed in the small intestine of the digestive tract by some people. When this happens, these molecules then continue their journey up the digestive tract to the large intestine. This is where they act as a food source for the bacteria that usually live there. The bacteria then digest/ferment these FODMAPs and can cause irritable bowel syndrome symptoms (IBS).

    These symptoms include bloating and abdominal distension, excess wind (gas), abdominal pain, nausea, changes in bowel habits (diarrhea, constipation, or a combination of the two).

    Here's a brief description of the modalities of FODMAPs:

    Source: https://www.monashfodmap.com/about-fodmap-and-ibs/

    CHAPTER 2 - ADOPTING THE DIET 

    How do you know if you need to follow this diet?

    This diet is for you if a doctor has diagnosed your gastrointestinal symptoms with IBS or if a healthcare professional recommends it. Otherwise, you should not follow this diet.

    Many conditions have symptoms similar to IBS, such as celiac disease, inflammatory bowel disease, endometriosis, and bowel cancer.

    We're all too familiar with that time you see a strange pimple in a weird place of your body. You start to check the Internet, and all of a sudden, you're diagnosing yourself with skin cancer or whatnot.

    All that to say: don't try to self-diagnose yourself with IBS.

    Instead, see a doctor who will assess your symptoms, perform the necessary tests to rule out other conditions, and give you a precise diagnosis of IBS before starting this diet.

    Is this diet effective?

    A low-FODMAP diet has been shown to:

    • Reduce pain and discomfort
    • Reduce bloating and distension
    • Improve bowel habits (diarrhea or reduce constipation)
    • Improve the quality of life.

    These benefits are typically seen within two to six weeks of a low-FODMAP diet.

    Of course, the diet does not cure the symptoms of IBS. It just helps people cope better with their digestive disorders.

    A diet low in FODMAP also does not improve symptoms in ALL people with IBS.

    In fact, one in four people with IBS finds that their symptoms do not improve with diet. In these people, other dietary therapies may be needed in addition to or as a replacement for a low FODMAP diet. Other therapies for IBS relief to consider include stress reduction, bowel-directed hypnotherapy, over-the-counter medications such as laxatives, fiber supplementation, or prescription medications.

    Talk to your healthcare professional to learn more about other therapies to try.

    What does this diet consist of?

    The low-FODMAP diet has two phases. It is recommended to consult an experienced dietitian specializing in teaching this special diet for these two phases. Why? FODMAP intolerances are different from other conditions that have a single cause and have a simple solution. They affect people differently and therefore require an individualized approach.

    Generally, both phases are described below, but be aware that there is no one-size-fits-all approach.

    The low-FODMAP diet is most effective and nutritionally adequate when a dietitian adapts it to your needs. You mustn't rely on reading information on the Internet (even mine), books, and other literature to diagnose yourself and follow the diet on your own. I strongly recommend that you first see a doctor who can diagnose you with a digestive disorder like IBS.

    After studying your symptoms, a registered dietitian trained by Shepherd Works' teachings can recommend this diet and make sure it is suitable for YOU.

    What follows is just a sharing of what I'm going through. Now that this is clear, let's move on to the following paragraphs.

    Phase 1

    The first phase of the low-FODMAP diet usually involves strictly restricting all foods high in FODMAP for four to six weeks. The dietitian identified these foods and offered options to ensure the diet is nutritionally adequate. I need to keep a food diary and note the reaction to symptoms during this time. Later, a review appointment will follow with her to provide me with advice on the second phase.

    Phase 2

    The second phase is where the restricted foods in the first phase are gradually reintroduced, and the diet is relaxed to suit me. This is where the type and amount of FODMAPs I can tolerate is spotted to establish a long-term diet. It is essential to determine the level of FODMAP that can be well-tolerated. In doing so, the prebiotic effects of FODMAPs can be enjoyed, and the diet is not too restricted.

    The dietitian will advise the reintroduction process to minimize symptoms and ensure maximum variety in the diet. The end result should be a long-term diet that contains less problematic FODMAPs for me than what was initially consumed, but which is not as FODMAP restricted as the first phase of the diet.

    Is this diet good for weight loss?

    Just because you see the inclusion of the word "diet," it doesn't mean you should understand it literally as a weight loss diet. Basically, "diet" means "lifestyle in terms of food, hygiene. "

    So, a low-FODMAP diet approach is not intended as a weight loss plan.

    Additionally, this is a low-FODMAP diet, not a no-FODMAP diet. Long-term elimination of these foods is neither desirable nor recommended. Again, I highly recommend that you consult an experienced professional who has followed Shepherd Works' teachings to guide you through all aspects of this diet.

    CHAPTER 3 - A DEEPER LOOK AT FODMAPs

    Where are FODMAPs found in food?

    They are found in various foods, including fruits and vegetables, grains and grains, nuts, legumes, lentils, dairy products, and manufactured foods. This makes following this diet a bit tricky, as you can't just guess which foods will be high or low in FODMAPs.

    Having a basic understanding of foods containing FODMAPs makes it easier to follow this diet. It helps you avoid unwanted symptoms of IBS.

    Although many people rely on the FODMAP food lists found on the Internet to treat IBS, they are often inaccurate.

    The list of foods below is taken from laboratory studies conducted by the Monash University team, published in the scientific literature. All information is publicly available through FODMAP Diet Monash University's app.

    Their app uses a simple traffic light system to rate foods as low, moderate, or high in FODMAP.

    When you click on each food, you will also see which FODMAPs are present. For example, the main FODMAPs found in pears are fructose and sorbitol, while those found in cashews are fructans and GOS; in cow's milk, it's lactose.

    Free FODMAP Foods List

    Fill out this form to access my FODMAP food list, plus all my other my nutritional charts and my plant-based diet course.

    What to eat on a low-FODMAP diet? 

    The information below will help you understand which food groups typically contain which FODMAPs. However, for the most complete information on the FODMAP content of foods, consult the Monash FODMAP app.

    Meat, poultry, and fish

    Protein foods such as meat, poultry, and fish are naturally FODMAP free. However, processed and marinated meats may contain FODMAPs due to the addition of high FODMAP ingredients such as garlic and onion.

    Low-FODMAP choices include plain cooked meats, poultry, seafood, eggs. In contrast, high-FODMAP options include marinated meats, processed meats (e.g., sausage/salami), and meats served with gravy/sauces. This may include high-FODMAP ingredients.

    Dairy products and their substitutes

    The main FODMAP found in dairy products is lactose. Dairy products high in lactose include soft cheeses, milk, and yogurt. Many dairy products are naturally low in lactose, for example, butter and cheese. For this reason, dairy products are not radically excluded from a diet low in FODMAP.

    Many plant-based milk alternatives are also low in FODMAPs, for example, soy milk (made from soy protein), almond milk, and rice milk. However, milk substitutes do not naturally contain calcium, so choose varieties fortified with calcium (containing> 120 mg of calcium per 100 ml).

    Fruits

    The main FODMAPs found in fruits are sorbitol and excess fructose. Fruits particularly high in excess fructose include apples, pears, mangoes, cherries, figs, nashi pears, watermelon, and dried fruits.

    Fruits particularly high in sorbitol include apples, blackberries, nashi pears, peaches, and plums. Many fruits contain both fructose and sorbitol, for example, apples, pears, and cherries.

    Vegetables

    The main FODMAPs found in vegetables are fructans and mannitol. Vegetables particularly high in fructans include artichoke, garlic, leek, onion, and scallion. The ones that are particularly high in mannitol include mushrooms, cauliflower, and snow peas.

    Grains and cereals

    The main FODMAPs found in cereals and cereal foods are fructans and, to a lesser extent, GOS.

    Grains and foods that are particularly high in fructans include wholemeal bread, rye bread, muesli containing wheat, wheat pasta, and crusty rye bread.

    Legumes

    The main FODMAP present in legumes is GOS. The ones particularly high in GOS include kidney beans, split peas, falafel, and dry beans.

    Nuts and Seeds

    Most of the seeds are low in FODMAP. The main FODMAPs found in nuts are GOS and fructans. Nuts high in FODMAP include cashews and pistachios, while nuts with low FODMAP content include macadamias, peanuts, and pine nuts.

    Sugars and Sweeteners

    The main FODMAPs found in sugary foods and drinks are fructose and sugar polyols (e.g., sorbitol, xylitol, erythritol). It's a good idea to read food labels to identify sugars high in FODMAP, especially on artificially sweetened drinks and sweets.

    Sugars high in FODMAPs include honey, high-fructose corn syrup, and sugar-free candies. Low-FODMAP options include dark chocolate, table sugar, maple syrup, and rice malt syrup.

    Condiments and sauces

    Some dips, condiments, sauces, and marinades contain garlic and onion. Ask for them separately or alongside if you are unsure of their FODMAP content.

    High-FODMAP options include garlic/onion marinades and sauces, vegetarian minced meat. Low-FODMAP options include barbecue sauce, mayonnaise, soy sauce, chutney, cranberry juice.

    The Complete FODMAP Food List

    This sample food list highlights some key examples of foods high and low in FODMAP. It is essential to consult a dietitian before starting such a diet (I know, I sound like a broken record).

    For the world's most comprehensive FODMAP food information database, check out Monash University's FODMAP diet app.

    List of FODMAP foods in the vegetable protein and dairy substitute categories.
    List of FODMAP foods in the fresh fruit, dried fruit, vegetables and root vegetables categories.
    List of FODMAP foods in the nuts and bakery and cereal products categories.
    List of FODMAP foods in the categories of oils, vinegars, spices and condiments; sweeteners and miscellaneous foods.

    → Subscribe and download your free printable FODMAP food chart here and so much more!

    The low-FODMAP diet in short

    Simply put, FODMAPs are a collection of short-chain carbohydrates (sugars) that are not absorbed properly in the gut. These can trigger symptoms in people with irritable bowel syndrome (IBS).

    These components are found naturally in many foods and food additives. Each person has their own "tolerance threshold": the higher the FODMAP load, the more likely the presence of symptoms.

    The elimination of FODMAPs makes it possible to limit foods that are highly fermentable in carbohydrates. The low-FODMAP diet, developed by researchers at Monash University, limits foods shown to worsen the gut.

    It is best to follow the Monash University diet under the supervision of a qualified dietitian or healthcare professional with experience in this specialized area. The diet begins with a high restriction period of two to six weeks, then moves on to a more relaxed diet where certain foods are gradually reintroduced.

    Successfully Eat a Low-FODMAP Diet Fuss-Free

    At first glance, a diet low in FODMAP can seem restricting. And I won't lie to you that you'll have to relearn how to cook.

    But that doesn't mean you're doomed to eat bland food. Eating low in FODMAP can be pleasant. Yes, it's possible!

    Thanks to the information provided in this article, you are now armed with knowledge. You know what to do, to the very least, to relieve your symptoms. You know who to contact. And you have access to a good list of foods that are high, medium, and low in FODMAPs to help you eat the right foods. (The database in Monash University's FODMAP diet app is still the most comprehensive, up-to-date, and most reliable.)

    All that's left for you to do is take action.

    Are you ready to put an end to all this intestinal fuss? Ready to adopt a new diet for a while and get relief from these very bothersome symptoms? Ready to cook and enjoy your first and numerous low-FODMAP dishes?

    To support you in your efforts, I'll share my best recipes to show you that, even with dietary restrictions, the foodie in you has no reason to shut down.

    So let's make this journey together.

    Get Your Free Plant-Based Eating Toolkit and More

    Subscribe to my newsletter and unlock my plant-based course, nutrition charts, recipe secrets, and exclusive updates to prepare wholesome, varied & balanced meals effortlessly. All you need is a good appetite. Subscribe!

    Smiling girl with big afro sitting cross-legged on a sofa

    Hi there!

    I'm on a mission to help you get nutrient-dense, easy, and mouthwatering plant-based recipe ideas so you can feel stimulated, well-equipped, and confident to eat and cook better.

    Learn more about me →

    {Light and Fluffy} Savory Vegan Muffins

    Feb 4, 2021 · 10 Comments

    These vegan savory muffins won't make it to the table! Quick and easy, they're made with leek and mushrooms, and they have crisp, golden tops and light, moist interiors.

    Keep a reserve for snacks, place them in lunch boxes or serve them in a basket with dinner!

    A batch of savory muffins in a metal plate resting on a wooden chest and torn muffin on a narrow cutting board.
    Gluten-Free Savory Muffins
    [feast_advanced_jump_to]

    The Best Savory Muffins

    Oh, how glad I was that this recipe presented itself to me on a lazy Saturday night. For almost a year, I've kept a package of chickpea flour. And its content has been disappearing as quickly as a sloth crossing a road.

    Rest assured, the expiration date hadn't yet passed. Fortunately, I had just the right amount, to the nearest gram, to make savory muffins. The stars were aligned. What's more, the idea of ​​cooking for hours didn't vibrate in me.

    But when I realized that 10 minutes of effort was the only thing standing between me and a batch of goodness, my Saturday night laziness quickly turned into a little dance on the floor.

    These babies are fantastic. They are :

    • Gluten-free
    • High-protein (10 g)
    • Healthy
    • Fast (set them and forget them)
    • Easy (four main steps)
    • Straightforward (only five main ingredients)
    • Toddler-friendly

    Why this last point? Because it's the perfect cover to hide vegetables. Yes, the end justifies the means.

    These toasted and spicy muffins have a moist and substantial crumb but not heavy. I tinkered with the original recipe to make it airy and fluffy. And if you eat them while they're hot, you'll find that the top is cracked and reveals some traces of greenery.

    And then the flavor comes, that calm, whispering warmth that allows time to hatch, more a sensation than a flavor. If you swallow two or three muffins per meal, you might feel a burning sensation in the back of your throat, not that it's a warning, but it's a preamble to a great bite.

    Answers to your Burning Questions

    What are savory muffins?

    These are individual mini-cakes. However, they're salty and consist of tasty vegetables. As with sweet muffins, the characteristic manufacturing principle is to prepare the mixture of liquid ingredients and that of dry ingredients separately, then quickly and coarsely stir the two preparations.

    Are savory muffins healthy?

    Many recipes include eggs, dairy products (butter, cow's milk, lots of cheese), making them relatively high in saturated fat. Plus, they contain refined white flour, which is often devoid of nutrients. To make them healthier, you can replace these two elements with chickpea flour.

    What is chickpea flour?

    It is a gluten-free flour made from ground chickpeas (garbanzo). It's traditionally used in Indian cuisine as gram flour.
    Thanks to its texture, it's often used in vegan cooking to make recipes containing eggs.
    Since it's made entirely from chickpeas, this flour provides 21 grams of protein per cup, while all-purpose flour provides 13 grams.
    How does it taste? Chickpea flour has a taste reminiscent of chickpeas in flour, but only inconspicuously. It has a slight cornbread flavor, which definitely contributes to these muffins' esculent factor.

    What do You Put in Them?

    Savory muffin ingredients (clockwise): In a metal plate, jars of chickpea flour and nutritional yeast with mini bowls of onion powder and garlic powder and a bunch of kale, leek, brown mushrooms, soy drink in a tilted bottle, set of spoons with spices and various ingredients (cayenne pepper, black pepper, salt, baking powder, olive oil, maple syrup).
    Ingredients for healthy savory muffins (clockwise): chickpea flour, nutritional yeast, onion powder, garlic powder, a bunch of kale, leek, coffee mushrooms, soy beverage, cayenne pepper, black pepper, salt, baking powder, olive oil, maple syrup.

    Main Ingredients

    Chickpea flour – very convenient for recipes for cookies, bread, muffins, etc., without eggs and gluten. Its protein and fiber content provides a nice texture to the final product. You can typically find it in the health food section. Otherwise, go to grocery stores for that kind of vocation.

    Brown mushrooms – also called crimini mushrooms, I prefer to use them for their concentration of antioxidants.

    Kale – this cruciferous is one of the most protein-rich leafy greens. I like to cook with it for its antioxidant and anticancer properties. You can use curly kale, Tuscan cabbage (aka black, dinosaur, palm), or spinach.

    Unsweetened soy beverage – to ensure your protein intake. Other plant-based drinks can be used if you are concerned about soy or are allergic to it. In this case, I recommend drinks made with plain oats (which have a fairly neutral taste), cashew, or macadamia (more expensive).

    Leek – for the taste, but also to show a few spots of green.

    Seasonings

    Nutritional yeast – this is an inactive yeast that is grown on a nutrient-rich culture. Some are fortified with vitamin B12, such as that of the Red Star brand. Thanks to its flavor, it recalls the taste of cheese and adds a depth of taste.

    Onion powder – I tried this recipe with fresh onions before but found that the flavor did not carry through the crumb. So, I switched to onion powder, and the taste was much more enhanced.

    Garlic powder – same.

    Cayenne pepper – to warm you up a bit. It's said that combined with black pepper, capsaicin's properties, an antioxidant, are increased tenfold. Capsaicin may have significant potential to promote vascular and metabolic health.

    Maple syrup – to soften the dough slightly. Choose good quality ones. Real maple syrup, not that fake Aunt Jemima stuff.

    Salt and pepper – I like to use kosher salt for its fine crystals. The pepper is freshly ground.

    Miscellaneous Ingredients

    Baking powder – this will raise the dough to have a mushroom-like appearance and nice craters on top.

    How to Make Savory Muffins Step by Step

    Making savory muffins without cheese, without eggs, without white flour, without dairy products (butter or milk) is child's play.

    • Leek and onions being sautéed on a pan
    • A bowl of dry ingredients combined
    • A measuring cup with the liquids combined
    • The liquid being poured in the dry ingredients
    • A bowl with sautéed vegetables dipped in a in batter
    • Muffin cups with the batter divided in 6 cavites
    Making Easy Savory Muffins

    1 / Sauté the vegetables (leek, mushroom, kale) and seasonings (cayenne pepper, pepper, salt).

    2 / Combine the dry ingredients (flour, nutritional yeast, spices)

    3 / Combine the wet ingredients.

    4 / Quickly and roughly mix the two preparations.

    5 / Add the vegetables. 

    6 / Divide the dough into muffin tins and cook.

    7 / Unmould and serve immediately or reserve. 

    Other Creative Variations

    You have many add-in options. Add in these vegan savory muffins:

    • Corn
    • Zucchini
    • Salted Carrots 
    • Sun-Dried Tomato
    • Spinach
    • Sweet Potato

    How to Serve Them?

    If you eat them for lunch or dinner, serve the warm muffins (2 per person) with grilled vegetables, stew, or soup. This will make a whole meal.

    These savory muffins were a huge hit with my little one, who used them as a ketchup sponge. But the adult in you will appreciate them as well.

    Instead of dividing the dough into muffin cups, you can also shape it into a rectangular cake shape, like a quick bread.

    If you eat them as a breakfast or a snack, you can add a handful of berries.

    Make this Meal Now

    Unless you're familiar with various recipes using chickpea flour, it's rare to use it in large quantities. Gluten-free savory muffins are the perfect way to take advantage of this opportunity.

    Among other things, these gluten-free savory muffins are quick and nutritious, tasty, and healthy. They can disguise vegetables without the reluctant victims—your kids—blatantly noticing them.

    So when laziness seizes you, savory muffins will come to your rescue.

    Pair them with what's in your fridge, and you'll have a satisfying and relaxing meal in an instant.

    Vegan Savory Muffins Recipe

    A batch of savory muffins in a metal plate resting on a wooden chest and torn muffin on a narrow cutting board.
    Savory muffins for breakfast, lunch, or dinner

    If you try this recipe, I want to know about it! I always appreciate your feedback. Leave a star rating in the recipe card right below and/or a review in the comment section further down the page. You can also follow me on Pinterest, Facebook, or Instagram. Sign up for my email list, too!

    A batch of savory muffins in a metal plate resting on a wooden chest and torn muffin on a narrow cutting board.
    Print Recipe
    5 from 8 votes

    Vegan Savory Muffins

    These healthy savory muffins are quick to make. The resulting muffins are tender and golden yellow and somewhat reminiscent of cornbread. They're best when they’re fresh from the oven, or on the day that they’re made, but they'll still be good in your lunch box.
    Prep Time10 minutes mins
    Cook Time40 minutes mins
    Course: Breakfast, Snack
    Cuisine: American, Canadian
    Keyword: brown mushrooms, cayenne pepper, chickpea flour, garlic powder, kale, leek, maple syrup, nutritional yeast, onion powder, soy beverage
    Servings: 9
    Calories: 158kcal
    Author: Naïby

    Ingredients

    • 1 teaspoon olive oil plus 3 tablespoons
    • 1 leek minced
    • 2 cups brown mushrooms sliced
    • 2 cups kale chopped
    • 1 pinch cayenne pepper
    • 2 ½ cups chickpea flour
    • ½ cup nutritional yeast
    • 1 teaspoon onion powder
    • 1 teaspoon garlic powder
    • 1 teaspoon baking powder
    • 3 tablespoons maple syrup
    • 3 cups soy milk unsweetened
    • Salt and pepper to taste
    Get Recipe Ingredients

    Instructions

    • Preheat the oven to 475 °F (245 ° C).
    • In a non-stick skillet, over medium heat, heat 1 teaspoon of oil and sauté the leek for 3 minutes. Add the mushrooms and continue cooking for 3 minutes or until tender. Add kale and cayenne pepper for 1 to 2 minutes. Add salt and pepper to taste. Drain and let cool.
    • In a large bowl, combine the flour, nutritional yeast, garlic powder, onion powder, baking powder, and a good pinch of salt. In another bowl, combine 3 tablespoons of oil, maple syrup, and soy beverage. Pour the wet ingredients into the dry ingredients and mix until smooth. (You can also combine all the ingredients at once in one bowl.) Add the vegetables and mix well.
    • Oil the muffin cups, distribute the dough, taking ¼ cup of the mixture, and place them in 18 cavities. Bake in the center of the oven for 25 to 30 minutes or until the muffins are golden and a toothpick comes out clean.

    Notes

    These savory muffins are best taken out of the oven or on the day they are made.
    HOW TO SERVE
    Serve the muffins warm (2 per person) with grilled vegetables, soup, or soup.
    STORAGE
    Placed in an airtight container, these savory muffins can be frozen.

    Nutrition

    Calories: 158kcal | Carbohydrates: 25g | Protein: 9g | Fat: 2g | Saturated Fat: 1g | Sodium: 69mg | Potassium: 352mg | Fiber: 4g | Sugar: 8g | Vitamin A: 18IU | Vitamin C: 1mg | Calcium: 50mg | Iron: 2mg
    Smiling girl with big afro sitting cross-legged on a sofa

    Hi there!

    I'm on a mission to help you get nutrient-dense, easy, and mouthwatering plan-based recipe ideas so you can feel stimulated, well-equipped, and confident to eat and cook better.

    Learn more about me →

    Get Your Free Plant-Based Eating Toolkit and More

    Subscribe to my newsletter and unlock my plant-based course, nutrition charts, recipe secrets, and exclusive updates to prepare wholesome, varied & balanced meals effortlessly. All you need is a good appetite. Subscribe!

    Fuss-Free Spicy Black Bean Soup

    Jan 29, 2021 · 14 Comments

    Black bean soup speckled with corn and topped with cubed avocado, cubed tomatoes, and cilantro sauce

    This black bean soup has an earthy, spicy, and slightly sweet taste. This meal is perfect when you come home from work and want to cook something hearty but quick.

    Black bean soup speckled with corn and topped with cubed avocado, cubed tomatoes, and cilantro sauce
    Black Bean Soup
    [feast_advanced_jump_to]

    The Best Black Bean Soup

    I love sitting in front of a bowl of steaming beans, especially when the climate is, shall we say, gloomy. It really just warms you up from the inside.

    When you make them from scratch, the wisdom of cooking a fabulous meal with pre-cooked beans as a solid base comes with time. Because if they're not pre-cooked, you might find yourself one night, after running into your kitchen dangerously hungry, opening your cupboards to see nothing on your sadly empty shelves but jars of dried beans.

    But if you get a head start, having beans ready to eat is really great. Plus, it's not so hard to prepare, and it's so economical. Plus, you'll find it's just as fast as canned beans.

    This soup is extraordinary. It's really great because it's:

    • High-protein
    • Low in calories
    • Naturally salty, therefore low in salt
    • Diet-conscious

    This is exactly what you need to reach your healthy weight goals. In fact, it's very satisfying. You'll love it.

    After the vegetables are sautéed, the cumin, chili, and chipotle intertwine happily with the black beans in your kitchen for just under an hour while your butt is waiting on the couch.

    Once it has simmered, you top the soup with a textured gremolata-style herb sauce made with cilantro, oil, and lime zest. What a delight!

    I was thrilled to bring a spoonful of this thick and variegated soup to my mouth. 

    The acidity of the sauce comes first hits the palate. Then comes the softness of the tomatoes and the smoothness of the avocado. And finally, some explosions of sweetness emanating from the carrots, corn kernels, and red bell pepper and amalgamated with the beans' earthy taste. At the very end, all I felt was a pleasant tickle in the back of my throat.

    It is a good backup dish to prepare at any time. Your family will think you've been working at simmering it for hours.

    What Goes in It?

    Black Bean Soup Ingredients (spread on a surface
    Black Bean Soup Ingredients (clockwise): corn kernels, black beans, red pepper, extra virgin olive oil, vegetable broth concentrate, bunch of cilantro, avocado, salt and pepper, garlic, powder chili, ground cumin, chipotle, kombu, lime, tomato and red onion

    Main ingredients

    • Black beans – it's ridiculously easy to make them at home. In this case, pre-soak them the night before in water with a tenderizing substance (like baking soda). If you're using canned beans, make sure they're organic and salt-free.
    • Corn kernels – fresh or frozen will do the trick. It brings a color contrast in the brown porridge and a touch of sweetness.
    • Red bell pepper – another color element to take the monotony out of the meal.
    • Carrot – and another one.
    • Cilantro – used in the herb sauce. It goes really well with black beans.
    • Lime – I used it instead of lemon because it reminded me of the Caribbean's flavors.
    • Tomato – for garnish and color.
    • Avocado – ditto.

    Seasonings

    • Red onion – to me, red onions are more flavorful than yellow onions.
    • Garlic – ditto.
    • Vegetable broth – gives umami. Not all broths are equal. Choose one that is tasty enough but doesn't leave its mark.
    • Ground cumin – it's a bitter spice that gives a depth of taste. I like to have whole seeded cumin, then grind it in a small coffee/spice grinder if necessary. This way, I can be sure that there are no additives or other possible dubious substances. Also, the fragrances are more obvious. The finest ones are from India.
    • Chili powder – this is a mixture of spices used among others in Tex-Mex cooking. The main element that gives its name to the mixture is the chili serrano (chile serrano). Also found in its composition (in ascending order) are paprika, garlic, cumin, oregano, and cloves. It comes in the form of a fine powder with a dark red-brown color. 
    • Chipotle powder – it's a variety of chili pepper native to Central and South America. It's actually a type of large jalapeno picked very ripe, then smoked and dried. It has a café au lait color. It's a little hotter than the jalapeno but less fiery than the cayenne pepper. The finest ones are from Mexico.
    • Salt and pepper – for seasoning, of course. It's worth using kosher salt. It dissolves twice as fast as dense salt and gives you an early indication of your preparation's saltiness.

    Optional Ingredients

    • Kombu – widely used in Japanese cuisine, it's a food seaweed usually dried which is rich in minerals.

    How to Make Black Bean Soup Step by Step 

    I start by sautéing the vegetables (onion, garlic, bell pepper, carrot) ①. Then I add the black beans, corn, broth, and spices ②. In a food processor, I roughly mix the soup and season ③. Then, I prepare the herb sauce ④. 

    4-photo collage showing how to make black bean soup.

    When I'm done, I divide into bowls and put the toppings on.

    Black bean soup in a bowl.

    The Keys to Success: My Top Tips

    These tips are for you if you decide to go the canned bean route. 

    Choose the right black beans

    I'm going to go on a limb, but in my opinion, it's useful, dear guest, to know how to doctor those. It's one of those important life skills, like knowing how to tie your shoes, make your bed or use a corkscrew. If you have this skill, it's nothing to be ashamed of.

    Anyway, I've heard through the grapevine that they're very different from brand to brand. So you have to be fussy and aim right.

    Cook them to perfection

    Also, be aware that canned beans should only be heated briefly; otherwise, you'll end up with a sad mush.

    Bring out the spices' inherent flavors

    If you have a small coffee/spice grinder, I suggest you have whole cumin seeds and grind them for usage to release its volatile oils—aromatic compounds that give the spices their fragrance and flavor.

    How to Serve It

    If you can, keep a quantity of pre-cooked black beans handy. Put some in the freezer to keep them longer. You'll be able to create the easiest, quickest and tastiest meals ever!

    Your soup may thicken over the next few days. What to do with your bean mixture? 

    • Mix them with rice (white or brown), a sliced tomato salad, or anything in the refrigerator.
    • Wrap it all up in a tortilla or burrito with a cream that imitates sour cream.
    • Use it as a base to make black bean burgers.
    • Turn your soup into a taco filling.
    • Accompany them with plantains.

    Answers to Your Burning Questions

    Are black beans good for you?

    Black beans contain an impressive total amount of fiber (about 15 g per cup) and protein (close to 15 g per cup). These can help regulate the passage of food through your digestive tract and stabilize the flow of digestion. This is believed to help regulate blood sugar levels and the overall health of the digestive tract.
    Also, these legumes have unique qualities: their fiber is a valuable source of resistant starch. This is because it "resists," it doesn't break down, and therefore does not cause an undesirable increase in your blood sugar level. 
    Resistant starch is counted as calories on labels and charts, but 90% of resistant starch calories are lost during digestion, acting more like a type of fiber. Let me explain.
    Let's say you eat about 41 grams of total carbohydrate. About 15 of those grams are classified as fiber. If you subtract them from the total amount of carbohydrates, you end up with 26 g, which contains lots of starch. 
    Usually, this high starch content would increase a food's Glycemic Index value and make it a food of concern concerning blood glucose and insulin impact. 
    However, in the case of black beans, these concerns are not raised because a large amount of the starch in black beans "resists" digestion, as I said earlier, and goes straight through, if you will, like water through a sieve. 
    Recent studies show that black beans contain unique components that also improve the regulation of blood sugar and insulin levels on the protein side.

    What's the difference between canned black beans and dried black beans?

    Dried black beans generally need to be soaked, drained, and cooked before being consumed. Canned black beans are pre-cooked, which provides a greater level of convenience. 

    A nutritional loss would be negligible when switching from dried and cooked black beans to canned black beans. They are generally sorted, graded, and cleaned, and they go through the drying and cooking process in both cases. 

    The manufacturing process

    Canning is not very aggressive. Before being cooked inside their sealed can, they are hydrated, blanched for 3-8 minutes in water heated to 180-199°F (82- 93°C). A common type of cooking method for canned black beans would involve about 45 minutes of cooking at approximately 240°F (116°C). After cooking, they are cooled and then placed in their can with brine or another type of liquid.

    This liquid may be low or no salt, a better choice for those who want or need to avoid salt. 

    Sometimes calcium (for example, in the form of calcium chloride) can be added to canned black beans to maintain their firmness. Other times, sodium bicarbonate can be added to help reduce acidity and improve water absorption when they are cooked. 

    The choice of consumption

    As a general rule, these added ingredients would not be a problem for most people. But if their presence bothers you, just rinse thoroughly to reduce them considerably. 

    It's not difficult to find canned organic black beans that have been cooked without the addition of salt, calcium chloride, or sodium bicarbonate in most areas. It's possible to find them with a sea vegetable such as kombu. 
    Both types can be beneficial to health. My concern, however, is the can material. 
    Recent nationwide testing shows that many canned foods still contain chemicals, such as BPA, linked to cancer and birth defects.

    So, if you're concerned about the environment, cans cause more waste.

    Do black beans cause farting or diarrhea?

    Normally, canned black beans are better for the stomach, as they are already well prepared and pre-cooked.
    However, the dried ones should be pre-soaked in water with a tenderizing substance (such as baking soda) for at least 8 hours to make them easier to digest and reduce flatulence caused by certain types of sugars. Another advantage is that it shortens their cooking time. You can also add strips of kombu, a food algae, which has the unique ability to neutralize the effects responsible for gas.

    Afterward, you throw away the water and cook them for your favorite meals.

    Well, I'm aware of the debate on the disposal of soaking water. 
    Some websites and commentators have argued that it contains too many valuable nutrients to throw away. I agree, but it goes along with other undesirable nutrients (anti-nutrients), such as those associated with flatulence. 

    It's up to you, negligible loss of nutrients or more farting, indigestion, diarrhea, etc.?

    Make this Soup Now

    This black bean soup is the perfect comforting meal on a cold winter day.

    Make it a backup meal when you don't feel like thinking about what to cook when looking for something filling, healthy and tasty.

    All you need are some fine beans that are ready to cook. But they're not pre-cooked, it's not hard to get them ready. Soak them the night before, and then add ingredients that combine well with their earthy taste.

    The day you come home from work hungry, you'll cry with gratitude for doing it early.

    And your hungry belly and lazy buttocks will thank you too, both of them happily soothed.

    Other Black Bean Recipes

    Once cooked, the beans make a blank base, ready to be made into anything you fancy.

    • Easy Mango Quinoa Salad with Maple-Lemon Dressing
    • A burger on a thin wooden board with ketchup oozing our of it
      Freaking Firm Black Bean Veggie Burger (Effortless & Baked)
    • Mind-Blowing Low-Calorie Pulled Jackfruit Burritos
    Black bean soup topped with cilantro sauce, avocado, and tomatoes
    Black Bean Soup with cilantro sauce, tomato and avocado

    If you try this recipe, I want to know about it! I always appreciate your feedback. Leave a star rating in the recipe card right below and/or a review in the comment section further down the page. You can also follow me on Pinterest, Facebook, or Instagram. Sign up for my email list, too!

    Overhead view of black bean soup speckled with corn and topped with cubed avocado, cubed tomatoes, and cilantro sauce
    Print Recipe
    5 from 7 votes

    Spicy Black Bean Soup with Cilantro sauce

    This black bean soup burbles together just long enough to warm through, and then it’s ready to go, earthy and spicy and faintly sweet. With a green salad on the side, this soup makes a terrific, supper or an easy lunch. 
    Prep Time20 minutes mins
    Cook Time1 hour hr
    Resting Time1 day d
    Course: Soup
    Cuisine: Mexican
    Keyword: avocado, black beans, chipotle, corn, cumin, garlic, red bell pepper, tomato, vegetable broth
    Servings: 4
    Calories: 562kcal
    Author: Naïby

    Ingredients

    • 1 tablespoon olive oil
    • 1 red onion chopped
    • 4 cloves garlic minced (about 1 tablespoon)
    • 1 carrot cubed (about 1 cup)
    • 1 red bell pepper cubed
    • 720 g black beans rinse, and drain (2 dry cups, 4 pre-soaked cups, or 2 cans of 540 ml each)
    • 1 cup corn kernels frozen (160 g or 1 x 199 ml-can, rinsed and drained)
    • 4 cups vegetable broth plus 1 cup to dilute
    • 1 tablespoon ground cumin
    • 2 teaspoons chili powder
    • ½ teaspoon chipotle powder or to taste
    • 1 tomato diced
    • 1 avocado diced
    • Salt and pepper to taste

    For the cilantro sauce

    • 1 bunch cilantro fresh, chopped
    • 3 tablespoons olive oil
    • Grated zest and juice of 1 ½ lime
    Get Recipe Ingredients

    Instructions

    • In a large saucepan over medium heat, heat the oil and sauté the onion and garlic for 3 minutes.
    • Add the red bell pepper and carrot and continue cooking for 5 minutes. Add black beans, corn, broth, cumin, chili, and chipotle. Cover and simmer over low heat for about 50 minutes. Remove the kombu.
    • In a blender, coarsely blend the soup to obtain a thick texture, keeping some beans and vegetable pieces intact. Add salt and pepper to taste. Meanwhile, in a bowl, mix all the ingredients for the coriander sauce.
    • Serve the soup in bowls. Garnish with tomatoes, avocado, and cilantro sauce.

    Notes

    Choose the right black beans: Canned black beans are very different from brand to brand. So you have to be choosy and aim right.
    Cook them to perfection: Also, be aware that canned beans should only be heated briefly; otherwise, you will end up with a sad mush.
    Bring out the spices' inherent flavors: If you have a small coffee/spice grinder if needed, I suggest you have whole cumin seeds and grind them when you use them to release its volatile oils, aromatic compounds that give the spices their fragrance and flavor.
    USEFUL TIPS
    This soup can also be prepared in the slow cooker. Simmer all the ingredients for 6 to 8 hours, until the vegetables are tender.
    STORAGE
    This soup can be kept for one week in the refrigerator. 
     

    Nutrition

    Serving: 1g | Calories: 562kcal | Carbohydrates: 9g | Protein: 3g | Fat: 60g | Saturated Fat: 8g | Sodium: 92mg | Potassium: 343mg | Fiber: 3g | Sugar: 1g | Vitamin A: 1374IU | Vitamin C: 1mg | Calcium: 151mg | Iron: 11mg

    Get Your Free Plant-Based Eating Toolkit and More

    Subscribe to my newsletter and unlock my plant-based course, nutrition charts, recipe secrets, and exclusive updates to prepare wholesome, varied & balanced meals effortlessly. All you need is a good appetite. Subscribe!

    Smiling girl with big afro sitting cross-legged on a sofa

    Hi there!

    I'm on a mission to help you get nutrient-dense, easy, and mouthwatering plant-based recipe ideas so you can feel stimulated, well-equipped, and confident to eat and cook better.

    Learn more about me →

    Empowered Gluten-Free Banana Bread with Cacao Nibs

    Jan 21, 2021 · 11 Comments

    Slice of banana bread lying on a counter and placed in front of the whole preparation and a few slices spread with butter

    Moistened with mashed bananas and speckled with cocoa nibs, this banana bread has a dense but soft crumb. Plus, it has the right balance of crunchiness.

    It's the perfect snack to satisfy your cravings.

    Slice of banana bread lying on a counter and placed in front of the whole preparation and a few slices spread with butter
    Banana bread with walnuts and cacao nibs
    [feast_advanced_jump_to]

    The Healthiest Banana Bread

    I'm not a baker, but I have the necessary culinary resources—my countless cookbooks—to understand the mysterious science of baking. I always dreaded making up disasters and destroying any feeling of rejoicing over bites that were supposed to be sweet and divine.

    The fear is even stronger when venturing into vegan baking.

    Without eggs, without butter, without milk, you have to scratch your head to achieve the desired texture.

    My main challenge was to get a soft crumb when bananas should already have done it. Well yes, when we read the reviews of certain recipes on the web, we see that it's the greatest desire of many. Sometimes, it's too dense; sometimes, it's too dry.

    I'll admit that my first attempts were not impressive.

    My most reckless wish was to concoct super healthy banana bread while optimizing nutrient-density to complicate matters. After a few tweaks and tastings, I'm proud to have made something that is:

    • Egg-free
    • Dairy-free 
    • Sugar-free
    • Gluten-free
    • High-protein

    I discovered that the key to achieving the perfect texture, taking into account the required criteria, was not to add oil but applesauce.

    And voilà, success! Add a good dose of crunchiness, like nuts and cocoa nibs, and you've got the perfect bite to eat when you're feeling hungry.

    Answers to Your Pressing Questions

    What exactly is banana bread?

    As a classic baked good, banana bread would have emerged in the United States at the heart of the 1930s' economic crisis. As times were hard and so to not lose anything, people recycled overripe blackening bananas that no one decided to eat. 
    In Quebecer French, we literally translated banana bread as "Pain aux bananes."
    But in Europe, some are led to believe that, in reality, it is a cake aux bananes (gâteau aux bananes), and not bread as the name suggests. However, it seems that Quebecers have it right: this preparation does not contain candied fruit (cake in European French is the short name of "fruitcake") and, what's more, it has a bread shape.
    In my humble opinion, calling it gâteau aux bananes (banana cake) would be wrong. Especially since its crumb is lighter and sweeter than banana bread and is normally covered with icing.
    Since it does not need time to rise, banana bread is made quickly. In fact, baking soda or baking powder makes the dough rise when baking in the oven. 
    Most importantly, given denser flours like all-purpose flour or whole wheat, banana bread has a dense crumb and is less sweet.
    And that makes it a perfect healthy breakfast or a snack.

    Is banana bread good for you?

    It all depends on what you put in it. Many banana breads are high in saturated fat and cholesterol. Also, they're packed with sugar (refined white sugar or even said natural sugar). My preparation is without added sugar. To sweeten the taste, my recipe includes dates.
    There are also sources rich in omega-3s and a great dose of plant-based protein to quench your hunger. Finally, my banana bread can boast about being gluten-free, possibly thanks to gluten-free oats, if intolerances are a nuisance.

    What's the egg substitute for banana bread?

    You have several options for replacing eggs. But to have the desired dense and moist texture, we will mainly use ground flax or chia seeds soaked in water to thicken with applesauce. Coconut oil is also an option, but it would increase fat intake too much.

    What Goes in a Banana Bread

    Banana bread Ingredients (clockwise): cocoa nibs and almond butter on small plates, ground flax seeds on a small plate, rolled oat in a glass jar, soy beverage in a small bottle, applesauce in a small glass jar and three bananas placed on a thick book, walnuts in a jar, baking powder and vanilla extract in a set of spoons, psyllium husks on a glass lid, and dates and scattered walnuts
    Gluten-free and vegan banana bread ingredients (clockwise): cocoa nibs, almond butter, ground flax seeds, rolled oats, soy beverage, applesauce, bananas, walnuts, baking powder, vanilla extract, psyllium husks, and dates

    Main ingredients

    Bananas – the riper, the better. In this way, they're loaded with sugar and aroma.

    Rolled oats – have gluten-free if you want.

    Ground flax seeds – when added to water, they act as a binder, just like eggs do. Their additional benefit: they are rich in omega-3.

    Baking powder – take it without alum, if possible. It helps the dough to rise due to the carbon dioxide production.

    Walnuts – these will provide crunch and an extra dose of omega-3.

    Dried dates – these will act as your sweetener, only better.

    Soy beverage – great for boosting your protein intake. You can use any plant-based drink (preferably organic). Note: if you ever try something akin to plant-based buttermilk, it will be even better, because together with the baking powder, it will help the dough to rise more.

    Applesauce – it'll act as a binding agent and is a good susbstitute for eggs or oil when you want to reduce fat and calories.

    Almond butter – to make banana bread high in protein.

    Seasonings

    Vanilla extract – to flavor your preparation.

    Optional ingredients

    Psyllium – used as an egg substitute, it's a soluble plant-derived fiber. It can be found in the form of envelopes (as in this recipe) or finely ground.

    Cocoa nibs or semi-sweet chocolate chips – it's rich in magnesium. Plus, it's an antidepressant. You won't have any reason to feel guilty if you take multiple slices.

    How to Make Banana Bread Step by Step

    As there are few instruments and technical gestures, it's the ideal baked good for beginners. Combine the dry ingredients with the wet ingredients and pour everything into a classic (28 cm) well-oiled bread/cake pan (rectangular).

    Making vegan banana bread

    1 / Prepare the flax seeds "egg."

    2 / Reduce the rolled oats into flour.

    3 / Combine the dry ingredients (psyllium, baking powder, walnuts, and cocoa nibs).

    4 / Mix the wet ingredients (dates with the soy drink, then with the bananas, vanilla, and almond butter) .

    5 / Combine the dry ingredients with the wet preparation, plus the applesauce and flax seeds.

    6 / Pour the preparation into a well-oiled 9 x 5 in. (23 x 13 cm) bread/cake pan.

    7 / Bake in the middle of the oven for 1 hour.

    The Keys to Success: My Top Tips

    Most quickbread recipes are made with ingredients that add moisture, such as banana, applesauce, or even zucchini. Some of them omit the applesauce but trust me, that makes all the difference between a dry and a wet prep.

    About bananas: the more black spots on the skin of bananas, the better. Ripe bananas are sweeter. And they are definitely easier to mash.

    Oh, and while we're at it, let's talk about frozen bananas. I strongly recommend that you always keep a reserve in the freezer. You just have to peel them, put them in a resealable plastic bag and slip them inside.

    And when you want to use a few, just take them out. Put them in a bowl and let them thaw at room temperature for a few hours. It doesn't take long. The only downside is that they look pretty naughty. Think wet, slimy, and slug-like.

    Other Creative Variations

    Add to the dough:

    •  Nuts: incorporates ⅓ cup chopped hazelnuts, pumpkin or sunflower seeds, pecans, slivered almonds... Roast them in the pan for 10 minutes at low heat to give them more flavor. The options are limitless.
    •  Fresh fruit: add to the dough 1 apple cut into cubes, 125 g berries, like blueberries or raspberries, or 200 g pineapple pieces. Place a banana cut in half lengthwise on the dough before placing it in the oven.

    For a hybrid, half bread, half cake version, decorate your concoction as follows:

    • Cover the banana cake with frosting.
      • For example, with something like salted caramel. In a food processor, mix ½ cup dates or dried apricots, ¼ to ½ cup macadamia nuts, ½ cup maple syrup with 1 teaspoon maca and a pinch of salt. Spread it on the banana bread.
      • Or simply mix 4 tablespoons almond butter, 1 tablespoon maple syrup, and 2 to 3 tablespoons soy beverage.
    • Decorate it. Sprinkle as desired with other nuts (almonds, pistachios, pecans, or dried fruits [coconut flakes] and let stand in the fridge for 1 to 2 hours before tasting.

    Serve this Recipe with...

    As my preparation is quite consistent, it can be eaten well on its own. But accompany it with fresh fruit with a plant-based drink. Who would say no to enjoying it with a chocolate drink?

    Or, spread your slices with jam, peanut butter, or plant-based butter, as some do, especially the Australians.

    Make this Banana Bread Now

    My vegan sugar-free banana bread is the ultimate snack.

    My version is downright healthy compared to banana breads packed with saturated fat, cholesterol, and sugar. It contains excellent doses of omega-3s and proteins to nourish your mind.

    Also, there are cocoa nibs, which are unequivocally good for morale.

    The variations are limitless. Make simple or super gourmet versions, you will certainly be satisfied.

    Slice of banana bread lying on a counter and placed in front of the whole preparation and a few slices spread with butter
    You can spread vegan butter on this banana bread.

    If you try this recipe, I want to know about it! I always appreciate your feedback. Leave a star rating in the recipe card right below and/or a review in the comment section further down the page. You can also follow me on Pinterest, Facebook, or Instagram. Sign up for my email list, too!

    Slice of banana bread lying on a counter and placed in front of the whole preparation and a few slices spread with butter
    Print Recipe
    5 from 9 votes

    Gluten-Free Banana Bread with Cacao Nibs

    This beautiful substance forms in less than an hour, including cooking time. And unlike more conventional quick breads, which are best allowed to cool completely before slicing, this one doesn't suffer when eaten hot. This makes for a perfect afternoon treat or a last-minute dessert. It's a good thing to have in your repertoire when you want to detoxify yourself from sugar.
    Prep Time15 minutes mins
    Cook Time50 minutes mins
    Course: Breakfast, Snack
    Cuisine: American
    Keyword: almond butter, applesauce, bananas, cacao nibs, dates, rolled oats, soy beverage, walnuts
    Servings: 10
    Calories: 165kcal
    Author: Naïby

    Ingredients

    • 1 tablespoon ground flax seeds
    • 3 tablespoons water
    • 2 cups rolled oats
    • 1 tablespoon psyllium husks
    • 1 tablespoon baking powder
    • ⅔ cup walnuts coarsely chopped
    • 1 cup cocoa nibs or semi-sweet chocolate chips
    • ½ cup dried dates pitted and chopped
    • ½ cup soy beverage
    • 3 bananas
    • ¼ cup applesauce
    • 2 teaspoons vanilla extract
    • 6 tablespoons almond butter
    Get Recipe Ingredients

    Instructions

    • Preheat the oven to 350 ° F/180 ° C.
    • In a small bowl, combine the flax seeds and water. Reserve.
    • In a food processor or coffee grinder, reduce the rolled oats to flour. In a large bowl, combine these with the psyllium, baking powder, and walnuts.
    • In a blender, puree the dates with the soy beverage. Add the bananas, vanilla, and almond butter, then mix until well blended.
    • In a bowl, combine the dry ingredients, the wet preparation, and the applesauce and flax seeds.
    • Pour the preparation into a well-oiled 9 x 5 in. (23 x 13 cm) loaf pan. Bake in the center of the oven for 1 hour, until a toothpick comes out clean. Let cool before unmolding.

    Notes

    • Applesauce: don't skimp on this. It makes all the difference between a dry and a wet prep.
    • Bananas: The more black spots on the skin of bananas, the better. Ripe bananas are sweeter. And they are definitely easier to crush. I strongly recommend that you always keep some in the freezer. You just have to peel them, put them in a resealable plastic bag and slip them inside.
    And when you want to use a few, just take them out. Put them in a bowl and let them thaw at room temperature for a few hours.
    VARIANTS
    Add to the dough:
    • Nuts: add ⅓ cup chopped hazelnuts, pumpkin (squash) or sunflower seeds, pecans (pecans), slivered almonds… Roast them in a pan for 10 minutes over low heat to give them more disgust. The options are limitless.
    • Fresh fruit: add to the dough 1 apple cut into cubes, 125 g of berries, such as blueberries (blueberries) or raspberries, or 200 g of pineapple pieces. Place a banana cut in half lengthwise on the dough before placing it in the oven.
    For a hybrid, half bread, half cake version, decorate your concoction as follows:
    • Cover the banana cake with frosting.
      • For example, with something like salted caramel. In a food processor, mix ½ cup dates or dried apricots, ¼ to ½ cup macadamia nuts, ½ cup maple syrup with 1 teaspoon of maca and a pinch of salt. Spread it on the banana bread.
      • Or simply mix 4 tablespoons almond butter, 1 tablespoon maple syrup, and 2 to 3 tablespoons soy beverage
    • Decorate it. Sprinkle as desired with other nuts (almonds, pistachios, pecans, or dried fruits (coconut flakes) and let stand in the fridge for 1 to 2 hours before tasting.
    CONSERVATION
    This banana bread can be frozen.

    Nutrition

    Serving: 1g | Calories: 165kcal | Carbohydrates: 23g | Protein: 5g | Fat: 7g | Saturated Fat: 1g | Sodium: 130mg | Potassium: 269mg | Fiber: 5g | Sugar: 6g | Vitamin A: 25IU | Vitamin C: 3mg | Calcium: 119mg | Iron: 1mg

    Get Your Free Plant-Based Eating Toolkit and More

    Subscribe to my newsletter and unlock my plant-based course, nutrition charts, recipe secrets, and exclusive updates to prepare wholesome, varied & balanced meals effortlessly. All you need is a good appetite. Subscribe!

    Smiling girl with big afro sitting cross-legged on a sofa

    Hi there!

    I'm on a mission to help you get nutrient-dense, easy, and mouthwatering plan-based recipe ideas so you can feel stimulated, well-equipped, and confident to eat and cook better.

    Learn more about me →

    Super Simple Cluster Granola

    Jan 13, 2021 · 12 Comments

    A bowl of granola on a white counter accompanied by a small bottle of soy beverage and a cup of tea

    This easy granola is loose with a bit of cluster. You can dress it up however you like, but this recipe is designed to be unpretentious and let the essential ingredients shine.

    A bowl of granola on a white counter accompanied by a small bottle of soy beverage and a cup of tea
    Simple cluster granola
    [feast_advanced_jump_to]

    A Granola Triple Rich in Omega-3

    I'll be honest with you: I never made granola before. But sometimes, after a hundred days of routinely-made green smoothies, I want something else. And my men aren't always as fond of them as I am.

    A while ago, laziness clouded my mind, and I started buying store-bought granola—but healthy, locally made granola, nonetheless.

    However, making it at home is so advantageous: it's much less cloying (you can measure the amount of sugar) than that in the store-bought one and on the other hand, it's much cheaper! But really cheaper.

    Okay, I'm not kidding when I say this granola is super simple. It's close to being butt naked.

    There's no fluid oil, no quirky spice, no syrupy sweetener.

    It's a humble and shy breakfast, but one that's confident enough to make room for the warm flavors of toasted nuts and oats.

    Its extravagance is absent, but its nutritional richness in omega-3 (walnuts, flax, and hemp) will nourish your brain to "uncloud" your mind and help you start the day well.

    Is Granola Vegan?

    Not straight up. Sometimes it is, sometimes it is not. Basically, granola (sometimes called muesli) is usually made from oatmeal, nuts, and dried fruits held together by a binder.

    This binder is often honey (non-vegan) but can be a vegan sweetener like maple or rice syrup, for instance, or on its darker side, corn syrup (hyper-rich in glucose). Also, if you want to give it a texture with small clusters, it's possible to add egg whites.

    Finally, if it includes chocolate, it could be white chocolate—cocoa butter, or worse, hydrogenated fats—mixed with milk powder or milk chocolate.

    What Goes in this Easy Granola?

    Vegan granola ingredients (clockwise): metallic dish containing pumpkin seeds, unsweetened grated coconut flakes next to lots of small jars of walnuts, hemp, cinnamon powder, rolled oats, cranberries, applesauce, and a set of measuring spoons containing almond butter and vanilla extract
    Vegan granola ingredients (clockwise): pumpkin seeds, unsweetened grated coconut flakes, walnuts, hemp seeds, cinnamon powder, rolled oats, cranberries, raisins, applesauce, almond butter, and vanilla extract

    Main Ingredients

    Oatmeal – I put regular, rolled oats oatmeal. Choose gluten-free if you have an intolerance.

    Walnuts – that's your dose of omega-3. You can certainly add other nuts. You can combine them from the start or at the end to keep them "raw," but you'd miss their toasty taste.

    Pumpkin seeds – the only sophisticated side of granola. It brings a little touch of green color and zinc.

    Hemp seeds – they are real little powerhouses. Although small, they provide protein (much more than nuts would for the equivalent volume) and your second dose of omega-3. Chia seeds are of the same caliber.

    Dried cranberries – okay, this granola has another sophisticated side to pigment it a little red, but more importantly, to give it a tangy touch and sweetness. It's possible to add other dried fruits, of course.

    Raisins – ditto.

    Unsweetened grated coconut – uh… yes! This granola is enhanced with a little exoticism 🤗🙈😝. Your flakes can be small or large (for a crispier texture).

    Ground flax seeds – this will feed you with the same nutritional strength as hemp seeds (so, your third dose of omega-3). Usually, I grind the flax seeds to keep them fresh, but you can buy them pre-ground if you want to save time or don't have a spice grinder or mini blender to reduce them that way. Once wet, the mucilage obtained will serve as a binder and contribute powerfully to the oatmeal agglomeration.

    Almond butter – another glue, in a way, to form small clumps. Peanut butter is also a good choice.

    Applesauce – this contains pectin and will perform the same function as the two ingredients above. On the positive side, this food is light, softening, and healthy.

    Vanilla extract – this granola might be straightforward, but it likes to be minimally flirtatious, all the same. It's good to perfume it.

    Seasonings

    Ground cinnamon – I endowed this unassuming thing with a little spice.

    How to Make Simple Granola Step by Step

    Montage of three photos showing the process of making granola: combining ingredients, mixing, and spreading out on the baking sheet lined with parchment paper
    Making granola

    Normally, granola's basic formula is to combine the dry ingredients (oats, nuts, and/or seeds) with the wet ingredients (oil and/or liquid sweetener).

    Here I mixed everything, given the simplicity of the ingredients.

    1 / Combine all the ingredients.

    2 / Stir them well.

    3 / Spread out on a baking sheet

    4 / Bake in the oven.

    The Keys to Success: My Top Tips

    Depending on your tastes, you can play with the texture to obtain granola, either loose or clumpy. In this case, the steps and cooking method will differ.

    For loose granola...

    Combine the dry ingredients, then the wet ingredients together, and finally the dry and the wet; spread everything out on a baking sheet, bake in the oven, add the dried fruits at the end (because some pieces can be close to combustion).

    For clumpy granola...

    The order of the steps is a little different. Add the dried fruits at the start. Flax mucilage—the translucent, viscous gel resulting from pre-soaking whole or ground flax seeds in water should be stirred well. It will act like egg whites, the ultimate edible glue.

    So the gum is added so that the ingredients stick together.

    The granola is baked at a lower temperature (which helps ensure the dried fruit does not burn), then allowed to cool in the oven to clump and have a nice crispy finish.

    Do not stir the granola—or you do it very lightly—while it's cooking; otherwise, you will break up the clumps.

    No matter what texture you choose, place the baking sheet in the center of the oven.

    Also, I learned this super awesome tip from another food blogger. If you want to make sure that the middle of the granola mixture is golden brown and crisp without the edges burning, spread the mixture on the baking sheet with a big hole in the middle (make it look like a ginormous Cheerioh).

    Other variations

    Mix, spice up, and build your own granola using the ingredients you love and have on hand.

    Prepare a gourmet granola with...

    • Other nuts: almonds, pecans, or macadamia nuts;
    • Other dried fruits: figs, apricots, apples, bananas, mangoes, etc.;
    • Chocolate chips or cocoa nibs;
    • Other exotic spices: nutmeg, cardamom, star anise, ginger, etc.

    Make it nut-free if you are allergic to those.

    Add maple syrup, agave syrup, or molasses to soften it.

    Add canola, nut, coconut, or even olive oil for a more grassy taste.

    Serve this recipe with...

    Normally, we serve granola with dairy products, but not in our case! Here are some alternatives:

    • Almond, oat, or soy milk (politically correctly called a plant-based beverage). Not everyone likes soy beverage (🙋‍♀️), but it's worth selecting it for its high-protein content and added calcium and vitamins, especially vitamin D and B12.
    • Plant-based yogurt. You can make it with cashews, coconuts, soy, whatever rocks your boat.
    • Fresh fruits. Add sliced ​​fruit (apples, bananas, mangoes, etc.) or berries on top of it.

    Make this Cluster Granola Now

    When you're looking for a little crunchy bite, granola will make you happy.

    You can make it in different ways, but nutritionally-focused granola will only focus on the essential ingredients: those that are high in protein and omega-3 along with other thought out, essential nutrients.

    Plus, when it's unsweetened, it's easier to limit your sugar intake.

    Then, decide on your texture, loose or clumpy, mix your ingredients, put everything in the oven, and enjoy your cheerful breakfast accompanied by your dairy-substitute of your choice.

    You will see that simplicity also tastes very good.

    Super Simple Cluster Granola Recipe

    A bowl of granola on a white counter accompanied by a small bottle of soy beverage and a cup of tea
    Simple cluster granola

    Si tu essaies cette recette, je veux le savoir ! J'apprécie toujours tes commentaires. Laisse une note dans la fiche de recette juste en dessous et/ou un avis dans la section des commentaires plus bas sur la page. Tu peux également me suivre sur Pinterest, Facebook, ou alors Instagram. Inscris-toi à ma liste de diffusion aussi !

    A bowl of granola on a white counter accompanied by a small bottle of soy beverage and a cup of tea
    Print Recipe
    5 from 6 votes

    Cluster granola

    Obviously, you can use whatever nuts you like here — or whatever seeds, if you like.  This simple recipe consists of coarsely chopped walnuts with pumpkin seeds. That's the beauty of this granola. It doesn't have to be fancy to show off. For optimal nutrition, combine your nuts and seeds at the very end to keep them "raw."
    Prep Time10 minutes mins
    Cook Time25 minutes mins
    Course: Breakfast
    Cuisine: Vegan
    Keyword: apple sauce, coconut flakes, dried cranberries, flax seeds, hemp seeds, pumpkin seeds, raisins, rolled oats, walnuts
    Servings: 8
    Calories: 230kcal
    Author: Naïby

    Ingredients

    • 2 cups rolled oats
    • 2 tablespoons almond butter or peanut butter
    • ½ cup apple sauce
    • ½ teaspoon vanilla extract
    • ¼ teaspoon ground cinnamon
    • ¼ cup walnuts coarsely chopped
    • ¼ cup hemp seeds or chia seeds
    • 2 tablespoons flax seeds ground (flax meal)
    • 2 tablespoons pumpkin seeds
    • ¼ cup dried cranberries
    • ¼ cup raisins
    • 2 tablespoons coconut flakes unsweetened and grated
    Get Recipe Ingredients

    Instructions

    • Preheat the oven to 350 ° F/180 ° C.
    • In a large bowl, combine the oatmeal, almond butter, applesauce, vanilla, and cinnamon. Incorporate the rest of the ingredients.
    • On a baking sheet lined with parchment paper, spread the mixture evenly and bake in the oven center for 25 minutes, stirring very lightly.
    • Serve ½ cup of granola per person with a dairy substitute of your choice.

    Notes

    • For loose granola: combine the dry ingredients, then combine the wet ingredients, and finally combine dry and wet; spread everything out on a baking sheet, bake in the oven, add the dried fruits at the end (because some pieces can be close to combustion).
    • For cluster granola: add the dried fruit at the beginning. Stir the flax mucilage well, cook the granola at a lower temperature (which helps ensure that the dried fruits do not burn), and then let it cool in the oven off to allow it to have a crispy finish and clump together. Do not stir the granola — or do it very lightly — while it's cooking; otherwise, the clumps will break.
    • Place the baking sheet in the center of the oven for better cooking.
    • To make the middle of the granola mixture golden and crisp without the edges scorching, spread it out on the baking sheet with a hole in the middle.
    • STORAGE: This granola will keep for up to two weeks in an airtight container in the refrigerator. It can also be frozen.

    Nutrition

    Calories: 230kcal | Carbohydrates: 29g | Protein: 7g | Fat: 10g | Sodium: 3mg | Potassium: 252mg | Fiber: 5g | Sugar: 7g | Calcium: 56mg | Iron: 2mg

    Get Your Free Plant-Based Eating Toolkit and More

    Subscribe to my newsletter and unlock my plant-based course, nutrition charts, recipe secrets, and exclusive updates to prepare wholesome, varied & balanced meals effortlessly. All you need is a good appetite. Subscribe!

    Smiling girl with big afro sitting cross-legged on a sofa

    Hi there!

    I'm on a mission to help you get nutrient-dense, easy, and mouthwatering plan-based recipe ideas so you can feel stimulated, well-equipped, and confident to eat and cook better.

    Learn more about me →

    The Best Vegan Half-and-Half

    Dec 17, 2020 · 4 Comments

    Homemade vegan half-and-half in three small glass jars and in front of a small mason jar of coconut cream, all on a piece of jute

    Thicker than milk (plant-based) but less rich than cream (also plant-based-based), this dairy-free half-and-half (also called coffee creamer) is the real deal. It's exactly what you need to boost your preparations' smoothness. Add it to your soups, Alfredo sauce, whipping cream, ice cream…

    They will marry this sweet half without question. All the more as it can be prepared in about 5 minutes.

    Homemade vegan half-and-half in three small glass jars and in front of a small mason jar of coconut cream, all on a piece of jute
    Homemade half and half vegan vegetable cream is the best alternative if following a vegan diet.
    [feast_advanced_jump_to]

    Why This Recipe Rocks

    There are some ingredients that we never see or notice until they're brought to our attention. Sometimes they are completely forgotten.

    This was exactly the case with half-and-half. Since I don't take a morning cup of coffee, it's not something I'm familiar with.

    When I made my lentil cottage pie the last time, which has a filling made from mashed potatoes, the recipe I was inspired by called for this ingredient. Of course, I needed to find good non-dairy alternatives right away, the half-and-half cream being dairy-based.

    I stumbled upon a commercial almond-based product, but I was not satisfied with the final taste in my mashed potatoes. There was an almond aftertaste that bothered me. And so, I decided to take matters into my own hands and make a homemade half-and-half substitute recipe.

    And that was a good thing. I didn't regret it at all.

    Thanks to the coconut cream and cashew milk, I created a silky liquid that could be drunk well alone. Pure and light on the tongue, its richness is just perfect. The coconut flavor is imperceptible, and that of cashews only amplifies our pleasure.

    Hold me back, I have a jar left in the fridge, and I'm afraid its safety is threatened.

    What Goes in it?

    Ingredients for dairy-free half-and-half.
    When looking for vegan half-and-half substitutes, the best option is to mix a heavy cream substitute with another dairy-free creamer, such as a coconut creamer and cashew cream. 

    Ingredient Notes

    • Coconut Cream. Get yourself a product in the grocery store that contains only coconut and water.
    • Cashews. Mixed in water, you'll get cashew milk or cashew cream. This can be made separately and then added, or the cashews can be combined with other ingredients with water, and the cashew milk will be made automatically from the mixture.
    • Soy Lecithin. Thick and golden, this liquid consists of phospholipids extracted from soybean oil. It's used to emulsify or homogenize the fatty acids (in general, we put 1 teaspoon for 1 cup of the volume). Sunflower lecithin also works, but it will give a light nutty taste. This ingredient is completely optional.

    Simple Vegan Half-Half Substitutes

    • Play with non-dairy milks. Coconut milk acts as a good heavy cream substitute so I would stick with it. However, you could substitute cashew milk for any of your favorite dairy-free milk. Be it cashew milk for soy milk, rice milk, or oat milk. But you won't get the same smoothness. In this case, you will need to add a thickening agent like xanthan gum. (You might see some products use gellan gum or acacia gum.)

      The easiest way is to use non-dairy milks made from nuts, as they contain fat. The fatter they are, the more I like them. It can be:
      • Almond milk;
      • Macadamia milk (Ooh! That must be to die for);
      • Brazilian milk.

    How to Make this non-dairy creamer Step by Step

    This recipe begins by mixing the coconut cream, cashews and water in the blender ①. I optionally add soy lecithin ②. And either I keep it in a jar ③, without I use it in the desired recipes.

    Overhead view of white milk-like liquid in blender pot
    ①
    ②
    Non-dairy substitute for half-and-half being poured in a small glass jar.
    ③
    Plant-based cream isn't just for morning coffee.

    The Keys to Success: My Top Tips

    Creates a smooth cream: use a high-speed mixer for an ultra-silky texture. If you don't have this device, pass the liquid through a sieve.

    What is half and half cream? What is it made of?

    It's so simple! It is an American recipe made up of equal parts milk: half 35 % heavy cream and half whole milk. And wham! You have half and half! The texture is thicker than milk but less rich than cream. I'm not exactly talking about half pastry and half whipped cream, or capitol cream, but we're not far from it.

    The featured cream cannot be whipped, but it adds richness without being as heavy as cream on its own. It's the perfect environment.

    And the half-and-half plant-based cream? We will follow the same principle and look for a similar rich texture: one part non-dairy milk, one part coconut cream.

    On the other hand, it will consist of a blend of coconut cream and half non-dairy milk.

    Is Regular Half-and-Half Bad for You?

    Let's assume that creams contain a fair amount of fat. Understanding the preferences for fat in fluid milk can potentially inform your efforts to change your fat consumption habits or optimize consumer products. So let's examine its composition and manufacturing process.

    The composition

    Traditional half-and-half generally contains more fat than any type of cow's milk, with a fat content that usually varies between 10.5 and 18%, depending on its composition.

    If it's made from heavy cream, it will have 36% or more fat; made from light cream, it will have 17 to 30%.

    Despite the name, fat-free half-and-half still contains fat: about 1.4 grams of fat per 100 grams (3.4 ounces). This is made from skimmed milk, thickened with various additives, such as corn syrup.

    The result is a high carbohydrate product containing more sodium than any other regular milk or half-and-half product. (See this comparison table.)

    Low-fat Half-and-Half is made from milk and cream like most other products. It contains about a half to a third of the fat content compared to standard half-and-half products.

    In contrast, it will vary depending on the nuts used when made from canned coconut cream and plant-based milk. If you hope that it contains less fat, you'll be disappointed to know that its content is around 85%. 

    Nevertheless, the fats will be whole, healthy, and devoid of questionable additives.

    The manufacturing process

    Ultimately, this type of product is usually homogenized (i.e., insanely mixed). For physical stability purposes, it is a process by which fat molecules are pulverized and reduced into droplets, including caseins and some whey proteins at the interface thereof.

    Some believe that homogenization destroys nutrients and proteins and makes the fat—then healthy—rancid, and causes free radicals in the body.

    Others claim that "These nanoglobules of fat reduced to the state of microns pass directly into the lymph and then into the blood without being digested by the intestine which does not recognize them" and that this process, therefore, promotes the development of cholesterol and obesity problems. 

    True or not, homogenization remains controversial.

    Other Answers to Your Burning Questions

    Is heavy cream the same as half-and-half?

    No. Heavy cream is a thicker, richer cream that contains at least 36% dairy fat, which is almost double that of half-and-half.
    Half-and-half combined with butter can be a simple substitute for many recipes that call for heavy cream. You can also use it to replace heavy cream without adding butter in some recipes, such as sauces and soups.

    And what about light cream vs. half-and-half?

    There is even less difference between light cream and half-and-half than between heavy cream and half-and-half. In the United States, the Food and Drug Administration requires that products labeled as light cream contain between 18 and 30% dairy fat, which means it contains more fat than half-and-half but is not as rich and creamy as heavy cream.

    13 speedy and delicious ways to use coconut milk half-and-half (other than vegan coffee creamers)

    You may have a quantity of half-and-half left, and you may not know what to do with it other than thinking about vegan coffee creamer options. Before letting it spoil, here are some half-and-half recipe ideas (all plant-based):

    1. Mashed potatoes;
    2. A quiche filling;
    3. Soups, like my broccoli and pea soup;
    4. A white Alfredo-style pasta sauce;
    5. Baked goods, like bread or bread rolls;
    6. A smoothie;
    7. Drinks with chocolate milk or creamy milk;
    8. Cocktails;
    9. Pancakes, like my thin pancakes, waffles, or French toasts;
    10. Ice cream (make it vanilla or chocolate);
    11. Yogurt;
    12. Fudge;
    13. Eggnog.

    Now anytime, you see a recipe that uses half-and-half, you'll know what to do for dinner, soup, or dessert recipes that call for it.

    Try it in these recipes!

    • Piece of Cottage Pie style lentil pie in a small plate placed in front of a glass pan of the whole dish
      Heart-Warming Lentil Cottage Pie
    • Bright Broccoli and Pea Soup
    • Unforgettable Vegan Pancakes

    Make this Cream Now

    A recipe will call for half-and-half to moderately increase the dish's creaminess without achieving ostentatious richness one day or another.

    You'll then think about finding a good non-dairy substitute for half-and-half without animal products.

    You'll only have two options: buy a store-bought product or make your own cream.

    The first choice implies that you have unwanted elements, while the second choice allows you to control the composition and the manufacturing process. Here, coconut cream and cashew milk will replace cow's milk for your preparations.

    And you'll have a finish that won't disappoint you. Close to the real thing.

    So, are you ready to get started?

    Are you ready to raise the bar on your other recipes?

    They're just waiting to mingle with this silky texture until the last drop.

    If you try this recipe, I want to know about it! I always appreciate your feedback. Leave a star rating in the recipe card right below and/or a review in the comment section further down the page. You can also follow me on Pinterest, Facebook, or Instagram. Sign up for my email list, too!

    Homemade vegan half-and-half in three small glass jars and in front of a small mason jar of coconut cream, all on a piece of jute
    Print Recipe
    5 from 3 votes

    Vegan Half-and-Half

    This recipe is my half-and-half replica that you sometimes put in preparations that you want creamy without being too rich. It contains coconut cream and cashew milk and will serve you for many occasions. It is wonderful in mashed potatoes, soup, or happy concoctions.
    Prep Time5 minutes mins
    Total Time5 minutes mins
    Course: Staple
    Cuisine: Vegan
    Keyword: cashew nuts, coconut cream, half and half, soy lecithin
    Servings: 1 cup
    Calories: 396kcal
    Author: Naïby

    Ingredients

    • ½ cup full-fat coconut milk or coconut cream (Notes)
    • ½ cup water
    • ¼ cup cashew nuts ideally previously soaked 30 min before (Notes)
    • 1 teaspoon soy lecithin (Optional)
    US Customary - Metric
    Get Recipe Ingredients

    Instructions

    • Place all ingredients in a high-speed blender and blend until smooth.
    • Kept in a tight container in the refrigerator, this vegan half-and-half will keep for up to 5-7 days.

    Notes

    • Coconut cream: Depending on the brand, the cream may stubbornly stay separate from the milk. In this case, it does not matter. Make the recipe with the aqueous liquid.
    • Soaking cashew nuts: this process makes them. It is not an obligatory passage, but ideal.
     

    Variants

    Make it with ½ cup Almond milk, Macadamia milk, or Brazil nut milk.

    Nutrition

    Serving: 1cup | Calories: 396kcal | Carbohydrates: 10g | Protein: 4g | Fat: 43g | Saturated Fat: 37g | Sodium: 11mg | Potassium: 390mg | Fiber: 4g | Sugar: 1g | Vitamin C: 3mg | Calcium: 17mg | Iron: 3mg

    Get Your Free Plant-Based Eating Toolkit and More

    Subscribe to my newsletter and unlock my plant-based course, nutrition charts, recipe secrets, and exclusive updates to prepare wholesome, varied & balanced meals effortlessly. All you need is a good appetite. Subscribe!

    Smiling girl with big afro sitting cross-legged on a sofa

    Hi there!

    I'm on a mission to help you get nutrient-dense, easy, and mouthwatering plan-based recipe ideas so you can feel stimulated, well-equipped, and confident to eat and cook better.

    Learn more about me →

    Heart-Warming Lentil Cottage Pie

    Dec 13, 2020 · 30 Comments

    Piece of Cottage Pie style lentil pie in a small plate placed in front of a glass pan of the whole dish

    Whether you call it shepherd's pie or cottage pie, this pie is heart-warming! Intensely flavorful, this creamy potato filling is sure to put a smile on your face.

    While this dish is traditionally made with meat, the lentils will be just as delicious in this recipe. This timeless classic, now veganized, will hit the mark! You'll do it again and again.

    Piece of Cottage Pie style lentil pie in a small plate placed in front of a glass pan of the whole dish
    Lentil Cottage Pie
    [feast_advanced_jump_to]

    The Best Lentil Pie

    Unlike Cottage Pie or Shepherd's Pie, this lentil pie doesn't have a particular name or mysterious history. However, it's profoundly tasty, and it has nothing to envy to his meat counterpart.

    Especially since it's high in protein.

    It's not difficult to make this dish. Of course, there are a few steps to take, but you can prepare it in several stages. In short, you make the lentils mixture, then the mashed potatoes, you assemble everything in a baking dish, and you put it in the oven.

    I find the easiest way to prepare this dish is to get started in advance. So you can cook either the lentil mixture, the mashed potatoes, or the whole thing earlier.

    In the third case, cover the dish and keep it in the fridge until you're ready to cook it. The taste will be just as divine.

    When I tasted it, I was floored. The mashed potatoes, velvety and buttery, enveloped my tongue pleasantly, and when my teeth split the first layer, the smell of lentils streamed to my nostrils. Their meaty texture made me moan with pleasure so much that my eyes slowly grew heavy. 

    Fortunately, I had a bit of strength in my neck. Otherwise, I'd have been found face first in the dish's white cottony cushion.

    What unspeakable and memorable comfort!

    What Goes in this Vegan Cottage Pie?

    Ingredients for Cottage Pie (clockwise): frozen corn, peas, vegetable broth, green lentils, garlic, oil, fresh rosemary and fresh thyme herbs, soy lecithin, tomato paste, vegan Worcestershire sauce, half-and-half cream, carrots, potatoes, red onion, vegan butter, oat flour, salt, and pepper

    Main ingredients

    Potatoes cut into cubes on a cutting board
    Russet potatoes
    • Russet potatoes - These have white flesh and are high in starches. If you can't find any, you can replace them with Yukon or yellow-fleshed potatoes.
    • Lentils - They can be green or brown. As a source of protein, they will replace minced meat. Soak them the night before in salted water if you want to make them more digestible.
    • Carrots - I took the usual orange carrots. But don't hesitate to use other colors for variation.
    • Fresh or frozen corn kernels - You can make this dish without corn, but you would remove the dish's sweetness spikes.
    • Fresh or frozen peas - You can also make a cottage pie without peas. But it's worth keeping them to boost your protein intake.

    Shortcut! You can buy a bag of frozen mixed vegetables to speed up your preparation. However, you won't have the delicious concentrated taste of the sautéed carrots.

    • Oat flour - Normally, flour is used to thicken the sauce that results from the meat preparation. However, in our case, we'll do it to tighten and slightly thicken the softened lentils from the previous cooking. You can get it by just grinding oat flakes in a spice mill. For a gluten-free recipe, select a product without it. If you don't have any, we'll follow the original recipe and use all-purpose flour.
    • Concentrated vegetable broth - This will give a depth of flavor and amplify the umami of the lentils. Choose it in liquid form, powder (put 1 teaspoon of powder in a cup of water), or cubes (put 1 cube in 1 cup of water).
    • Plant-based half-and-half - Usually, this ingredient is made from whole milk and cream in equal proportions, hence its name. To make it vegan, we'll simply mix coconut cream and plant-based milk. 

    Here, I opted for cashew milk for its high-fat content, which increases the mash's creaminess. If you prefer convenience, you can get a store-bought product. However, keep in mind that if it contains almonds, it will carry that taste to the potatoes.

    Optional ingredients

    • Soy Lecithin - In the traditional dish, we put an egg yolk to produce a very creamy consistency. I thought about replacing it with soy lecithin. Thick and golden, this liquid consists of phospholipids extracted from soybean oil. 

    It's used to emulsify or homogenize the fats and recreate the same result as the egg yolk (usually 1 teaspoon per 1 cup of the volume). As the heading indicates, this ingredient is completely optional. The mashed potatoes will also be creamy without (but a little less).

    • Mashed potatoes in saucepan with golden thick liquid squirted on
      Before
    • Close-up view of mashed potatoes looking uber creamy on a potato masher
      After
    Before and after adding the soy lecithin, which is optional by the waySide-by-side pictures of the mashed potato with the soy lecithin squirted into a saucepan and the smooth mashed potato

    Seasonings

    • Red onion - This variety of onions gives more flavor, and its red color indicates its richness in nutrients, hence my favorite onion.
    • Garlic - It will enhance the taste of the lentils.
    • Tomato Paste - This ingredient adds a bit of acidity and another dimension of umami.
    • Vegan Worcestershire Sauce - This condiment brings umami. To my surprise, I found a vegan version at the local grocery store, i.e., without anchovies. This is essentially composed of various acidic sauces with soy sauce, molasses, agave nectar, and a mix of spices.
    • Herbs - Rosemary and thyme are fresh.
    • Salt and pepper - I used kosher salt and freshly ground pepper.

    How to Make this Lentil Pie Step by Step

    Don't be intimidated by the ingredients. Like I said earlier, you can get started in advance. You can cook the lentil mixture one day, then the mashed potatoes another day. There's also the plant-based cream called half-and-half, which you can also prepare earlier if you want to make it from scratch rather than get the store-bought product.

    Of course, it's possible to cook everything on the same day. You just need to be well organized and prepare for the downtime. When you're ready, assemble everything in a baking dish and put it in the oven.

    This recipe begins by simultaneously cooking the lentils and the previously diced potatoes ②. Once the two ingredients are cooked, I filter the water. I put the lentils aside and take care of the potatoes, that I mash ③ and I wet with the butter and cream, the seasonings, and optionally the soy lecithin ④.

    You can get started in advance. You can cook the lentil mixture one day, then the mashed potatoes another day.

    I then move on to my vegetables, that I sauté in a skillet ⑤. I combine the lentils, seasonings, and flour ⑥ and continue with the tomato paste, broth, Worcestershire sauce, and fresh herbs ⑦. I finish with the corn kernels and the peas.

    Finally, I transfer the lentil mixture to a baking dish, cover it with the garnish, and put the dish in the oven ⑧.

    4-photo collage showing how to cook the lentils and the mashed potatoes.
    Lentil Cottage Pie in a glass baking dish
    Look at that! Scrumptious vegan cottage/shepherd's pie

    The Keys to Success: My Top Tips

    Cool the lentil filling before covering it with the potato: it thickens, makes it easier to spread the mash on top, and prevents it from flowing into it.

    Make sure you have very creamy mashed potatoes: a very firm, dry mash is not really pleasant. When the puree is smooth, it's easier to spread and gives a better palatable experience. When you break up the mash, you want it to collapse rather than cut it cleanly like a cake.

    Choose the right baking dish: the size of it will determine the thickness of the fillings. It's recommended to take a baking dish measuring 11 in x 7 in (or 27.94 x 17.78 cm) for this recipe. You can probably exceed these dimensions by 1 in (2 cm), but not more than that. 

    Don't cook your dish too early: I find it best to cook it within 3 days of preparation.

    When you're ready to cook it, take it out of the fridge for about 20 minutes before cooking to let it come to room temperature. Uncover it and bake it.

    Other Variations

    There are several variations of this comforting dish. Prepare :

    • A lentil shepherd's pie, spreading puréed corn on the lentils layer;
    • A lentil Hachis Parmentier (French take), removing the vegetables from the lentils, replacing the tomato paste with fresh tomatoes, and sprinkling grated vegan cheese on top.

    Serve this Recipe with

    When it comes to choosing sides, try roasted carrots or maybe sautéed garlic spinach. Afterward, enjoy your dish with a good glass of red wine in a warm place.

    Answers to Your Burning Questions

    What is a Cottage Pie or a Shepherd's Pie?

    In short, it's a dish of British origin consisting of a meat pie with a mashed potatoes crust.

    What's the difference between Cottage Pie and Shepherd's Pie?

    First of all, the name Cottage Pie was first used at the end of the 18th century. Around this time, Britain's poorest people—those who lived in country cottages—began to use potatoes as their daily food.
    Basically, a pie made with any kind of meat and mashed potatoes is called Cottage Pie.
    But if it's made with lamb, it's usually called Shepherd's Pie (because a shepherd takes care of the sheep).

    Is Cottage Pie good for you?

    Homemade cottage pie certainly is. And the vegan version will be too, if not more. While most Cottage/Shepherd's Pie recipes contain quite a bit of saturated fat from animal sources (cream, butter, meat), this recipe has very little.
     
    Here, the fats come from whole plant-based sources, such as cashews and coconut. Plus, many recipes add white flour to potatoes, while oat flour substitutes for it, making it gluten-free.

    Finally, it contains lentils, which can help lower cholesterol and are particularly useful in managing blood sugar disorders. Their high fiber content prevents blood sugar from rising quickly after a meal. 
    They also provide good to excellent amounts of seven essential minerals—our B vitamins and protein, all without virtually any fat. The calorie value of all that nutrition? Only 230 calories for a whole cup of cooked lentils. This tiny nutrition giant has you covered.

    Make this Lentil Pie Now

    When you crave classic comfort food that's tasty and meaty, cook a lentil pie reminiscent of cottage pie or shepherd's pie.

    Hearty, this tourte is an excellent recipe to stock up on vegetables.

    The preparation has several steps, but don't be intimidated by it. In reality, you only have four to six to go through: cooking the lentils and the potatoes (simultaneous or separate; that's two steps), their respective mixing (that's two), the assembly (ridiculously simple), and baking (here you can start sipping your glass of wine).

    You'll see, even with lentils, nothing else can dethrone this dish.

    It'll stay at the top of the most comforting dishes there is.

    Piece of lentil cottage pie in a small plate placed in front of a glass pan of the entire dish
    Lentil Cottage Pie inspired by Alton Brown of the Food Network

    If you try this recipe, I want to know about it! I always appreciate your feedback. Leave a star rating in the recipe card right below and/or a review in the comment section further down the page. You can also follow me on Pinterest, Facebook, or Instagram. Sign up for my email list, too!

    Piece of Cottage Pie style lentil pie in a small plate placed in front of a glass pan of the whole dish
    Print Recipe
    5 from 23 votes

    Lentil Cottage Pie

    This lentil cottage pie is a rich dish, buttery and creamy on the top and super tasty on the bottom. The mashed potatoes are thus spread on a layer of lentils mixed with vegetables. The flavor of the lentils is deep and complex. Best served while still hot, this vegan cottage pie is also utterly delicious the next day—it's the ultimate cold-weather comfort food.
    Prep Time15 minutes mins
    Cook Time1 hour hr 15 minutes mins
    Resting Time15 minutes mins
    Total Time1 hour hr 45 minutes mins
    Course: Main
    Cuisine: American, Canadian
    Diet: Vegan
    Keyword: corn, lentils, soy lecithin, vegan butter, vegan Worcestershire sauce
    Servings: 6
    Calories: 600kcal
    Author: Naïby

    Ingredients

    For the potatoes:

    • 2 pounds Russet potatoes (about 900 g) (Notes)
    • ¼ cup plant-based half-and-half (Notes)
    • 2 ounces vegan unsalted butter (about ¼ cup)
    • ¼ teaspoon kosher salt
    • ¼ teaspoon black pepper freshly ground
    • 1 teaspoon soy lecithin (Optional)

    For the filling

    • 1 ½ cup lentils
    • 2 tablespoons olive oil
    • 1 cup red onion chopped
    • 2 carrots peeled and diced (Notes)
    • 2 cloves garlic minced
    • ½ teaspoon black pepper freshly ground
    • 2 tablespoons oat flour or all-purpose flour
    • 2 teaspoons tomato paste
    • 1 cup vegetable broth concentrate (Notes)
    • 1 teaspoon vegan Worcestershire sauce
    • 2 teaspoons rosemary leaves fresh, chopped
    • 1 teaspoon thyme leaves fresh, chopped
    • ½ cup corn kernels fresh or frozen
    • ½ cup peas fresh or frozen
    Get Recipe Ingredients

    Instructions

    • Cook the lentils in a pot of salted boiling water (they should be covered with 1 ¼ inch / 3 cm of water) 20 to 30 min, or until tender. Drain the lentils in a colander and set aside.
    • Meanwhile, peel the potatoes and dice them about ½ inch (7 mm). Place in a medium saucepan and cover with cold water. Put on high heat, cover, and bring to a boil. When boiled, uncover, reduce heat to maintain a boil, and cook until tender and easily crushed with tongs, about 10 to 15 minutes.
    • Place half-and-half and butter in a small saucepan or microwave-safe container and heat until heated through, about 1 min on the stovetop or 35 seconds in the microwave. Drain the potatoes in a colander and return them to the pot. Mash the potatoes, then add the half-and-half, butter, salt, and pepper and continue mashing until smooth. Optionally stir in soy lecithin until well combined.
    • Preheat the oven to 400 ° F/200 ° C.
    • Prepare the filling. Place olive oil in a 12-in (30 cm) sauté pan and set over medium-high heat. Once the oil is sparkling, add the onion and carrots and sauté until they begin to take color, about 3 to 4 minutes. Add the garlic and stir to combine. Add the lentils, a pinch of salt, and black pepper and cook for about 3 minutes. Sprinkle the lentils with flour and toss to coat evenly, continuing to cook for another minute. Add the tomato paste, vegetable broth, Worcestershire, rosemary, thyme, and stir to combine. Bring to a boil, reduce heat to low, cover and simmer slowly 5 to 6 minutes or until the sauce thickens slightly.
    • Add the corn and peas to the lentil mixture and divide evenly in an 11 x 7-inch (27.94 x 17.78 cm) glass baking dish. Top with the mashed potatoes, starting at the edges to create a seal to prevent the mixture from bubbling and smooth with a rubber spatula. Place a sprig of rosemary on top. Place on a half baking sheet lined with parchment paper on the middle rack of the oven and bake for 25 minutes or until the potatoes begin to brown. Let sit on a cooling rack for at least 15 minutes before serving.
    • Kept in an airtight container, this pie will keep for up to 5 days in the refrigerator and can be frozen.

    Notes

    • Lentils: if you do decide to soak the lentils in salted water the day before, do not add salt to the boiling water.
    • Vegetables: you could put 4 cups of mixed frozen vegetables, including corn and peas to save time. 
    • Vegetable Broth Concentrate: Take it in liquid form, powder (put 1 teaspoon of powder in a cup of water), or in cubes (put 1 cube in 1 cup of water).
    • Cool the lentil filling before covering it with the potato: it thickens, makes it easier to spread the mash on top, and prevents it from flowing into it;
    • Ensure you have very creamy mashed potatoes: a very firm, dry mash is not really pleasant. When the puree is smooth, it is easier to spread and gives a better taste experience. When you break the mash, you want it to collapse to the limit, rather than being able to cut it cleanly like a cake.
    • Don't cook your dish too early: I find it best to cook it within 3 days of preparation. When you're ready to cook it, take it out of the fridge for about 20 minutes before cooking to let it come to room temperature. Uncover it and bake it.

    Nutrition

    Calories: 600kcal | Carbohydrates: 77g | Protein: 20g | Fat: 25g | Saturated Fat: 3g | Polyunsaturated Fat: 3g | Monounsaturated Fat: 8g | Trans Fat: 1g | Sodium: 6924mg | Potassium: 1325mg | Fiber: 20g | Sugar: 10g | Vitamin A: 3585IU | Vitamin C: 21mg | Calcium: 72mg | Iron: 6mg

    Get Your Free Plant-Based Eating Toolkit and More

    Subscribe to my newsletter and unlock my plant-based course, nutrition charts, recipe secrets, and exclusive updates to prepare wholesome, varied & balanced meals effortlessly. All you need is a good appetite. Subscribe!

    Smiling girl with big afro sitting cross-legged on a sofa

    Hi there!

    I'm on a mission to help you get nutrient-dense, easy, and mouthwatering plan-based recipe ideas so you can feel stimulated, well-equipped, and confident to eat and cook better.

    Learn more about me →

    Bright Broccoli and Pea Soup

    Dec 4, 2020 · 15 Comments

    Basic, maybe; tasty, absolutely. Making this vegan broccoli and pea soup is quite quick and easy. You put everything in a saucepan, and you blend it all to get something velvety. This soup is perfect as a side dish or for those evenings when you want to cook instantly and healthily.

    Two bowls of green soup garnished with white cream in a spiral, parsley and lemon zest and placed diagonally
    Broccoli and pea soup
    [feast_advanced_jump_to]

    The Perfect Instant Meal

    I can always count on green peas whenever I let myself fall into the arms of laziness. And it's funny, it always happens to me during my Sunday evenings. Fortunately, these tiny green protein pearls have the advantage of being cooked in a jiffy and fraternizing with any green vegetable that is on the verge of wilting or looks pitiful in the back of your fridge.

    Therefore, peas can form the basis of a wonderful empty-your-fridge recipe.

    This soup essentially has 4 elements: onions and garlic (allium vegetables), green vegetables, broth, and plant-based cream. The pan smells fantastic, very tasty, and fragrant. You blend the mixture and pour the liquid into the same saucepan. Just before serving, you add lemon zest to this bright green concoction, and voila!

    You get a soup with a sweet and bright taste and a light, rich texture, soothing in some parts and striking in others.

    What Goes in it?

    This super simple and quick meal contains just three main ingredients with four basic seasonings.

    Ingredients spread out on a surface for broccoli and pea soup
    Broccoli and pea soup needs essentially 10 ingredients.

    Notes on a few ingredients

    • Broccoli – the fresher, the better, but don't be afraid to use broccoli that's about to wilt. Frozen broccoli will do too. I did this soup with only the broccoli florets, but you can also keep the broccoli stems.
    • Green peas – frozen peas were used for this recipe.
    • Cashew nuts – to provide greater nutritional density, I decided to take natural cashews and make a plant-based cream rather than going with a store-bought product. To obtain a light cream, blend 1 part of these nuts—ideally soaked beforehand 30 minutes earlier to make them more digestible—in 2 parts of water. 

    For example, you put ½ cup of cashew nuts in 2 cups of water. This provides more smoothness, but any plant-based cream will do. If you can't find one like this, replace that ingredient with any plant-based milk. Your soup will be a little thinner, but that's okay.

    • Vegetable broth concentrate – you can choose a vegetable broth in liquid, powder (1-2 tablespoons per cup of water), paste (same), or cube (1 cube or 1 ½ per cup of water).
    • Miso – it's a traditional thick paste from Japan. It's made from the fermentation of chickpeas, rice, barley, soybeans, or adzuki beans (darker color). Light (with a milder flavor) or dark (with a stronger flavor) miso is often used to enhance soups and sauces' taste.

    How to Make Broccoli and Pea Soup Step by Step

    This broccoli and pea soup starts with soaking cashews in water for 30 minutes to cream from scratch. The nuts will later be placed in the blender to make a cashew nut cream. But this happens while judiciously simmering the soup (see below).

    So, I soften the onion and garlic over medium heat ①, then add the broccoli florets ② and broth ③. At this point, you can discard the broccoli stalks or thinly slice them and add them. Then, I incorporate the frozen green peas and let everything simmer ④ (this is when I take care of finishing the coconut cream 👆).

    $-photo collage showing how to make broccoli and pea soup.

    I go on to blend the concoction of broccoli and peas in a high-speed blender, return it to the pan and stir with most of the cashew cream added.

    Broccoli and pea soup in the saucepan.

    I divide the soup into bowls and finish by combining the cream, seasoning with pepper, and garnishing with chopped parsley, lemon zest, and cream.

    The Keys to Success: My Top Tips

    Is your soup too salty?

    Option # 1: dilute it by adding more unseasoned ingredients. This will increase the total volume of the concoction. Starches (rice or potatoes) and fats (olive oil, cashew cream, coconut cream) are particularly useful in these circumstances. Otherwise, more simply, add water or unsalted broth.

    Option # 2: If you think you have more food than you want for the desired meal, divide the soup in half and only dilute the part you think you can eat when diluted. You can refrigerate or freeze the rest until you can dilute it in turn or use it otherwise.

    Option # 3: balance the flavors with a little acidity (lemon juice or vinegar) or fat.

    Is your soup too thin?

    Add more body with broccoli or peas. Their fiber content will muscle your soup.

    How to Serve It

    Going back to the solutions for over-salting, you could take a quantity of the soup and make a sauce to cover cereals or pseudo-cereals, like rice or quinoa.

    Otherwise, coat them on pasta as I have for my High-Protein Parpadelle-Style Pasta and Zucchini, if ever.

    As a garnish, you could sprinkle your soup with toasted pumpkin seeds or grated vegan Parmesan cheese.

    Answers to Your Burning Questions

    Is broccoli and pea soup good for you?

    It couldn't be any healthier. This soup is made with a superfood—broccoli, a member of the cruciferous family. This food has been recognized as having anticancer effects.

    That's because these vegetables contain several nutrients and phytochemicals with cancer-preventive properties, including folate, fiber, carotenoids, and chlorophyll. Several studies have previously reported that daily consumption of cruciferous vegetables helps prevent this degenerative disease.

    As for the peas, according to Web MD :

    [They] are a good source of vitamins C and E, zinc, and other antioxidants that boost your immune system. Other nutrients, such as vitamins A and B and coumestrol, help reduce inflammation and the risk of chronic diseases, including diabetes, heart disease, and arthritis.

    Also, they are rich in fiber and protein.

    What's the difference between green peas and split peas?

    In fact, they are one and the same. In other words, you can make split peas with green or yellow peas. Both kinds come from the seeds Pisum Sativum.
     
    The difference between split peas and green peas is the way the peas are processed.
     
    To make a split pea, the green pea is peeled and dried. The skin is removed, and a natural division occurs in the cotyledon. The latter can be further exaggerated manually or mechanically.

    Can you make pea soup with canned peas?

    From a nutritional standpoint, the canning process is designed to preserve as many nutrients as possible. This maneuver takes place a few hours after picking the fruits and vegetables.
     
    The downside is that the heat of this manipulation decreases some of the water-soluble vitamins, like vitamins B and C. And, of course, the cooking that occurs during this process changes the texture of the vegetables. And to add insult to injury, the salt and sugar added in the process deplete canned foods nutritionally.
     
    Anyway, if you can avoid it, do it and use fresh, or even frozen, foods at best. Recent nationwide testing shows that many canned foods still contain chemicals, such as BPA, linked to cancer and birth defects.

    Can you make pea soup without a blender?

    Why the hell would you try to do this without it? But if you have the misfortune of not owning one or have no choice but to dig the grave for your broken appliance, your best bet would be to use a food processor.
     
    And if you don't have a food processor, you could go at it with a fine-mesh sieve or an old-fashioned potato masher. This should mash them well enough for the soup. And if you don't have these kitchen utensils, you have to go back to your ancestor's days: cook the peas longer. They will decompose and soften on their own.

    Other Recipes with Peas

    Other inspirations in my sights include:

    • Green pea and spinach soup
    • Pea and coconut milk soup
    • High-Protein Pappardelle-Style Pasta and Zucchini

    You could also make this soup with yellow peas or split peas; in this case, you will have to soak them to soften them before cooking them.

    Make this Dish Now

    When laziness, a lack of time or ideas take hold of a quiet evening, a broccoli pea soup is a perfect standby, especially if the peas are fresh or frozen.

    In 30 minutes, you will have a radiant green cream, nutritious, lively, and rich. Plus it's high in protein and gluten-free. So, follow the steps mentioned above and blend away happily.

    Your taste buds will thank you for this light and protein meal.

    Two bowls of green soup garnished with white cream in a spiral, parsley and lemon zest and placed diagonally
    Broccoli and pea soup

    If you try this recipe, I want to know about it! I always appreciate your feedback. Leave a star rating in the recipe card right below and/or a review in the comment section further down the page. You can also follow me on Pinterest, Facebook, or Instagram. Sign up for my email list, too!

    Print Recipe
    5 from 12 votes

    Broccoli and Pea Soup

    I like this soup with cream on top, but you could also use plain vegan yogurt; it is also terrific. If you are using plant-based soy yogurt, keep in mind that it contains less fat than cashew cream or coconut-based cream. So you will probably need to add a little olive oil. Don't overlook the lemon zest as a finish. It magically invigorates the soup. And put in small doses so as not to completely change the taste of the soup.
    Prep Time5 minutes mins
    Cook Time30 minutes mins
    Course: Soup
    Cuisine: American, Canadian
    Keyword: vegetable broth, broccoli, cashew cream, soups, soups and stews
    Servings: 4
    Calories: 295kcal
    Author: Naïby

    Ingredients

    • ½ cup cashews divided (Notes)
    • 1 onion chopped
    • 2-3 large cloves garlic chopped (about 2 tbsp)
    • 2 medium broccoli cut into florets (about 3 cups) (Notes)
    • 2 cups peas frozen
    • 4 ½ cups vegetable stock (powder, paste, or cube) (Notes)
    • 2 tablespoons miso light (Optional)
    • Salt to taste
    • Pepper to taste
    • parsley chopped, to serve
    • Zest of 1 lemon to serve
    • Cashew nut cream or vegan sour cream to serve (Optional)
    Get Recipe Ingredients

    Instructions

    • Soak the cashews in water for 30 min.
    • Heat 1 tablespoon of olive oil in a large pot, add the onion and garlic, and cook, 3 to 5 minutes, or until softened. Add the broccoli and broth and bring to a boil. Reduce the heat and simmer for 30 minutes. Add the frozen green peas and cook until softened, about 2 minutes.
    • Let the soup cool slightly. In the meantime, discard the cashew soaking water and rinse them. Place them in a high-speed blender, add a cup of water and blend until smooth and creamy. Reserve ¼ cup for garnish and keep the rest in the pot.
    • Now transfer the container from the pot to the blender and blend until smooth. Return the soup to the pot and add the milk of your choice. Season with salt and pepper. Garnish with chopped parsley, lemon zest, and cream.

    Notes

    About the cashew nuts: if you'd prefer to skip making cashew cream, get a store-bought cashew cream or milk.
    Broccoli: You can discard the broccoli stems or cut them finely and add them. 
    Vegetable stock concentrate options:
    • Powdered form: use 1-2 tablespoons, or to taste
    • Cube form: use 1-2 cubes, or to taste
    About the miso: if you can't find any, add two more tablespoons, or to taste, of vegetable stock powder or cube.
    Is your soup too salty?
    1. Dilute it with starchy foods (rice or potato) or fat (olive oil, cashew cream, coconut cream) or add water or unsalted broth.
    2. Divide it in half and dilute only the portion to be consumed.
    3. Balance the flavors with a little acidity (lemon juice or vinegar) or fat.
    Is your soup too thin? Add more body with broccoli or peas. Their fiber content will muscle your soup.

    Nutrition

    Calories: 295kcal | Carbohydrates: 44g | Protein: 17g | Fat: 9g | Saturated Fat: 2g | Polyunsaturated Fat: 2g | Monounsaturated Fat: 4g | Sodium: 1482mg | Potassium: 1308mg | Fiber: 13g | Sugar: 14g | Vitamin A: 3020IU | Vitamin C: 303mg | Calcium: 181mg | Iron: 5mg

    Get Your Free Plant-Based Eating Toolkit and More

    Subscribe to my newsletter and unlock my plant-based course, nutrition charts, recipe secrets, and exclusive updates to prepare wholesome, varied & balanced meals effortlessly. All you need is a good appetite. Subscribe!

    Smiling girl with big afro sitting cross-legged on a sofa

    Hi there!

    I'm on a mission to help you get nutrient-dense, easy, and mouthwatering plant-based recipe ideas so you can feel stimulated, well-equipped, and confident to eat and cook better.

    Learn more about me →

    Melissa Clark's Creamy Corn Pasta {Vegan Version}

    Nov 10, 2020 · Leave a Comment

    Creamy corn fusilli with green onions and basil in a cast-iron pan on a wooden board and other decorative items

    Gluten-free and high-protein, here's how to concoct a nourishing pasta dish with an ultra-creamy white sauce without being based on dairy products. 

    The secret? A corn-based sauce. Flavors of Parmesan and lemon are added for the finish to make this dish the most comforting! 

    Creamy corn fusilli with green onions and basil in a cast-iron skillet on a wooden board and other decorative items
    Vegan Cream Corn Pasta
    [feast_advanced_jump_to]

    Why this Creamy Corn Pasta Recipe Works so Well

    The original recipe comes from Melissa Clark. However, I made a few changes to give it more interesting nutritionally and convert it to a vegan version (can we say veganize it?). 

    My gluten-free, high-protein version is perhaps as divine as the original recipe.

    To veganize it, I replaced the Parmesan cheese with a plant-based cheese to preserve, if you will, the same delusional satisfaction. You could omit this ingredient, but you would miss all the umaminess so characteristic of the Parmesan taste. Let's be honest: for many, it's hard to let go of cheese, the addiction being so strong. So, is it so bad not to want to completely destroy the dream of savoring it?

    Honestly, this might be the best pasta I've made in a long, long time. 

    The sauce is like a lemony alfredo. The lemon juice, drizzled at the end, brings out that extra, subtle flavor that complements this dish. The overall effect is creamy but not at all heavy. It's lively where your tongue touches a basil leaf, salty where it touches small pieces of Parmesan. The chili flakes provide a kind of heat that makes your lips tingle as you scratch your bowl.

    Everything is simply divine.

    What's in it?

    Use the freshest ingredients possible for extraordinary flavor.

    Overhead view of the ingredients for making the creamy corn pasta lying on a wooden board (clockwise): pepper on green onions, fresh basil, three corn on the cob, potted chili flakes , vegan parmesan cheese in a metal plate, bottle of extra virgin olive oil, piece of butter on a small pale green plate, dry fusilli with two halves of lemons in an enamel plate
    Ingredients for making the creamy corn pasta (in clockwise): pepper, green onions, fresh basil, corn on the cob, chili flakes, vegan parmesan, extra-virgin olive, non-dairy butter, bean pasta (fusilli), lemon

    Main ingredients

    • Bean pasta – The original recipe calls for farfalle or orecchiette. To make it more nutritious, I opted for bean pasta, fusilli made from chickpeas. You can use any other small form of bean pasta available on the market (rotini, penne, rigatoni, shells, etc.). Here in North America, the Explore, Tolerant, and Banza brands offer these products.
    • Green Onions – I find green they provide a sweet flavor and contrast in color.
    • Corn – Fresh corn cobs were used in their entirety, both the kernels and the ears. While this dish is best made during the corn season's height, it remains quite tasty even when it's out of season supermarket cobs or frozen corn.
    Three peeled corn cobs resting on rustic wooden boards
    Fresh corn cobs

    Tip! When the time comes to shell the corn, hold it upright in a plate with the edges so that you don't end up with kernels all over the place (you'll see what I'm talking about later).

    • Unsalted non-dairy butter – There are several types on the market. Many rely on Earth Balance to mimic the taste and texture of butter. However, other brands compete with this one. I just recently discovered the Miyoko's Creamery brand, and this is what I used. Moreover, unlike the popular brand, this one doesn't use palm oil, responsible for deforestation, destruction of animal habitats, and potentially climate change.
    • Grated vegan Parmesan – I rarely use store-bought products, but I relaxed to achieve the desired effect. Nafsika's Garden products, a Canadian brand, were springing up like mushrooms in grocery store fridges. So, I tried this brand out, and I was frankly delighted.
    • Lemon juice – This is added for the finish, and it invigorates the flavors.

    Seasonings

    • Basil – Fresh basil for garnish. You can also use shredded mint.
    • Chili flakes – It adds a little heat, but you don't have to add some, especially if you're serving this dish to children. This ingredient can easily be replaced with black pepper.
    • Salt and pepper

    How to Make it Step by Step

    • Right hand holding a corn corb vertically and left hand holding a vegetable knife at the tip of the ear
      1a
    • Right hand holding a corn cob vertically and left hand shelling the corn with a vegetable knife
      1b
    • Overhead view of corn on the cob in a pot full of water
      2
    • Overhead view of corn kernels mixed with chopped green onions in a frying pan
      3
    • Overhead view of puréed corn in a pot of a blender
      4
    • Overhead view of corn kernels sautéing in butter in a skillet
      5
    • Overhead view of corn kernels mixed with puréed corn in a frying pan
      6
    • Overhead view of corn kernels, puréed corn, chopped green onions, and fusilli in a frying pan
      7
    • Close-up shot of a wooden spoon lifting up creamy corn fusilli
      8
    • Creamy corn fusilli with green onions and basil in a cast-iron pan on a wooden board and other decorative items
      9
    Process for making creamy corn pasta

    1a and 1b / Cut off the corn on the cob.

    2 / Cook the pasta in salted corn water for up to 1 minute before being al dente.

    3 / Sauté the white parts of the green onions and almost all the corn kernels in a little cooking water.

    4 / Season and purée everything.

    5 / Cook the reserved corn kernels in non-dairy butter.

    6 / Pour in the corn puree.

    7 / Add the pasta and half of the cooking water reserved for the pasta.

    8 / Incorporate the green part of the green onions, the Parmesan, the herbs, and the spices. 

    9 / Drizzle with fresh lemon juice to taste and garnish with more green onions, herbs, a drizzle of olive oil, and black pepper.

    My Top Tips : The Keys to Success

    Intensify the corn flavor 

    At the suggestion of an internet user, I cooked the pasta in corn broth to intensify the corn flavor. To do this, the ears of corn were cooked in water for about ten or fifteen minutes. 

    Add more crunch to the bite

    The original recipe calls for two ears of corn, from which one should reserve a quarter cup of corn kernels for sprinkling at the end. For more crunch, I added an extra ear and reserved double the kernels from the original recipe. 

    Make this Dish Now

    This dish is a celebration of lemons, cream, and cheese with pasta. 

    It's heartwarming and incredibly delicious. You will be surprised at the creaminess of the sauce. 

    So, take advantage of the crisp flavors that fresh ingredients can bring to you, follow the demonstrated steps, and indulge in this nutritious pasta and dairy-free white sauce.

    Creamy corn fusilli with green onions and basil in a cast-iron pan on a wooden board and other decorative items
    Creamy corn pasta. Adapted from Melissa Clark of the New York Times
    Close-up shot of a wooden spoon lifting up creamy corn fusilli
    Print Recipe
    5 from 2 votes

    Melissa Clark's Creamy Corn Pasta {Vegan Version}

    The original version of this recipe called for orecchiette or farfalle, but these have been replaced by fusilli-shaped bean pasta to increase nutrient density and eliminate gluten. You can use any other small form of bean pasta available on the market (rotini, penne, rigatoni, shells, etc.). Corn and basil from the farmer's market are great for this creamy dish, but frozen corn will do too. If you're worried about the amount of heat, consider starting with a little less chili than requested or simply omit this ingredient – especially if you're making this dish for kids. They'll love it a lot more without it, and you will whichever it's prepared. I guarantee it.
    Prep Time10 minutes mins
    Cook Time20 minutes mins
    Course: Main
    Cuisine: American, Canadian
    Keyword: bean pasta, corn, green onions, vegan parmesan
    Servings: 4
    Calories: 788kcal
    Author: Naïby

    Ingredients

    • sea salt fine
    • 1 ½ packages bean pasta (about 12 oz/340 g)
    • 1 tablespoon olive oil more for drizzling
    • 2 garlic cloves crushed
    • 1 bunch green onions trimmed and thinly sliced ​​(keep the whites and greens separated) (about 8)
    • 3 large ears corn peeled and kernels removed (3 cups of kernels)
    • ½ teaspoon ground black pepper more for serving
    • 3 tablespoons non-dairy butter unsalted
    • ½ cup grated vegan Parmesan more to taste
    • ⅓ cup basil or mint, chopped, more for garnish
    • ¼ teaspoon chili flakes or to taste
    • lemon juice fresh, as needed
    Get Recipe Ingredients

    Instructions

    • Bring a large pot of well-salted water with the corn on the cob to a boil. Cook pasta for up to 1 minute before being al dente, according to package directions. Drain and reserve ½ cup of pasta water.
    • Meanwhile, heat oil in a large sauté pan over medium heat; add the garlic, green onion whites, and a pinch of salt and cook until tender, 3 minutes. Add ¼ cup of water and all but ½ cup of corn; simmer until corn is heated through and almost tender, 3 to 5 minutes. Add ¼ teaspoon of salt and ¼ teaspoon of pepper, transfer to a blender and puree until smooth, adding a little more water if necessary to achieve a thick but pourable texture.
    • Heat the same pan over high heat. Add the butter and let it melt. Add the rest of the reserved corn kernels and cook until tender, 1 to 2 minutes. (Kernels may burst; put a fine rack on top of the pan if you have one.) Add the corn mash and cook for 30 seconds to heat through and combine the flavors.
    • Reduce the heat to medium. Add the pasta and half of the cooking water reserved for the pasta, stirring to coat. Cook for 1 minute, then add a little more pasta cooking water if the mixture seems too thick. Stir in ¼ cup of the green onion greens, vegan Parmesan, herbs, red pepper flakes, ¼ teaspoon of salt, and ¼ teaspoon of pepper.
    • Sprinkle with fresh lemon juice to taste. Transfer to hot pasta bowls and garnish with more green onions, herbs, a drizzle of olive oil, and black pepper.

    Notes

    • Cooking the pasta in corn broth intensifies the corn flavor. 
    • Make sure to reserve a quarter cup of corn kernels for sprinkling at the end. 

    Nutrition

    Calories: 788kcal | Carbohydrates: 128g | Protein: 27g | Fat: 18g | Saturated Fat: 5g | Polyunsaturated Fat: 4g | Monounsaturated Fat: 8g | Trans Fat: 2g | Cholesterol: 9mg | Sodium: 283mg | Potassium: 426mg | Fiber: 6g | Sugar: 5g | Vitamin A: 303IU | Vitamin C: 2mg | Calcium: 196mg | Iron: 3mg

    Get Your Free Plant-Based Eating Toolkit and More

    Subscribe to my newsletter and unlock my plant-based course, nutrition charts, recipe secrets, and exclusive updates to prepare wholesome, varied & balanced meals effortlessly. All you need is a good appetite. Subscribe!

    Smiling girl with big afro sitting cross-legged on a sofa

    Hi there!

    I'm on a mission to help you get nutrient-dense, easy, and mouthwatering plant-based recipe ideas so you can feel stimulated, well-equipped, and confident to eat and cook better.

    Learn more about me →

    Scrape-the-Bowl Pappa Al Pomodoro

    Oct 27, 2020 · Leave a Comment

    Tomato and bread soup in a bowl on a wooden board

    Half-soup and half-sauce, pappa al pomodoro is little more than ripe tomatoes, olive oil, and stale bread. Think of this staple Tuscan dish as a warm salad with tomatoes and bread, or maybe a savory, ultra-sexy porridge oozing sensuality. These red fruits aren't shy to show you their best assets. Exhibitionists, they are!

    Top view of Pappa al pomodoro in a bowl
    Pappa al pomodoro with homemade bread
    [feast_advanced_jump_to]

    The Best Veggie Soup at the Cusp of Autumn

    When the last tomatoes of the season fall to the ground ripe, bumpy, and ugly, it's time to turn them into something savory.

    And at the cusp of autumn, pappa al pomodoro is perfect for a windy, gusty night. You won't have to feel bad about staying stuck at home, inhaling its heady aromas.

    If you can't do without bread, I'm sorry for you, you'll find that the best thing since sliced ​​bread is a piece of bread that is soft like a cushion in a bowl of tomato soup.

    I love this dish for its simplicity, as it has around five ingredients. Anyhow, I read somewhere that you shouldn't joke around with Italians and their traditional cuisine. They don't tolerate variations in the preparation of this soup. Variations like adding any non-Tuscan bread, any herbs other than sweet or Genoese basil, cheap olive oil, canned tomatoes, or any cheese.

    Hold up! We have a 100% vegetable dish here! 🙌

    Tuscan people, I understand y'all. It reminds me of my food fundamentalism way back when I was vigorously opposed to cooked food and called the ayatollah of food. I understand this rejection of modernity. I understand this plea of ​​strict compliance with the authentic recipe. This is why I will not tell you that I departed from the tradition by adding in my soup primo, fresh bread, and secondo, sourdough bread rather than Tuscan bread.

    No, you won't know this. Not even that it was scrape-the-bowl amazing.

    A Six-Ingredient Tuscan Soup

    Overhead view of the ingredients for the pappa al pomodoro (clockwise): tomatoes, garlic, red onions in a metal bowl with to their right a bottle of olive oil, a half of a loaf of bread , a pepper pot and a set of measuring spoons with powdered vegetable broth and salt
    Ingredients for the pappa al pomodoro (clockwise): tomatoes, garlic, red onions, olive oil, loaf of country bread, pepper, powdered vegetable broth, and salt

    Main ingredients

    • Tomatoes – I used heirloom beef heart tomatoes (real heart-shaped, i.e., with a baby belly button-like tip sticking out) bought at the farmers market. To make an authentic pappa al pomodoro, you need a particular variety of tomatoes, called pisanelli or costoluto fiorentino. Made from various heirloom Italian tomatoes, they have a distinct flattened shape and are heavily ribbed. 

    Obviously, it's not always easy to find this variety, even in Italy. In this case, you can use canned San Marzano tomatoes found in specialty grocery stores. They are considered the best of their kind in the world by many chefs. If you want to use fresh ones, Roma tomatoes are a good option. They come from a cross between a San Marzano and two other varieties of tomatoes.

    Warning! I don't know if this practice is common in North America, but there is a whole scandal of fake beef heart tomatoes in France. Nicely ribbed fakes are said to be sold under the name "beef heart-type tomato" and at a price 30% higher than regular tomatoes, on top of that! According to the National Association of Consumers and Users, the major brands are the instigators of misleading labeling to maintain confusion among consumers and take advantage of high prices.

    • Bread – The authentic recipe calls for stale bread, but I used fresh bread (shhh!). Dried bread works great here too. If we want to get closer to the authentic recipe, the latter is, in fact, better than stale bread (don't say that to the die-hard Italian cooks). 

      The difference between the two seems insignificant, but it may be helpful to know that staling and drying are two different processes, though often simultaneous. Staling refers to the recrystallization of starch from bread, while drying describes moisture loss through evaporation. Staling leads to a hard, firm bread, while drying (in the absence of staling) leads to a light, crunchy texture, like that of a fresh crouton.
    • Onions – They're not in the authentic recipe, but in this recipe to add sweetness and compensate for the tomatoes' natural acidity. I almost always use red onions in my recipes because their bright color is a testament to their antioxidant power.
    • Garlic – I use it to enhance the taste.
    • Olive oil – It should be extra-virgin and of good quality. And if we wanted to stick to the authentic recipe, Tuscan. Before serving the soup, pour the last raw drops, and you'll go to the next level!

    Seasonings

    • Basil – The best basil to use for this dish is Genoese or sweet basil; standard basil might taste too minty. Everything about this plant was used: the stem to enhance the taste and the leaves, of course.
    • Vegetable broth – As the tomatoes alone aren't juicy enough to bring you to the end result, you have to add a little more liquid to the pot to completely soften the bread. I used a vegetable broth for my extra liquid, which adds flavor (water + powder broth).
    • Salt – I used very little of it since the vegetable broth was sufficiently salty.

    How to Make it Step by Step

    For this dish, the goal is to completely reduce the bread to mush, with no crispness. Adding a liquid to the saucepan, such as vegetable broth, will help you achieve this. On the other hand, if you use already fresh bread rather than stale or dried out, you will be even closer to the finish line.

    • 1
      1
    • 2
      2
    • 3
      3
    • 4
      4
    Making pappa al pomodoro

    1 / Brown and sweat the onion and garlic.

    2 / Add the tomatoes, the reserved juice, and the basil stems to the onion and garlic mixture and simmer for 15 minutes.

    3 / Add the cut bread and the broth to the tomato mixture and simmer for about 40 minutes.

    4 / Season the soup with salt and pepper.

    My Top Tips for Having an Ultra Comforting Soup

    Choose top-notch ingredients

    Given its simple and few ingredients, they must be of high quality. Traditional pappa al pomodoro requires ripe tomatoes, unsalted country bread (Tuscan or otherwise), and the best extra-virgin olive oil.

    Don't use sweet, hard greenhouse tomatoes. At the beginning of September, farmers’ markets are full of wonderful fresh heirloom tomatoes. In the winter, I understand that it's difficult to find fresh tomatoes, so canned tomatoes of good quality will do. The addition of oven-roasted cherry tomatoes will perhaps improve the taste.

    Cook your "porridge" in the right pot

    Traditionally, pappa al pomodoro is cooked in a clay pot. In principle, clay cooking is a great choice for slow-simmered meals like soups, stews, legumes, among others. This cooking method is also a good, healthy solution to toxic non-stick cookware. If you don't have one—which I can well imagine—a large saucepan, a cast-iron Dutch-oven (this is what I used), or an enameled or earthenware casserole dish are also suitable options.

    What to serve it with?

    Whether served hot, warm, or chilled like a Spanish gazpacho, pappa al pomodoro is a versatile dish. It can be served as a main course or as a side dish with a green salad, other dishes of vegetables, or vegetable protein, such as a few green beans drizzled with lemon and olive oil. For a contrast of textures, add croutons.

    This soup is also a satisfying meal if you add a little vegetable protein, such as soft tofu (don't worry, your secret is safe with me).

    Everything You Need to Know about Pappa al Pomodoro

    What is pappa al pomodoro?

    Pappa al pomodoro is a traditionally made soup with ripe and tasty tomatoes, stale bread (ideally Tuscan and without salt), basil, and lots of extra-virgin olive oil.

    How do you say pappa al pomodoro in English?

    The Italian word pappa translates to porridge or baby food and pomodoro to tomatoes. So pappa al pomodoro literally means "tomato porridge."

    What's the origin of this dish?

    This frugal tomato soup is a dish from so-called "poor" cuisine(cucina povera). Of peasant origin, it is typically Tuscan, from the region of Siena.

    What is the history of this dish?

    It comes from the age when wasting a single piece of bread, even if it was stale, was a kind of blasphemy. In the 12th century, Pisa's rulers disagreed with Florence’s rulers and cut their supply lines from the coast. This made salt banned. The Florentines, unwilling to give in to the pressure, simply started baking their bread without salt. This is how Pana Toscano was born, Tuscan bread that was later added to tomato soup. This dish was widely popularized by the 1911 publication of Il Giornalino di Gian Burrasca and its television version, in which Rita Pavone sang the well-known song Viva la pappa col pomodoro.

    What are the best tomatoes for making pappa al pomodoro?

    The tastiest tomatoes will make this dish a hit. In Florence, the tomatoes used to make the sauce are called Pisanelli or Costoluti, but Roma tomatoes are a great substitution. Other heirloom varieties such as beef heart tomatoes are also very suitable.

    Can we prepare it with fresh bread?

    This soup is just as good made from fresh bread. The advantage is that fresh bread softens much faster, which speeds up the preparation of the soup. In this case, opt for country bread, sourdough if possible.

    Make This Soup Now

    The Italian word pappa may mean porridge or baby food, but this healthy, digestible, and tasty tomato soup can be eaten at any age.

    Thanks to amazing tomatoes, country bread, high-quality olive oil, and fresh basil, the flavor is anything but bland!

    Stick to the traditional recipe for an authentic Italian soup or modernize it a bit for even more comfort.

    And above all, let yourself be seduced by the best that seasonal tomatoes have to offer.

    Top view of pappa al pomodoro
    Adapted from Gourmet, February 1999

    If you try this recipe, I want to know about it! I always appreciate your feedback. Leave a star rating in the recipe card right below and/or a review in the comment section further down the page. You can also follow me on Pinterest, Facebook, or Instagram. Sign up for my email list, too!

    Tomato and bread soup in a bowl on a wooden board
    Print Recipe
    5 from 1 vote

    Pappa Al Pomodoro

    This warm, homemade soup makes a delicious main course, served with nothing more than a bright green salad or a few green beans drizzled with lemon and olive oil. But you can pass it off as a side dish. For those like me who don't like the hassle of preparing lunches for work, you'll be happy to find that leftovers—quickly reheated in the microwave or preheated to put in a Thermos—make very happy meals.
    Prep Time15 minutes mins
    Cook Time40 minutes mins
    Total Time55 minutes mins
    Course: Soup
    Cuisine: Italian
    Keyword: bread, tomatoes
    Servings: 4
    Calories: 319kcal
    Author: Naïby

    Ingredients

    • 1 medium onion
    • 3 cloves garlic
    • 3 tablespoons olive oil
    • 1 kg Italian tomatoes quartered and quartered or a 28-32-ounce can of organic tomatoes
    • 4 sprigs basil
    • ¼ loaf Italian bread rustic or country bread, stale or fresh, crust removed, and crumb cut into 2-in cubes (about 1 ½ cups)
    • 3 cups vegetable broth or 3 cups of water + 1 tablespoon/1 cube vegetable broth powder
    Get Recipe Ingredients

    Instructions

    • Finely chop the onion and mince the garlic. In a large 4-liter saucepan or casserole, heat oil over moderately high heat until heated through, but without smoking and sauté onion and garlic, stirring, until that they are softened. Stir the tomatoes and their juices into the onion mixture and simmer, stirring occasionally, for 10 to 15 minutes. Increase the heat and bring the mixture to a boil.
    • Select the leaves from the basil sprigs, set the leaves aside and add the stems to the tomato mixture. Cook the mixture long enough for the tomato to melt and break down a bit, about 5 to 10 minutes or until the tomato mixture turns the orange-red color characteristic of cooked tomatoes.
    • While the tomato mixture is simmering, discard the crust on bread and cut enough bread into 1 inch (2.5 cm) cubes to measure 2 cups.
    • Back to the tomato mixture, remove and discard the basil stalk. Using kitchen scissors, cut the basil leaves into coarse strips and add them to the casserole dish.
    • Add the bread and broth to the tomato mixture and simmer with a lid, stirring occasionally, until the bread has absorbed the liquid and the soup is thick, about 40 minutes. Season the soup with salt.
    • Remove the casserole dish from the heat and let it sit for about 15 minutes in a warm place, so that the bread can soften and absorb the liquid.
    • When ready to serve the pappa, stir it roughly to break the bread and taste it again. Adjust if necessary by stirring another drizzle of olive oil to enrich the finished dish. Serve hot with freshly ground black pepper.

    Notes

    Choose top-notch ingredients: 
    • Go for very ripe tomatoes, such as heirloom tomatoes such as heart beef or Roma. At worst, take some canned tomatoes, like San Marziano or good quality. Or add oven-roasted cherry tomatoes to regular canned tomatoes. As for the bread, select unsalted country bread (Tuscan or other) and the best extra-virgin olive oil.
    • As for the bread, select unsalted country bread (Tuscan or other) and the best extra virgin olive oil.
    Cook the porridge in the right pot: if possible, simmer the soup in an enameled cast-iron pot or in an earthenware pot for a most comforting dish.
    Counter acidity, if necessary: ​​add a pinch or two of sugar if the mixture is too acidic.
    Whether served hot, warm, or chilled like a Spanish gazpacho, pappa al pomodoro is a versatile dish. It can be served as a main course or as a side dish with a green salad, other dishes of vegetables or vegetable protein, such as a few green beans drizzled with lemon and olive oil. For a contrast of textures, add croutons (as in the photo). 

    Nutrition

    Calories: 319kcal | Carbohydrates: 30g | Protein: 5g | Fat: 21g | Saturated Fat: 7g | Polyunsaturated Fat: 3g | Monounsaturated Fat: 10g | Trans Fat: 1g | Sodium: 824mg | Potassium: 709mg | Fiber: 5g | Sugar: 18g | Vitamin A: 2564IU | Vitamin C: 37mg | Calcium: 39mg | Iron: 1mg

    Get Your Free Plant-Based Eating Toolkit and More

    Subscribe to my newsletter and unlock my plant-based course, nutrition charts, recipe secrets, and exclusive updates to prepare wholesome, varied & balanced meals effortlessly. All you need is a good appetite. Subscribe!

    Smiling girl with big afro sitting cross-legged on a sofa

    Hi there!

    I'm on a mission to help you get nutrient-dense, easy, and mouthwatering plant-based recipe ideas so you can feel stimulated, well-equipped, and confident to eat and cook better.

    Learn more about me →

    Simple Vegan Plum and Ginger Crumble

    Sep 17, 2020 · 16 Comments

    Prune crumble, slice taken off, with juices

    This plum crumble contains a whole combination of sensations: fruity and spicy, lumpy on the top, crunchy in some parts, chewy in others, soft where it meets the jam fruit underneath... And the plum topping is solidly puckery.

    Top view of plum crumble
    Plum Crumble
    [feast_advanced_jump_to]

    Why This Recipe Works

    Each season brings its share of fruits. Late summer calls for corn, peaches, tomatoes...

    At the moment, we're talking about plums. So what to do with them? A plum dessert, of course! So far, plum crumble has received my full attention. I'm more of a salty food kinda girl, but I was very fond of this delicacy.

    My recipe is the vegan version of Marian Burros's, cookbook author and food columnist for The New York Times, a position she has held since 1983. It's an excellent replica of the original recipe.

    I've now done it three times, and my guests have not been disappointed. The taste of the jammy plums doesn't seem to displease the palate of the rare people who are crazy about sour flavors.

    Honestly, if your dessert isn't all about whole foods, you can't say it's 100% healthy. I won't lie and tell you this one is. It still contains a lot of added sugar.

    On the other hand, I'll tell you that I strove to make it a little more nutritious. This is because it features whole wheat and almond flour instead of white flour, and coconut palm sugar instead of white sugar. Plums make up most of the dish anyway, so we're not going to feel too bad about swallowing all that sugar.

    This dessert is made in no time.

    What do We Put in it?

    To make a crumble without eggs, you will simply remove them. And to make a crumble without butter, we'll replace it with non-dairy butter.

    Plum and ginger crumble ingredients
    This ginger plum crumble needs essentially 11 ingredients

    Notes on a Few Ingredients

    Sometimes also called Empress plums, they are European-style (Prunica domestica), a small, dense egg-shaped fruit with blue or purple skin, a non-sticky stone (it separates easily from the flesh), and yellow flesh. It is this kind that we transform into prunes (dry plums).
    • Plums – I chose Italian plums over the Japanese variety as their dense texture is full of sweet, rich, and complex flavors.
    • Egg replacement – this is optional. The original recipe includes a beaten egg, and I wanted to reproduce the same effect by adding an ingredient, called Egg Replacer, mixed with a little water.
    • Non-dairy butter – I used the Earth's Balance brand (not my favorite choice, as it contains palm oil). Another choice would be Miyoko's Creamery Cultured Vegan—a Californian product whose flavor is also mind-blowing.
    • Coconut palm sugar – the original recipe called for white granulated sugar. Instead, I used this type of sugar—a direct replacement for the latter. Its dark brown color and caramel, nutty and earthy flavor have a taste impact, but it compliments the plums.

    Notes: This granulated, unrefined sweetener is considered "healthier" than white sugar. It is also considered to be "a little healthier" than cane sugar because the conversion process retains more nutrients, including a fiber called inulin, which slows the absorption of sugar into the bloodstream.

    This allows for a lower glycemic index compared to some other sugars. The calorie content is the same as that of granulated sugar, ie about 4 calories per gram.

    • Muscovado sugar – I used it to give a deeper flavor and complex, with hints of caramel and a slightly bitter aftertaste. It is artisanal, unrefined cane sugar that contains natural molasses. It has a rich brown color, a chewy texture and a caramel taste. It contains the same number of calories as regular sugar, but also provides traces of minerals like magnesium, potassium, calcium, and iron due to its molasses content.

    Notes: Why are these quotes around healthier or a little healthier? Let's be clear, NO SUGAR is better for your health than another. But even if you have to take a sugar drug, you might as well do it with a minimum of processing and trace elements.

    • Candied ginger – it brings a play of textures in the compote, a bit of resistance to the tooth.
    See the recipe card for the exact quantities.

    Simple substitutions and Add-ins

    • Make it cook faster – use white flour instead of whole wheat flour. It's widely used for crumble. But it is devoid of nutrients.
    • Make it gluten-free – use gluten-free flour or coconut flour and make a gluten-free plum crumble.
    • Egg replacement – you can also use cornstarch or potato starch. If you don't add it, it won't make much of a difference to the crumbled topping.
    • Non-dairy butter – if you can't find any of the aforementioned brands, use margarine. It also lends itself well.
    • Turn it into a plum crisp for breakfast (or not) – replace the flour with rolled oats et add nuts (come closer; I have another secret to share with you: you'll boost the nutritional density at the same time).

    How to Make this Dish Step by Step

    Before going into the pan, the plums are simply cut in half and pitted ①. They are then stirred with a very small amount of brown sugar, even smaller amounts of ground ginger and cinnamon, just enough flour to give their juice body. Then, they're lightly electrified by candied ginger. ②

    Then you turn the plums over to see their skin. ③ While their buttocks are up in the air, you mix together the ingredients for the crumb topping in another small mixing bowl ④.

    Photo collage of fours photos showing how to make plum crumble
    You can do these steps in advance, including making the crumble topping.

    The glorious texture of the crumble will result from this final step: you cover the fruit with the crumble topping, then pour a little melted non-dairy butter on top ⑤ (seems like a lot, but be strong, be strong) so that it binds the pieces of dough together ⑥, forming a craggy crust.

    Photo collage of fours photos showing how to make the plum crumble topping
    The crumble topping is reminiscent of streusel—a mixture of butter, fine flour and/or breadcrumbs and sugar that is sprinkled on certain pastries before baking them.

    All you need to do is put everything in the oven and cook until the topping turns light brown and pleasantly lumpy.

    Keys to Success : My Best Tips

    Thanks to my next tips, you'll avoid having a soft topping. You won't say that your crumble is too wet, powdery, or crumbly enough.

    Choose the appropriate size baking dish

    As with all crumble or cobbler-type desserts, everyone wants a bit of crunchy or crumbly topping with every bite of fruit filling. If you use a baking dish that's too deep, you're probably going to cook something that looks like a jar of fruit jam with a thin layer of crust on top.

    Once the topping is removed, you'll end up with a lot of syrupy fruit at the bottom of the baking dish. For pretty presentations, the right-sized baking dish will ensure a good serving of crispy topping with the fruit filling.

    Don't skimp on the butter (non-dairy, eh)

    Butter, which encourages both browning and crispness, is the magical ingredient for the perfect topping.

    If you don't add enough butter, it will be a dry, mealy mass. If you put in too much butter, it will become a mass without a fatty form.

    Some recipes will ask you to cut cold butter with your dry ingredients, resulting in pea-sized pieces sprinkled over the hot fruit filling. Other recipes will ask you to melt the butter, starting with a few tablespoons, and pouring it over the dry ingredients for the topping.

    If you feel your topping is still too dry and crumbly (even for a crumble), add a little more melted butter, a tablespoon at a time.

    Essential Equipment

    • Pairing knife or chef's knife
    • Mixing bowls
    • 9-inch pie pan, rectangular baking dish or 8-inch square baking dish.

    What to Serve this Dish with

    The crumble's craggy, crunchy topping makes a perfect bed for streams of slushy ice or poured heavy cream. So, serve it with a scoop of vegan ice cream or whipped coconut cream.

    Other Creative variations

    Give your plums other partners

    Add other fruits to make a plum crumble and:

    • Apples;
    • Peaches;
    • Rhubarb;
    • Berries (strawberries, blueberries, gooseberries, etc.);
    • Figs
    • Peaches, abricots, or nectarines;
    • Oranges.

    Present it to a Rated R audience

    Add alcohol and prepare un plum crumble with port or brandy.

    Add a je ne sais quoi for texture and taste

    There's nothing wrong with a simple topping of flour, butter, and sugar. But consider adding a few more elements to create a textural contrast with the pudding-like fruit filling.

    Add crunchy ingredients, like chopped nuts or healthy oats. For example, the recipe presented here is a crumble with almond flour.

    Also, don't be afraid to incorporate an unexpected but flattering spice or herb to take the taste up a notch, and a light coating of Demerara sugar (real raw sugar) adds a nice caramelized finish.

    Change the style

    Use the ingredients in this recipe to turn it into a plum crumble cake, pie, bars, or squares.

    Answers to Your Buring Questions

    What's a crumble?

    A crumble is a hearty dish of British origin, a kind of fruit pie made up of a stewed fruit layer in the bottom of a dish. The fruits are topped with a dough layer, a crumbly mixture of fat, flour, and sugar, hence its name. Indeed, it comes from the verb to crumble. The crumble is baked until the topping is crisp.

    What's crumble made of?

    Popular fruits used in crumbles include apple, blackberry, peach, rhubarb, gooseberry, and plum. The topping can also include oatmeal, ground almonds, or other nuts.

    How to store crumbles?

    For storage, let cool to room temperature, lightly place paper towels on top of the topping to absorb condensation. Cover the dish tightly with foil, plastic wrap, or a lid.

    To reheat, place leftovers in the oven at 350-355 °F for 15 minutes. Or, if the microwave doesn't scare you, you can put the single servings in for 30 to 40 seconds at a time until heated through.

    Do crumbles need to be refrigerated?

    It depends on their ingredients. Usually, crumbles containing cow's milk and eggs need to be refrigerated. If they don't include any of them, as in our case, they can be left at room temperature by covering it lightly.

    Can you freeze the crumble topping?

    Put the uncooked crumble in a covered dish and store it in the refrigerator for up to 24 hours before baking or in the freezer for up to three months. If you're cooking it right out of the freezer, bake it at 355°F (180°C) for 50 minutes or until the crumble topping is golden brown.

    Can you make plum crumble using frozen plums?

    Absolutely! You won't need to thaw them. But your crumble will cook longer.

    Make this Dish Now

    As autumn dawns, it's time to cook with plums. Create an ever so lightly nutritious crumble with a crumbled crust and a spicy plum jam.

    You'll only have to cut the plums in half, mix them with spices, and cover them mainly with flour and sugar. You'll then pour a stream of melted butter over the topping, which will merge it into a sweet and spicy cookie after baking.

    You'll obtain a topping reminiscent of streusel: formed bunches of dough sprinkled on the plums cut in half and sweet.

    By brandishing your spoon and adding a judicious scoop of ice cream or whipped cream for their softening powers, you will pierce the crumbly topping to find soft purple plums below, cooked into a jam, and sweet and sour pulp.

    Is your mouth watering yet? Your dessert spoons are waiting.

    Recipe adapted from Luisa Weiss from The Wednesday Chef who adapted it from Marian Burros.

    If you try this recipe, I want to know about it! I always appreciate your feedback. Leave a star rating in the recipe card right below and/or a review in the comment section further down the page. You can also follow me on Pinterest, Facebook, or Instagram. Sign up for my email list, too!

    Prune crumble, slice taken off, with juices
    Print Recipe
    4.82 from 11 votes

    Plum and Ginger Crumble

    Burros crumble is made with a layer of tangy plum jam covered with a lumpy crust that looks like a giant cookie, warm with cinnamon. The plums are simply cut in half, pitted, and mixed with spices and a little flour and sugar. The topping looks like a streusel—flour, sugar, baking powder, salt, "beaten egg"—scattered over the fruit. For the vegan version, I replaced the beaten egg with Egg Replacer. Its wonderful cookie-cake texture comes from the final step: before the pan goes into the oven, you'll pour melted butter on top. The butter binds the dough lumps together to form a craggy crust.
    Prep Time10 minutes mins
    Cook Time35 minutes mins
    Total Time45 minutes mins
    Course: Breakfast
    Cuisine: American, Canadian
    Diet: Vegan
    Keyword: candied ginger, crumble, almond flour, ginger, Italian prunes, Marian Burros, Muscovado, plums, coconut palm sugar
    Servings: 8
    Calories: 227kcal
    Author: Naïby

    Ingredients

    • 10-12 Italian plums halved and pitted
    • 2 tablespoon Muscovado sugar or other brown sugar
    • 1 ½ tablespoon plus ¾ cup whole wheat flour
    • ¼ cup almond flour (optional)
    • ¼ teaspoon plus ½ teaspoon ground cinnamon
    • ¼ teaspoon ground ginger
    • 2 tablespoon candied ginger finely chopped
    • ¾ cup coconut palm sugar
    • 1 teaspoon baking powder (Optional)
    • ½ teaspoon ground cinnamon
    • ¼ teaspoon salt
    • 1 teaspoon Egg Replacer by Ener-G plus 2 tablespoons water (Optional)
    • ½ cup non-dairy butter melted
    Get Recipe Ingredients

    Instructions

    • Heat the oven to 375 °F, with a rack in the center.

    Prepare the plums:

    • Place plums in a medium bowl.
    • In a small bowl, combine the brown sugar, 1 ½ tablespoon flour, ¼ teaspoon cinnamon, ground ginger, and candied ginger. Add to the plums and mix well. Arrange plums skin side up in an ungreased 23 cm (9 inches) deep pie plate.

    Make the crumble topping:

    • In a small bowl, combine coconut palm sugar, baking powder, remaining flour, cinnamon, and salt. Mix well. Optionally stir in the egg substitute with 2 tablespoons of water. Mix without destroying the tiny lumps formed. Sprinkle over the plums.

    Finish the crumble:

    • Drizzle butter evenly over breadcrumb mixture and cook for 30 to 35 minutes. The crumble is cooked when the top is golden, and the plums give way easily when pricked. Take out of the oven and let cool down.
    • Serve the crumble hot and if desired, with vegan ice cream or coconut whipped cream.
    • Tightly covered, this plum and ginger crumble will keep up to two days in the refrigerator or up to a month in the freezer. If reheating, bring to room temperature, then reheat to 350 degrees F.

    Notes

    Almond flour: it's added to create a contrast in flavor. It's optional. If you don't have one, replace it more wheat flour.

    Variations

    Plum Crumble with Oats (aka Plum Crisp): replace the flour with healthy oats. 
    Plum Crumble with another fruit: reduce the quantity of plums and add apples, pears, peaches, oranges, berries, etc.
    Plum Nut Crumble: add crunchy ingredients, like chopped nuts or healthy oats. For example, the recipe presented here is a crumble with almond flour.
    Spiced Plum Crumble: don't be afraid to incorporate an unexpected but flattering spice or herb to take the taste up a notch, and a light coating of Demerara sugar (real raw sugar) adds a nice caramelized finish.
     

    Nutrition

    Calories: 227kcal | Carbohydrates: 30g | Protein: 2g | Fat: 13g | Saturated Fat: 2g | Polyunsaturated Fat: 3g | Monounsaturated Fat: 5g | Trans Fat: 2g | Sodium: 244mg | Potassium: 143mg | Fiber: 2g | Sugar: 23g | Vitamin A: 286IU | Vitamin C: 8mg | Calcium: 47mg | Iron: 1mg

    Get Your Free Plant-Based Eating Toolkit and More

    Subscribe to my newsletter and unlock my plant-based course, nutrition charts, recipe secrets, and exclusive updates to prepare wholesome, varied & balanced meals effortlessly. All you need is a good appetite. Subscribe!

    Smiling girl with big afro sitting cross-legged on a sofa

    Hi there!

    I'm on a mission to help you get nutrient-dense, easy, and mouthwatering plant-based recipe ideas so you can feel stimulated, well-equipped, and confident to eat and cook better.

    Learn more about me →

    From Grief to Joy

    Sep 12, 2020 · 1 Comment

    People walking in a forest

    Here I am a week after Labor Day weekend, the holiday that hit us stealthily. For me, that moment has turned into a sort of celebration that evokes mixed feelings. Usually, this long holiday is the time to get a break from work and celebrate our accomplishments.

    It has recently become the moment when I commemorate my younger sister's death—the year 2020, being my first year.

    My heart was sinking in the ocean's depths, while its surface was lulling my body. I was so comfortable in this unbearable lightness that I wanted this feeling to last forever. That said, besides the opportunity to celebrate our hard work, another undeniable truth emerges after the long weekend: the end of summer is approaching.

    At the start of the summer, I knew for a fact that it would happen, but I refused to believe it that would scroll like a movie played at double speed.

    However, I cannot deny that culinary achievements have emerged during these few days of sweet laziness. 

    Indeed, exquisite meals resulted. 

    I had good excuses for cooking. A few tantalizing New York Times newsletters found their way into my inbox to inspire me with meal ideas featuring seasonal ingredients.

    I stayed home alone with my little one for one of the rare times, while Mr. Agréable had returned to his mother's side in Trois-Pistoles. In the end, his father's health was fleeting and seemed to be fading slowly. 

    But all is not doomed to gloom.

    On Friday, I received a duo of 9-year-old diners excited to see the biggest draw for two weeks: two 6 week old gray and black tabby kittens born in the countryside. We had brought two of them home to choose one after a few weeks of observation.

    Two tabby kittens
    Meet Gaia (female) in front and Ziggy (male) in the back

    Knowing that I'm not as entertaining as those furry little balls—and neither as entertaining as Mr. Agréable, an unequaled tongue-in-cheek, by the way—I tried to delight them with my cooked dishes. A thorny task, my friend. 

    But I had concocted a wise plan. As a woman alone at home, before accepting to venture onto the slippery slope of receiving three over-active kids, they were subjected to my kitchen dictates. They would come to my house only if they ate all my food—all of it!—without exhaling complaints. 

    Nothing is more disappointing than seeing children push away their barely eaten plate because of an onion slice, a green speck, or an imperceptible pepper dot. In my hyposensitive adult eyes, anyway. 

    My winning tactic was to make pasta. But not just any pasta. Pasta with a little twist: mashed corn as a creamy white sauce. I give myself a mark of 14/20 for this exploit. 

    Three and a half of five people loved the dish: starting with me, my son, and one of his friends. The half person comes from the fact that his other friend loved my dish until chili flakes betrayed him and turned him off. He was unable to get up from the table before fulfilling his contract. Dictatorship is wonderful.

    The other days turned out to be more graceful.

    Saturday, I made my first Pappa al Pomodoro (bread and tomato soup) ùwith Roma tomatoes. I let myself be carried away by this dish whose tomatoes' elemental flavor, now sweet and now tangy, was on point. Bright and fragrant, they were enriched with good fruity olive oil and soft, puffy bread (homemade, too). Note: I think heirloom tomatoes would have been a hit. 

    On Sunday, my little monster and I left town early to breathe the fresh air an hour and a half north of Montreal, in Saint-Donat—a comfortable program on a beautiful sunny day. 

    I left with the idea of ​​making plum crumble, something that had been running through my head for a few days. Indeed, I had seen these pretty dusty purple jewels appear on the stalls. I had spotted another type of plum, Italian plums, but I had taken local plums instead. I still had the regret to have brushed against the other kind and to have abandoned them in their square wooden bed.

    So that morning, before heading to the Laurentians, I stuffed the ingredients I needed in a bag, and I stopped at the neighborhood grocery store to pick up fifteen of those oblong Italian babies.

    Eager to taste these unusual plums, my little monster swallowed one on the way while we were traveling the roads with mountainous and green horizons. I, too, was tempted to savor one.

    But I tried to save the other fruits for the best part.

    We arrived shortly before noon. My hosts, Yolaine and Peter, were quick to treat us to sugar-free cranberry veggie cookies. They then took us to a lake two steps away from their chalet to enjoy the first part of the day. Along the way, we lost Peter, who had met a neighbor and stopped to exercise his excellent chattering skills. 

    The children bathed in the lake a bit, while we sat on a bench watching them, inhaling the fresh air and letting our hair dance in the wind. The late afternoon involved a little walk in the woods where we philosophized on sensible but challenging to apply ideal parenting theories while my son was practicing his photographer skills. 

    • People walking in a forest
    • The profile of a little boy blowing blue bubble gum
    • Mushrooms in the soil
    My little monster's photography

    As a parent, you would be acting as a guide, as a resource person to help your child, this new traveler lost in earthly space, unravel his emotions, and know himself well inside to develop his full potential. Deep understanding and adapting life lessons to the child's unique character traits would be the approach. But you should not forget your self-understanding and self-development—your daily challenges.

    This little intellectual stroll was rewarded with olive focaccia, patiently waiting for us on the kitchen counter. But before we sat down to the table, I got busy to make my crumble, while Peter had gone to stock up on other food. 

    The plums' bellies were ripped open, pitted, cut in half, and placed in a baking dish; they were stirred with a little flour and spices and covered with a thin white coating of flour, mixed with brown sugar, non-dairy butter, and spices.

    All that remained was to put everything in the oven except that...

    Failing to have any aluminum foil, I covered my dish with stove rings, then slipped it into the oven until we finished our meal. 

    Once again, I was dealing with hard-to-please children. My hosts' children had withdrawn from the table because, they told me, the crumble was not their cup of tea. 

    But luckily, I raised a gourmet. 

    He was waiting for this moment and was very happy to stuff himself with dessert. After almost 45 min, the crumble's sweet scent perfumed the kitchen to such an extent that Peter's hunger worsened. It was high time we put it into our mouths. I opened the oven, and the plum jam was bubbling in their juice and bursting from the heat. They were ready to be attacked by our forks.

    The topping was pale brown and pleasantly lumpy, crisp in some parts, chewy in others, soft where it meets the jammy fruit below. The plum filling was so solidly tart that it reminded me of the taste of lemon.

    I think that's why my little monster served himself with two significant portions. 

    In fact, we all followed suit. During our tasting, Peter told me about an effective person's organizational skills, which made me feel out of place. I could only wipe away this grievous awareness or reminder by dipping my spoon into a third portion.

    But all good things come to an end.

    Darkness had arrived, and the time had come for us to hit the road again. I got into my car, sad to see another day of the long weekend disappear, and drove through the night to Montreal.

    We arrived a little before midnight. After the obligatory nightly personal care, we threw ourselves into our beds, drunk with happiness and aware that we still had Monday left—that extra day to be happily unemployed and celebrate our achievements from the last three days all lightly.

    Smiling girl with big afro sitting cross-legged on a sofa

    Hi there!

    I'm on a mission to help you get nutrient-dense, easy, and mouthwatering plan-based recipe ideas so you can feel stimulated, well-equipped, and confident to eat and cook better.

    Learn more about me →

    High-Protein Pappardelle-Style Pasta and Zucchini

    Aug 30, 2020 · 2 Comments

    Overhead view of ribbon-shaped pasta with green peas and ricotta, topped in a green sauce

    Nutritious ingredients, a succulent sauce, a bit of adventure, and delicious pasta reminiscent of pappardelle. I'm sure you will languidly gobble them up. These high-protein pasta twist and intermingle with zucchini noodles cut into ribbons to celebrate the late summer harvest.

    Pappardelle-style pasta with peas and ricotta in a rustic bowl, gravy boat with green sauce, peas in a bowl, stacked plates, a bunch of basil, ricotta in a ramekin
    High-protein pasta and zucchini pappardelle style with green peas and macadamia ricotta
    [feast_advanced_jump_to]

    The Perfect Recipe for an Elegant Dinner

    I have a weakness for pretty things, and I fell in love with pappardelle the first time I saw it. There is no more elegant pasta than this. It's her look that attracted me so much.

    Indeed, its broad, flat, and wide shape give it an excellent surface on which a light sauce, or even rustic, can cling on. To avoid gluten and increase your protein intake, I chose pasta that deceptively mimics its ribbon shape and gives the same effect. (I'll give you the details later.)

    The noodles are topped with a green pea sauce, a sauce unlike anything I had tasted before: delicate but rich, earthy but somehow also ethereal.

    Lastly, just because it's light doesn't mean it won't make you delirious. I couldn't help but lick my fingers off the blender jar before pouring it over the pasta.

    Satiating and heartwarming, this Tuscan-inspired pasta cut is everything you could want from a meatless dish. It will elicit a lot of sighs and plate-scraping around your table.

    What Goes in High-Protein Pappardelle-Style Pasta?

    Ingredients spread out on a white plate (clockwise): overhead view of peas in a bowl, ricotta in a ramekin, a bunch of basil on top of the zucchini, a brown sauce in a mini Mason jar, ribbons of dry pasta in a metal plate, cloves of garlic.
    High-protein pasta ingredients (clockwise): peas, almond-macadamia ricotta, basil, zucchini, demi-glace, ribbons of artichoke-based pasta, water, garlic cloves

    Main ingredients

    • High-protein pasta – I used pasta-shaped ribbons made of artichoke. I agree that it's probably difficult to find this kind. So I offer you three options if you want to stay in the vegan realm: 
    1. Fettuccine made from legumes for the protein side, 
    2. High-protein lasagna that you will then have to cut in ribbons (good luck), or
    3. Real pappardelle with durum wheat and without eggs (more rustic and firmer than those including eggs).
    • Peas – fresh or frozen, any of them will do.
    • Zucchini – raw, they're added to bring some freshness.
    • Macadamia-almond ricotta – This dairy-free ricotta brings a little liveliness in terms of color and mouthfeel. It's good to concoct it beforehand. It'll take away some prep time. At worst, it's done relatively quickly and will add about ten to fifteen minutes to the total preparation time.

    Seasonings

    • Demi-glace – Traditionally, robust, meaty, and rich sauces usually pair well with pappardelle. So demi-glace serves this role very well if we continue in the same vein (remember we have fake pappardelle). If you don't have any, opt for a vegetable broth. It's also delicious.

    How to Make High-Protein Pappardelle-Style Pasta Step by Step

    • Overhead view of peas cooking in a saucepan
      1a
    • Overhead view of pasta cooking in a saucepan
      1b
    • Overhead view of peas, garlic cloves, and basil on the surface of vegetable broth in a blender
      2a
    • Overhead view of mashed peas in a blender
      2b
    • Overhead view of the sauce being poured in a saucepan
      3
    • Overhead view of ribbon-shaped pasta with green peas and ricotta, topped in a green sauce
      4
    Steps to prepare the dish

    1 / Cook the pasta and the peas.

    2 / Make the pea sauce.

    3 / Pour the sauce over the pasta.

    4 / Divide into bowls and add almond-macadamia ricotta and peas.

    Note: if the almond-macadamia ricotta is not already prepared, do so before starting the above steps.

    My Top Tips for Surefire Success

    Pappardelle-style pasta overflowing with a sieve with on their left a bunch of basil and on their right, peas in a bowl, ricotta in a ramekin, a green sauce in a gravy boat and zucchini finely cut into ribbons.
    Basil, cooked artichoke pasta, peas, almond-macadamia ricotta, pea sauce, zucchini pappardelle

    Start preparing the pea sauce before the pasta. The sauce will hold well while the pasta cooks. If you are using fresh peas, check them every minute or so throughout cooking; they can take anything from 4 minutes too much longer to become tender. It all depends on their age and size. If you are using frozen peas, they should be done in four to five minutes. 

    You can make a similar sauce with broad beans. There are more starchy than peas, so be prepared to add a little more demi-glace/water mixture or vegetable broth while mixing.

    What to Combine High-Protein Pasta with?

    Here are some ideas for high-protein pasta meals that you can make with:

    • Pesto and bruschetta
    • An Alfredo-type sauce
    • Kale
    • Portobello mushrooms

    Other High-Protein Alternatives to Ordinary Pasta

    I really try to find accessible ingredients for most of my recipes. Still, sometimes I admit, I want to venture out with unusual ingredients. But don't worry: I always keep in mind which replacement ingredient is accessible, though. The main idea here is to use high-protein pastes.

    May I remind you of the different substitution options:

    • Bean-based fettuccine: they are thinner, but you will still have a flat pasta effect. Choose those made with chickpeas or red lentils for a taste that evokes ordinary pasta.
    • Bean-based lasagna: I tried to cook the legumes to cut them afterward, but it was an impossible task. The pasta was so sticky that I would have had to separate it with a crowbar. The solution would be to cook a few of them a few inches apart in several saucepans at a time. But seriously, who has time for that?
    • If you don't care about the high-protein side, use pappardelle made from durum wheat, as mentioned above. Tagliatelle is the closest, but these contain eggs. It's up to you. I wouldn't hold it against you.

    Everything You Need to Know about High-Protein Pasta

    Dry pasta ribbons in a shallow metallic plate
    Asparagus pasta ribbons

    If you are a vegetarian or vegan, it's important to choose plant foods higher in protein, such as beans and legumes. And high-protein pasta offers many advantages over regular pasta.

    What is high-protein pasta?

    It's pasta that contains between 14g and 25g of protein per serving. How does it translate? Typically, it's recommended to consume 0.8g per kilogram of your body weight per day to meet your nutrient intake. If you weigh 60 kilos (132.2 lbs), theoretically, you should be consuming 48g of protein per day. Let's say they are divided evenly, that equals 12 g of protein per meal. Thus, even by consuming only bare naked pasta, you would meet your intake requirement without adding anything else!

    What is in high-protein pasta? 

    When it comes to the ingredients, there's pasta made from mung beans, soybeans, edamame, lentils (red, green, or black), chickpeas, among others.

    Is high-protein pasta better for you?

    There's nothing evil about eating regular pasta. And you don't have to give it up royally to be healthier except for the following reasons: 
    1) You have a gluten intolerance
    2) You are celiac, or 
    3) You nod off after consuming regular pasta. 
    In these cases, they are better for you. That said, I personally prefer them to regular pasta. They are low in calories, high in protein, and contain zero refined flour.

    Is it gluten-free?

    Yes! This is precisely another of their significant advantages. For this reason, high-protein pasta is an excellent choice for replacing regular pasta.

    How to cook high-protein pasta? 

    You cook them in boiling water for the time indicated on the package, about 8 to 12 minutes. After this, I advise you to rinse them under water after draining them as they are very starchy and tend to stick. Finally, you splash oil on them to really, really avoid that last fact.

    Where to buy high-protein pasta? 

    First of all, know that not all high-protein pasta is created equal. In my opinion, those made from chickpeas or lentils taste better or closer to typical pasta. You can find it in some healthy grocery stores or online. I was introduced to the brand Explore Cuisine, and this is what I use at the moment. Sometimes I buy Tolerant. A 200g box costs around $4 CDN at retailers with warehouse prices or close to $6 CDN elsewhere. I heard that the American brand Banza is excellent or if not the best, but I have never found it in my hometown.

    Make this Dish Now

    High-protein pasta gives you many benefits, as it's gluten-free, low in calories, and obviously high in protein. And besides, they have a sexy allure, with their pretty ribbons which meander in your dish in all directions. 

    Here you have the secret to a successful meal for an elegant evening.

    Suppose you already have vegetable ricotta made in advance. In that case, you really only need four main ingredients to make this dish: pasta, zucchini, peas, and an exuberant pea sauce. 

    So, embark on this adventure, and you will have a comforting dish in one fell swoop.

    Hurry!

    Pappardelle-style pasta with peas and ricotta in a rustic bowl, gravy boat with green sauce, peas in a bowl, stacked plates, a bunch of basil, ricotta in a ramekin
    High protein pasta and zucchini pappardelle style with green peas and macadamia ricotta. This recipe is inspired by Nigel Slater, in Greenfeast, spring, summer.

    If you try this recipe, I want to know about it! I always appreciate your feedback. Leave a star rating in the recipe card right below and/or a review in the comment section further down the page. You can also follow me on Pinterest, Facebook, or Instagram. Sign up for my email list, too!

    Overhead view of ribbon-shaped pasta with green peas and ricotta, topped in a green sauce
    Print Recipe
    5 from 1 vote

    Pappardelle-Style Pasta and Zucchini with Green Peas and Almond-Macadamia Ricotta

    I call for asparagus ribbons here, but you could really use any high-protein pasta that mimics pappardelle. I was inspired to use this style not only because I find it awfully pretty, but because its big, flat, wide shape makes a lovely surface for the light sauce to cling to. I could also envision using high-protein fettucine. But feel free to use the real thing (the durum kind). If eggs aren't an issue for you and can't find pappardelle anywhere (eggs or sans), tagliatelle is the closest substitution. I chose the Eden brand for this recipe, but Explore Cuisine is also a good one.
    And about the demi-glace: use vegetable broth if you don't have one handy. And homemade if you can. If you must use a store-bought broth or stock, be fussy and prefer an organic one. The canned or boxed stuff will be sub-par here; instead, ask if your local specialty store carries a good frozen or refrigerated stock. The better it is, the better your pea sauce will taste.
    Prep Time15 minutes mins
    Cook Time15 minutes mins
    Course: Main
    Cuisine: Italian
    Keyword: demi-glace, make-ahead, mushrooms, sauce, shiitake, zucchini
    Servings: 3
    Calories: 423kcal
    Author: Naïby

    Ingredients

    • 1 medium zucchini shaved into ribbons
    • 4 cups green peas fresh or frozen (about 300 g)
    • 1 package protein pasta in ribbons, fettuccine or pappardelle (about 200 g)
    • ¼ cup vegetable demi-glace or 2 ½ cups of vegetable broth (about 30g)
    • Kosher salt and pepper
    • 1 tablespoon basil
    • 1 cup almond-macadamia ricotta
    Get Recipe Ingredients

    Instructions

    • Using a swivel peeler, shave the zucchini into ribbons. Set aside.
    • Bring 2 ½ cups of water to a boil, then add the demi-glace. Otherwise, use vegetable broth. Keeping a handful of raw peas aside, cook the rest in the boiling liquid for 5 to 7 minutes, depending on their size.
    • While the peas cook, boil the pasta according to package directions in generously salted water. (For pappardelle, aim for seven to eight minutes.)
    • Place the peas and 150ml of their cooking water in a blender and mix until smooth, adding the basil and more broth if needed to produce a thin, flavorful sauce.
    • Drain the pasta, return to the pot and drizzle with a drizzle of oil to prevent them from sticking. Carefully incorporate the zucchini ribbons and stir gently as to not brake them apart.
    • Pour in three-quarters of the pea sauce and stir. Check the seasoning.
    • Divide between two or three soup plates and pour in the rest of the sauce. Break the ricotta into large chunks, sprinkle it over the pasta with the reserved raw peas (but thawed or slightly warmed), pepper, and serve.

    Notes

    Start preparing the pea sauce before the pasta. The sauce will hold well while the pasta cooks. If you are using fresh peas, check them every minute or so throughout cooking; they can take anything from 4 minutes too much longer to become tender. It all depends on their age and size. If you are using frozen peas, they should be done in four to five minutes.
    You can make a similar sauce with broad beans. There are more starchy than peas, so be prepared to add a little more demi-glace/water mixture or vegetable broth while mixing.

    Nutrition

    Calories: 423kcal | Carbohydrates: 41g | Protein: 24g | Fat: 20g | Saturated Fat: 1g | Polyunsaturated Fat: 1g | Monounsaturated Fat: 1g | Sodium: 404mg | Potassium: 474mg | Fiber: 14g | Sugar: 14g | Vitamin A: 1514IU | Vitamin C: 77mg | Calcium: 128mg | Iron: 5mg

    Get Your Free Plant-Based Eating Toolkit and More

    Subscribe to my newsletter and unlock my plant-based course, nutrition charts, recipe secrets, and exclusive updates to prepare wholesome, varied & balanced meals effortlessly. All you need is a good appetite. Subscribe!

    Smiling girl with big afro sitting cross-legged on a sofa

    Hi there!

    I'm on a mission to help you get nutrient-dense, easy, and mouthwatering plant-based recipe ideas so you can feel stimulated, well-equipped, and confident to eat and cook better.

    Learn more about me →

    A Trip to the Bas-Saint-Laurent (part 2)

    Aug 11, 2020 · Leave a Comment

    Landscape with threes and lake

    My week in the Bas-Saint-Laurent region was not just about flitting from one place to another and spending my time discovering the area. I had important things to do.

    Misty landscape with conifers

    My first mission, dear guest, was to give Mr. Agréable support, who was giving it to his parents. A worrying situation had arisen. Over the past month, my stepfather's cognitive state had dramatically deteriorated in an unexplained way. For a month, he had been fading at home.

    This expansive ninety-year-old, this man who could monopolize a conversation by spouting his prewar memories, political speeches, and so on, was now giving laconic answers, dozing in his chair all day and had lost his appetite. He had been suffering from Alzheimer's disease for ten years—fortunately, in a rather mild way—and now, we were wondering if his days were numbered.

    Michelle, an elegant woman with short hair and constantly red-painted nails, spent most of her days physically striving to help her husband, this tall man of six feet, to move around, dress, and bathe. She was busy changing the bedding due to nighttime accidents. She was saddened to feel lonely by the lack of lively exchanges.

    So she was impatient to see us.

    If it's true that Jim had weakened, I never ceased to admire the tenderness, the concern, the love, inexhaustible, that my mother-in-law squandered. When he had been dozing in his straw-yellow swivel chair for a long time, she would shout cutely at him: "Coucou!", and her husband's velvet eyes widened happily. Sometimes she would tell him that as she leaned in and gave him a loving kiss on the forehead. I could see his face light up, and his smile broadening instantly, as his trembling hands and slender fingers took her face.

    After 60 years of marriage, these two looked like lovebirds.  

    My second mission was intentional.

    It consisted of sliding my demi-glace sauce into any dish—or any dish—so I could taste the result of my labor of the week before. So, I brought one of my jars that I was planning to leave with my mother-in-law as soon as I finished my cooking experiences.

    Wait, I have to share something with you. I'm a firm believer in coincidence.

    A theme followed me throughout this stay. The mushroom theme. Mushrooms haunted me everywhere: in my dreams, in the only available vegan meal at the Mange-Grenouille inn in Bic, in my hike in the forest and other impromptu meals.

    Mushrooms growing on a tree trunk
    White mushrooms on a tree

    It was enough to make a girl believe she was madly being hunted down.

    Well, I ended up performing what the fungal spirits were blowing at me on the second night of my arrival.

    My shiitake mushroom demi-glace was impatient to stay in her little Mason jar and never missed a single opportunity to look me straight in the eye every time I opened the fridge door.

    That night, Michelle had made snow peas, which had been soaked in a pot of water for a few hours. Thanks to the provisions I had brought from home, I sautéed red peppers and onions in a pan, added the snow peas in the dance, and incorporated the brown gelatinous sauce. At the first drop, it sizzled on the black surface. When the vegetables were done sautéing, I transferred them to a round baking dish that I brought to the table among the plates.

    Despite the complexity of the situation, the meal went off with grace.

    Now we didn't want to be shamefully accused of parricide. So Mr. Agréable and I were sitting at the table's ends, opposite the elders, to respect social distancing just as we had done the day before. We started with rosé and Vichyssoise-style leek soup, but without cream and without chicken broth.

    Jim, haggard-eyed, was sitting in front of his plate and eating very slowly, and Michelle was delighted to finally see him eating more than usual. The conversations with him were quite mysterious.

    Sometimes he'd be asked about some memory, but he'd always respond by saying with his quavering voice, yes, sure that's it, that's what I probably said earlier. And when Mr. Agréable asked him:

    — So, dad, what was the best time of your life?

    He slowly lifted his head, looking at his son, and a long pause ensued.

    — It must have been when you were ambassador, right? He continued. Your meeting with Fidel Castro when we lived in Cuba must have been a highlight!

    But the ex-ambassador was walled up in silence, and it felt like his story had suddenly evaporated from his memory. After a few moments, he replied:

    — Well... I'll have to think about it.

    No matter the question requiring to fish out in the reminiscences of a distant past—even not too distant—Jim sheepishly gave a simple and sure answer and never said I do not remember.

    Mr. Agréable and Michelle let go, and in the end, only three of us were talking.

    The second topping of sauce was in sight.

    On the third night, lamb was offered for the omnivores with a green salad for everyone. I bypassed the meat meal by sautéing cubed tofu in a splash of oil, then, once golden, in tamari. Then came the demi-glace.

    To my expectation, the sauce crackled in the pan as soon as it came in; but to my surprise, mixed with the black sauce, the steam rose, bathing my face in a hot and intoxicating scent, then filling the air with heady smoke.

    Mr. Agréable used it to coat the cauliflower first steamed, then sautéed. The menu was complete.

    This time around, we weren't asking Jim questions that were too many compromising. If he was called upon, it was to keep his head above water like a person treading water in the middle of a vast ocean.

    While Jim had invisible blinders, I only had eyes for my tofu, of which the sauce was glistening on one of the square surfaces. I stuck my fork into the soft dice and stuffed a few pieces into my mouth. It was incredibly tender, with a meaty flavor tinged with salt. It was so uplifting that for a moment, I disappeared into the flavor.

    And so, at this very moment, I let go, and there's was only two of us talking.

    Now I was longing to put my sauce on something else, like a dog with its tongue hanging out waiting for the next dish.

    In fact, I had only one idea in mind. A single obsession that I needed to satisfy.

    I desperately wanted to coat the sauce on some pasta.

    Unfortunately, I couldn't satisfy my desire.

    After our three other days of excursion in the region, we returned last Friday to Trois-Pistoles to end our stay. So far, our only concern was to give Jim the necessary care.

    He had received an assessment from a nurse who strongly recommended that the family bring him to the emergency room as soon as possible for observation. This is what we ended up doing. You can quite understand that I didn't feel very creative.

    This is how my adventures in the Bas-Saint-Laurent region ended, dear guest. But if you ever decide to travel to the area, let yourself be tempted by the gourmet treasures at Bic (Chez Saint-Pierre) and Kamaouraska (Le Café du Clocher).

    We returned to Montreal last Sunday in stormy rains with the loot of our trip: sourdough bread and antique finds.

    We called Michelle when we got back, and Jim was still in the hospital.

    But she announced to us the good news. My stepfather had contracted a urinary tract infection, which put him in a state of delirium. It turns out that anything can upset the cognitive state of an elderly person with Alzheimer's. After the right medication, he would return to his normal state, we were reassured.

    A few days later, good old Jim had's talkative nature returned.

    Now I'm home and can happily focus on my next assignment.

    A Trip to The Bas-Saint-Laurent (part 1)

    Aug 8, 2020 · 4 Comments

    The view on the Saint-Laurent's River rockbed on misty day

    Oh Bas-Saint-Laurent, we seem to be playing the hard-to-get game, but I must admit, you ended up charming me all the same. We meet on the shore in Trois-Pistoles, and you offer me pure air, magnificent sunsets, and peace of mind.

    Sunset at Trois-Pistoles
    Sunset at Trois-Pistoles

    You waltz your waves on the rocks every four hours, and I watch them tenderly, knowing full well that swimming in your arctic waters would turn me into a stone statue. You always wait for me with infinite patience, even when I'm stuck in an absurdly long line of vehicles of several kilometers, extending from the Fromagerie des Basques on Notre-Dame-des-Neiges, at the Highway 20 exit.

    We arrived at my in-laws' chalet on a Saturday evening after a disorganized departure (on my part) and wandering strolls in Montreal. After seven years of regular visits, the cottage in Trois-Pistoles has become my place of soothing and healing, with its convex floor in the living room, its rooms merged into one (for example, a sink in the bedroom), and its straight view of the St. Lawrence River. We go there at least three times a year.

    Not long after our arrival, my in-laws, my darling, and I sat down with a convivial meal and a glass of rosé. (My little one is being taken care of by his father in Paris.) After a quiet evening, we went up to our room, got ready to sleep, and threw ourselves into our semblance of a king-size bed, two small beds pushed together like Siamese twins.

    But we sleep very well there.

    As I sleep upright, I never slump into the slot. And waking up in this bedroom is like feeling the soft caress of the hand of a tender and loving mother on the cheek. The light and brisk winds slip through the windows, brush our faces, and leave their scent of salty air in their path.

    We had moments of sunshine during the three days that we stayed there, but the sky clouded pretty quickly, and the rain then poured down on us. This prompted me to stuff myself with food literature on my new e-reader.

    Then, we went to the Auberge Mange-Grenouille in Bic village. The small white front door, reminding me of Alice in Wonderland, set the tone. Under the warm and subdued lights, we were welcomed in a warm atmosphere and a heterogeneous, burlesque, and theatrical decor. I felt like I was part of a 17th or 18th century still life canvas.

    On either side were the waiting rooms with sumptuous sofas. Each room contained an upright piano with all kinds of antique decorative objects on them: busts, old books, and small terracotta plant pots. In the left corner, khaki statues of a man dressed as a senior military officer and a woman in an evening gown stood in front of the wall painted with a greenish landscape. The place was filled with huge flowerpots and flowering branches. Next came two dining rooms, large rooms with solid wood tables and overstuffed chairs.

    The one at the back, surrounded by large windows, opened directly onto the picturesque garden and gave the impression of being in a treehouse perched high in communion with nature. In the corners, slender white birch trunks crossed the floor, and flowering branches hung from the ceiling. And to accentuate nature's expression, two java finches chirped in a cute little cage under gold-colored cherubs, which, tilted down, floated in the air with trumpets in their hands.

    Everything was so enchanting.

    And other things enchanted us even more.

    The next day, after burning two hours of energy and calories on the steeply climbing trails at Parc régional du Bic, we discovered two large, bright red containers that were serving street food.

    It was the Cantine côtière, Chez Saint-Pierre restaurant's new endeavor to adapt to the Covid-19 crisis's constraints. The co-founder Colombe St-Pierre is an award-wining chef who was named chef of the year at the last Gala des Lauriers de la gastronomie québécoise (2018).

    Mr. Agréable ordered a lobster roll with shrimp, a sort of club sandwich typically garnished with coleslaw, mayonnaise sauce, and seafood; his sandwich had a fennel salad instead. I opted for homemade fries and vegetable antipasti.

    At the inn, I went to pick up some kitchen accessories bought earlier in a shop, then we settled down in its garden to enjoy our meals.

    Garden at Mange-Grenouille
    Garden at Mange-Grenouille

    When Mr. Agréable unpacked his lunch, I was jealous to see his sandwich so beautifully presented: his hot-dog bun tainted in black ink was filled with a dripping pale green sauce, shrimp, fennel ribbons twisted like streamers, all topped with pink flower petals.

    But my choice did not disappoint.

    The tomatoes, almost whole, were tasty and perfectly caramelized. With each incision of my teeth on their fragile skin, their juices exploded up to my throat. The zucchini melted in my mouth. The fries had a rustic taste, and the accompanying ketchup sauce, amber-colored, was sweet on the tongue. The flavors were perfectly balanced. It was not too sweet, not too sour. Despite my humble choice of food, several moans ensued.

    After this two-day stay, we moved towards Kamouraska village. But first, we hunted for fresh strawberries and rarities in antique shops.

    And we had achieved our goals.

    We had a 1.5L cardboard basket of passionately red strawberries, transparent brown retro water glasses, and a few miscellaneous items for my photo ops.

    At Auberge Le 112, in Saint-André de Kamouraska, the welcome was not warm, compared to the previous inn. The hostess looked horrified by our early arrival and our basket of bloodthirsty strawberries, risking to soil the crisp white sheets in the room. We placed our provisions in a fridge, stashed in a room next to the dining room by her indication. Then, Mr. Agréable brazenly dropped his luggage in the lobby before leaving.

    Room at Auberge Le 112, in St-André de Kamouraska, with a wooden horse in the corner of the room under a stained glass window
    A room close to the lobby
    Auberge La 112, Saint-André-de-Kamouraska
    Auberge La 112, Saint-at Saint-André de Kamouraska

    Failing to find attractive restaurants, we headed to the heart of Kamouraska, which was buzzing with life. Like flairless and lost paparazzi, we tried to spot the home of a Quebec actor-slash-director. We had heard that he owned a home in the region. A salesperson in a boutique showcasing Quebec's crafts even boasted that it was at the main road's bend. We looked at one house perched on top of a hill and determined that it was it. (We later found out that he was wrong.)

    We then moved to the Café du Clocher. 

    Café du Clocher, Kamouraska
    The Café du Clocher, Kamouraska

    Sitting at the corner of a terrace to admire the coastline, we had a late lunch, each eating lentil soup, a veggie-pâté sandwich for me, and a lobster roll with crab this time for mister.

    It was pleasant and sunny, and after a while, we trotted over to the Niemand Bakery, where a line stretched down the entire alleyway of the Victorian house. We found Denise Pelletier, the baker, closing the gates and warning stray customers of the impending closure and assured unavailability of her famous multigrain bread within the next few days.

    Boulangerie Niemand, Kamouraska
    Boulangerie Niemand, Kamouraska

    Humans operate by imitation, so we joined the lineup. We tried to bribe the baker to give us her sourdough starter to reproduce at home. Despite her interest in my ethnic big teardrop earrings and consideration for a fruitful exchange, it wasn't enough to spellbind her.

    But what luck we had!

    She gave us the very last loaf of bread before she could make more two days later.

    We entered a last antique shop to complete our walk, where I bought an old flour sifter with a crank in a kind of metal cylinder. I was hanging out inside the store, hoping to find something unique, while Mr. Agréable was out faster than me.

    Aside from his lack of interest in the proposed products, he was outraged by the sight of a rococo lamp made up of a black man holding a lampshade like an umbrella. When I asked the salesman in all lightness, mischievous, what the lamp with a negro as a foot lamp was, he stammered, awkwardly groping the neighboring lamp—a kind of statue of liberty—while giving its specificities with its back turned.

    I pointed out the said lamp and inquired about its popularity. "This? Oh yes, it's very trendy, he stammered. People are snapping it up in online marketplaces and paying double the price." It was captivating.

    It's a shame that I missed taken a picture of it to show it to you. I later tried to find it on the internet, but I couldn't find any trace of this thing.

    In the car before heading to the inn, we took a bite of our gourmet treasure.

    My thumb pierced a crisp, solid surface and sank into a spongy and moist crumb so wet I was surprised. This triggered my libidinous impulses—the texture was so damp and enveloping. I carried a wildly ripped piece to my mouth, and the crumb tasted perfectly toasted, slightly tart, nutty, with complex and subtle aromas. The freshness of this bread was on point.

    And with good reason!

    Kneaded and shaped by hand, Boulangerie Niemand's bread is well baked in a deck oven. And the wheat or rye grains from the region are stone-ground in their mill.

    Our day ended with our return to the inn. The hostess accompanied us to our room, with a dissuasive and aloof attitude. Was it the fear of contracting the COVID?

    Anyway, the refined charm of the room's rustic-meets-modern interior design compensated for her questionable reception. A few water features, a black painted clawfoot tub with sparkling silver faucets and a white pedestal sink, stood against a wall opposite our sleek four-poster bed.

    • Room at the Auberge Le 112, Saint-André-de-Kamouraska
    Our room at the Auberge Le 112, Saint-André de Kamouraska

    After a delicious nap in our cozy bed, we walked through the inn's front yard under a now cloudy sky towards the central kitchen and had a modest but convenient supper of multigrain bread and strawberries. Then, we ended our evening with relaxing activities. I slipped into a bubble bath listening to Chill & Soul music on Spotify while Mr. Agréable feasted on a playful read.

    Shortly after, we had turned off the lights hoping for the following day in the Bas-Saint-Laurent to be even more charming.

    To be continued…

    Smiling girl with big afro sitting cross-legged on a sofa

    Hi there!

    I'm on a mission to help you get nutrient-dense, easy, and mouthwatering plan-based recipe ideas so you can feel stimulated, well-equipped, and confident to eat and cook better.

    Learn more about me →

    Meaty Veggie Demi-Glace

    Jul 24, 2020 · 13 Comments

    A man, dressed in a dark blue shirt, holds a spoon in his left hand and pours brown sauce into a white enamel mug that he's holding in his right hand]

    This vegetable demi-glace will enhance your dishes. This brown sauce, slightly thicker than water, is incredibly tasty. And it takes a third or a quarter of the time of the traditional recipe. It has a rich and meaty flavor without the need to add meat.

    Well preserved, it will last for months. As long as you don't use it lavishly.

    Man dressed in a printed shirt holding a spoon in his left hand and pouring brown sauce into a white enamel mug he is holding with his right hand
    Demi-glace de légumes
    [feast_advanced_jump_to]

    Why You Should Make this Recipe

    Usually, traditional demi-glace sauce can take 6 to 8 hours to make.

    This only takes about two.

    This recipe is straightforward. The cooking time is long, but not the prep.

    Why does it take a third or a quarter of the time?

    The mere fact that you don't incorporate bones and cartilage considerably reduces your cooking time. Besides, you won't have to remove the solid fat layer that consequently forms on the surface. 

    In any case, it's not just the meat that gives the flavor. You just have to choose ingredients that contain what is called umami. 

    Umami is the flavor resulting from the amino acid L-glutamate. And they're mostly found in meat. 

    It's the pleasant taste of "broth" or "meat" with a lasting sensation, appetizing, and covering the whole tongue. It's the round, comforting, and invigorating taste.

    Moreover, this sauce includes an ingredient that gives almost the same effect to evoke the umami of meat: a rich flavor with body. Which one? The shiitake mushroom.

    The shiitake mushroom has a rich, buttery, and earthy flavor quite different from that of other varieties of mushroom in its raw form. In its cooked form, it's steamy, woody, and meaty.

    That's why this vegan demi-glace sauce is so cheerfully complex. Tasty, you know.

    And you'll be amazed by inhaling its scent, which perfumes all your kitchen.

    What is Vegetable Demi-Glace Made of?

    vegetables overflowing from a rustic spit basket with beside it, a bottle of wine lying down, a set of measuring spoons filled with pectin, olive oil, salt and tomato paste, on top of which rest a celeriac, sprigs of thyme, and shiitake mushrooms
    Use any fresh vegetables or leftover vegetables in your fridge. Make sure you merely incorporate ingredients representing the five basic flavors (sweet, salty, bitter, sour, spicy).

    In short, you can make a crazy vegetarian demi-glace with any vegetables. The most important thing is to balance the flavors: you have to add ingredients that emanate from sweet, salty, bitter, sour, pungent, and tasty vegetables (which give umami). I've broken down the ingredients for this recipe below so that you understand the main points. Sometimes a vegetable can have a primary and a secondary flavor.

    Sweet

    • Carrots – They add a nice sweet touch. For a more earthy flavor, don't peel them.
    • Beets – These red jewels add an earthy sweet flavor and a lovely dark color. To have more tannins, wash them thoroughly and don't peel them.

    Salty

    • Celery – This is natural salt.
    • Celery root – Optional ingredient. It brings even more natural salt and an earthy note.
    • Kombu – In strips, it serves a double function: it brings the salty flavor simultaneously as the umami.

    Bitter

    • Usually, aromatics (bay leaf, thyme, parsley) are added. You can splurge on other bitter vegetables, such as eggplant, broccoli, cauliflower, kale, cabbage, or something dark, green, and leafy. Moreover, when these vegetables are roasted, they add a pleasant bitter note. 

    Acid

    • Tomatoes or tomato paste – Tomatoes also give umami. Depending on them, they add a little citric acid and/or a sweet flavor to the final sauce. The tomato paste offers a more concentrated flavor.
    • White wine – It will intensify the flavor and aroma of the sauce and impart a fruity flavor. The alcohol in the wine evaporates while the food is cooking, and only the flavor will remain. For added richness and robustness, use red wine instead.

    Pungent (considered a flavor)

    • Red onions - They offer the pungency and, when finely chopped, a sweet note to the mixture. They also bring a spicy flavor. Red onions are tastier than the yellow ones.
    • Garlic - It's a cornerstone of many sauces. Garlic adds its own salt and tangy flavor.

    Umami

    • Fresh shiitake mushrooms - Definitely the essential ingredient. They reinforce the umami in the final sauce and give it a perfect round, earthy and meaty taste. Dehydrated ones taste much more pronounced than fresh ones, so if you use those, cut the amount in half. Portobello mushrooms or other tasty mushrooms will do the trick too.

    How to Make it Step by Step

    I'm not gonna lie. There's a lot of cutting involved. But once that's done, it's smooth sailing.

    All in all, you take a lot of vegetables, cut them into strips, and roast them in the oven until they brown ① ②. Then you produce the vegetable broth: You add water and let it simmer ③ ④.

    4-Step Photo Collage showing how roast the vegetables to make demi-glace

    Afterward, you drain the liquid ⑤ and thicken it ⑥ ⑦.

    4-Step Photo Collage showing how drain the vegetables to make demi-glace

    My Top 6 Tips for Making an Ultra-Tasty Demi-Glace

    Overhead view of a small bowl of white powder next to a saucepan filled with brown aqueous sauce in a saucepan and a set of measuring spoons
    Vegetable bouillon before thickening

    Cut the vegetables very thinly

    This will allow you to have a sweeter sauce. The mandoline is your best tool for that, but that doesn't stop you from using the food processor or doing it by hand.

    If you're going to use the mandoline, here's some tricks to accelerate the process:

    • Slice many carrots or celery stalks together;
    • Slice the whole garlic head. Even if garlic skins go into the mix, you'll end up expressing only the liquid.

    Warning: Unless you stubbornly want to go back to the traditional recipe for thickening your sauce with an inanimate component of a living being, use the mandolin's hand protector. This will prevent you from slicing your thumb into strips. 

    Alleviate the flavor of the tomato paste 

    If time permits, warm the tomato paste a little to reduce its acidity. For example, you can also add a little baking soda (ratio: 1 cup of tomato paste to a ¼ cup baking soda).

    Simmer gently, uncovered

    To get a good veggie demi-glace, use the same tips for preparing a meat stock: simmer gently. 

    But you may avoid letting it boil. Why? Apparently, the agitation caused by the boiling prevents the particles from rising to the surface. 

    Drain with a fine mesh

    I used my nut milk mesh bag to express the liquid to the maximum. (Let the mixture cool so as not to cook your hands on the bag). If you don't have this accessory, a fine-mesh sieve will do. 

    Blend the preparation before draining it

    This will allow you to get maximum flavor. But if you're like me and don't like messing up too much cookware, you can definitely skip this step. (I definitely skipped this step).

    Mix your thickeners really well

    You have two options: stir in the thickening powder and pectin separately or mix it with the pectin until you meticulously break up the lumps. 

    No lumps should get into the thick sauce. Otherwise, you'll find yourself crushing them with the back of your spoon to make them disappear forever, like when you untwist the tangled threads of a yarn ball.

    Answers to Your Burning Questions

    What is Demi-Glace Exactly?

    In classic cuisine, demi-glace is a reduced sauce. It's made from brown stock, usually veal bone, and sometimes beef or poultry carcasses and vegetables (celery, onions or leeks, carrot, etc. tomato paste). Thus, it derives its gelatinous texture from the marrow of the bones used in the brown background. And it derives its color from the caramelization of meats and bones before wetting. Sometimes tomatoes and herbs (bay leaf, thyme, parsley, pepper) are added.

    Demi-glace is the base for many sauces.

    Depending on the level of reduction, it has different names. When its reduction level is less, it's called Spanish sauce. And when its reduction level is very high, it's called meat ice cream, hence its name demi-glace.

    In classic French gastronomy, demi-glace is considered the queen of sauces. And in vegetarian gastronomy, she will gladly keep her crown 👑.

    How to Get a Very Sticky and Gelatinous Consistency

    To do this, thickening agents are used so that the sauce can stick well to the ingredients to season. 

    It could be guar gum, xanthan gum, or other thickening powders. As long as it's something that thickens sauces and soups. Or, just add unbleached all-purpose flour. Finally, the recipe calls for pectin to evoke the gelatinous texture. 

    As mentioned earlier, demi-glace is a reduced sauce, made from a brown stock. This gives it its body thanks to the extraction of collagen from bones and cartilages. In other words, the collagen turns into gelatin, which provides the stock with its gelatinous consistency. Gelatin is also the factor that sets stock in a jelly consistency once cooled.

    Thus, in the plant-based version, bones and cartilages are replaced with pectin. 
    This step is possibly optional. But hey, why not let the sauce keep her highness status? 👑

    What to Do with the Leftover Vegetables?

    Here are some solutions to avoid waste:

    1 / Dehydrate them

    If you have a dehydrator, dehydrate the vegetables for 12-16 hrs, or until they're dry, reduce them to a powder in a blender to make a powdered broth. If you don't have this appliance, bake them in a 100 ° F (38 ° C) oven with the door open until they're dry.

    2 / Turn it into a purée
    Blend them with a little water. Put one part in the freezer and keep the other in the fridge to enhance your dishes' flavor.

    3 / Feed the earth

    Finally, put them in the compost for your garden or the city.

    Other Creative Variations

    For a less pronounced vegetarian demi-glace, try other types of mushrooms, such as white mushrooms, coffee, or portobello.

    Tomato paste works well here to provide a concentration of tomato flavor. It can also act as a thickener after the liquid has been filtered. However, it will change the taste (more acid and more umami). It can be replaced by Passata. 

    For even more umami, add a little tamari or nutritional yeast.

    You can also make sweet demi-glace sauce using strawberries, berries, or apples.

    What to Combine it with?

    As mentioned earlier, demi-glace is excellent for adding depth of flavor to your preparations. Incorporate it into the following dishes:

    • Pasta, all kinds;
    • Risotto, rice or barley;
    • Soups and stews;
    • Stir-fried vegetables;
    • Potatoes, baked or mashed;
    • Stir-fried tofu and tempeh.

    It's very versatile, so experiment!

    However, keep this in mind: demi-glace will enhance the flavor of a finished dish when incorporated at the end of cooking. If it is intensely tasty, before adding the demi-glace, dilute it with a few teaspoons of hot water until it reaches dense cream consistency. This will make its integration more straightforward and faster. 

    Use it in these recipes!

    • Black bean soup speckled with corn and topped with cubed avocado, cubed tomatoes, and cilantro sauce
      Fuss-Free Spicy Black Bean Soup
    • Bright Broccoli and Pea Soup
    • Creamy corn fusilli with green onions and basil in a cast-iron pan on a wooden board and other decorative items
      Melissa Clark's Creamy Corn Pasta {Vegan Version}
    • Overhead view of ribbon-shaped pasta with green peas and ricotta, topped in a green sauce
      High-Protein Pappardelle-Style Pasta and Zucchini
    • Spiced Chickpea Stew with Coconut and Curry
    • Lentil, barley, and sweet potato salad with broccoli and baby tomatoes in a glass baking dish sitting on a wooden board
      Hearty Lentil, Barley and Sweet Potato Salad

    Make this Sauce Now

    A little know-how is all it takes to make a homemade demi-glace.

    It's enough to make commercial preparations jealous, with their unwelcoming additives.

    There's nothing colorful about the finished product, but you get a creamy, light sauce that's ready to stick on any dish for which you want to enhance the flavor.

    You'll see, your simple dishes will turn into magical meals with the addition of demi-glace.

    Now that the demi-glace has no secrets for you, you're ready to make your homemade versions! 

    Three small jars containing demi-glace
    Store your demi-glace in jars or in mini releasable plastic bags. Recipe dapted from Chef's Steps' website.

    If you try this recipe, I want to know about it! I always appreciate your feedback. Leave a star rating in the recipe card right below and/or a review in the comment section further down the page. You can also follow me on Pinterest, Facebook, or Instagram. Sign up for my email list, too!

    A man, dressed in a dark blue shirt, holds a spoon in his left hand and pours brown sauce into a white enamel mug that he's holding in his right hand]
    Print Recipe
    5 from 9 votes

    Vegetable Demi-Glace

    This delicious sauce is perfect for dressing vegetables, flavoring mashed potatoes, or enhancing any dish's flavor. Quite sophisticated, it contains more than 10 ingredients. However, if you want something simpler, omit the ones where you see "optional" marked. It will still be tasty. The advantage of a demi-glace is to give a tasty flavor, umami, to your preparations. Your friends will love the meaty taste it evokes. You can cut the ingredients' quantity in half, but you might as well make a large amount of sauce if it's going to take that long to prepare. What's more, no one will hold it against you if you want to perfume your kitchen more than once.
    Prep Time30 minutes mins
    Cook Time1 hour hr 45 minutes mins
    Course: Sauce
    Cuisine: French
    Keyword: demi-glace, make-ahead, mushrooms, sauce, shiitake, umami
    Servings: 7 cups
    Calories: 1025kcal
    Author: Naïby

    Ingredients

    • 1 medium eggplant
    • 1 small or ½ large cauliflower
    • ½ medium celery root
    • 1 beet
    • 1 whole broccoli
    • 4 medium carrots
    • 2 onions or leeks
    • 8 shiitake mushroom fresh (Notes)
    • 4 stalks celery
    • 1 bulb garlic
    • ¼ cup white wine (Optional)
    • 2 tablespoons tomato paste (Notes)
    • 8 strips kombu (Optional)
    • 8 sprigs thyme
    • 3 L water (12 cups)
    • 2 teaspoons pectin (Notes)
    • 2 teaspoons guar gum or xanthan gum
    • 1 teaspoon salt
    Get Recipe Ingredients

    Instructions

    • Preheat the oven to 450 °F / 230 °C.
    • Using a mandolin or vegetable peeler, finely chop or grate the vegetables and transfer them to a large and deep baking sheet.
    • Add the tomato paste and, if desired, the kombu. Stir to combine.
    • Toss the vegetables with oil to prevent them from sticking. Transfer to the oven and roast for about 45 minutes. Check them every 20 minutes or so, stirring and turning as needed to keep the edges from burning.
    • Add water to the vegetables and return to the oven for 30 to 40 minutes.
    • Filter the broth into a saucepan. Optionally, scrape and peel off the remaining vegetable pieces on the baking sheet with the wine, then filter carefully into an empty corner of the sieve to not lose the wine in the pile of vegetables. (A thin layer may form at the surface when let to cool for a few minutes.)
    • Over medium heat, reduce broth to about half of its original volume. Remove from heat.
    • Whisk the the pectin in the demi-glace. Incorporate the guar gum until there is no lumps and the liquid thickens.
    • Serve with your favorite dishes.

    Notes

    1. Vegetables: you can add as many vegetables as you want. Ones that wilt easily will do well. Make sure there are saltier than sweet veggies; otherwise, the sauce may be syrupy and sickening.
    2. Mushrooms: shiitake really add flavor. Dehydrated mushrooms taste much more pronounced than fresh ones, so if you use those, halve the amount and soak them in water to rehydrate them. If you don't like this kind of mushroom, replace them with white or coffee mushrooms or four portobello mushrooms. 
    3. Tomato paste works well here to provide a concentrated tomato flavor. It can also act as a thickener after the liquid has been filtered. However, it will change the taste (more acid and more umami). It can also be replaced by Passata. Sauté the tomato paste to alleviate its flavor.
    4. Salt: There is little salt in this recipe, but add some if you don't include enough salty ingredients like celery, celeriac, or kombu.
    5. Thickeners: If you think you'll rarely be using guar gum or xanthan gum in the future, you can opt for cornstarch or unbleached all-purpose flour instead (much cheaper, too).
     

    Variants

    For an easy vegetable demi-glace, you can omit the cauliflower, celery root, and/or beet.

    Conservation

    Placed in an airtight container, this vegetable demi-glace will keep for up to two weeks in the refrigerator. For longer conservation, keep 1 cup in the fridge and freeze the rest in small releasable bags.

    Nutrition

    Calories: 1025kcal | Carbohydrates: 214g | Protein: 49g | Fat: 8g | Saturated Fat: 1g | Polyunsaturated Fat: 2g | Monounsaturated Fat: 1g | Sodium: 3859mg | Potassium: 8217mg | Fiber: 73g | Sugar: 79g | Vitamin A: 46283IU | Vitamin C: 916mg | Calcium: 960mg | Iron: 16mg

    Get Your Free Plant-Based Eating Toolkit and More

    Subscribe to my newsletter and unlock my plant-based course, nutrition charts, recipe secrets, and exclusive updates to prepare wholesome, varied & balanced meals effortlessly. All you need is a good appetite. Subscribe!

    Smiling girl with big afro sitting cross-legged on a sofa

    Hi there!

    I'm on a mission to help you get nutrient-dense, easy, and mouthwatering plant-based recipe ideas so you can feel stimulated, well-equipped, and confident to eat and cook better.

    Learn more about me →

    The Gift of Being Catered to

    Jul 24, 2020 · Leave a Comment

    Overhead view of a small bowl of white powder next to a saucepan filled with brown aqueous sauce in a saucepan and a set of measuring spoons

    Be warned: if you are a hard-core foodie, cover your ears. My next words will be obscene, to say the least: I'm not a real cook. A genuine passionate cook.

    I don't follow restaurants that open and close and reopen. I don't watch out for cooking fads. I don't attend cooking classes. I don't do wine tastings or culinary tourism. Well, I never did.

    Yes, nutrition and health inspire me. And food science piques my curiosity. The truth is, I'm more excited about wowing my friends to receive a shower of compliments than creating new impromptu recipes. Call it low self-esteem, I don't know, but it makes me feel good.

    Cooking entails a lot of work. I speak for myself, eh.

    It doesn't excite me to spend a crazy and nerve-racking time in front of the stove for more than 1 hour to be successful with a few dishes. It doesn't amuse me having to clean up the spills that have flown on the stove, on the floor, or under the cooker hood. And I don't get excited about washing counters spotted with bits of ingredients and the uncountable pots and pans.

    Cleaning cookware and everything else in between put me off.

    I once saw a girl's Instagram post showing her messy counter as one would see at the end of a meal for ten. She had a gypsy fashion style with a floppy hat. After commenting poor you, you'll have to clean all these dishes, she replied that this was what she loved to do. It soothed her. Either she was a big liar, or I'm abnormal.

    I cooked with a friend who tidied up right away after using an ingredient. Super efficient. Obviously, that's the right thing to do, but I just can't do it.

    Thus, to avoid spending time in the kitchen and cleaning dishes, I could eat green lentils right out of the pan with every meal. Bland quinoa too. With a little salt. And olive oil. And some spices.

    Okay, I digress.

    This story begins with meal kits that I was receiving every week a few months ago. 

    They arrived at my door, in a big box, with three sets of ingredients separated in portions in advance and sometimes, partially prepped to cook homemade meals. What do you mean? You say.

    Well, it wasn't my idea. It was Mr. Pleasant's initiative.

    An ingenious trick to enjoy cooking 

    I was delighted to chill three times a week and be catered to. Sometimes a girl just wants to be lazy.

    So, yes, Mr. Pleasant enrolled in a membership to the Goodfood home-cooked meal delivery service, similar to Hello Fresh in Germany or Blue Apron in the United States. 

    To please everyone, he opted for vegetarian meals. To be honest, it made the guys happier than me. Many of the recipes contained a ton of cheese. I don't eat it, you know. 

    But I was able to find a way to take advantage of it too.

    Goodfood's dishes are supposed to take the time indicated, but honestly, it always took longer than expected. It would've been less the case if I had practiced the recipes a gazillion times. I must say that I'm a turtle in the kitchen too.

    If it weren't for the pre-cut ingredients, it would've been even worse. We receive almost everything so that it's also premeasured. 

    Indeed, the ingredients are often found in mini-containers or sachets prepared to make your life easier. Sometimes that's overkill, I think. You can end up with a peeled garlic clove or three parsley sprigs in a small bag or container.

    My negative comment: at the end of a recipe, although made from recycled materials, too many bags and small containers filled my trash. It was dreadful.

    Otherwise, their success undoubtedly lies in the preparation speed, the tasty side of the dishes, and the instructions to follow in their recipe cards. 

    In the front sheet, these recipe cards indicate the ingredients and the material to use. On the back, you find the step by step recipe with photos.

    Anyway, everything was delicious.

    My palate reveled in world-inspired dishes. 

    Goodfood offered us recipes from all over the world. From the East to the West, passing through Italy, India, and Morocco.

    We feasted on the red lentil dal in coconut milk, served with a spinach salad with currants and hot naans. We loaded our bowls with the veggie Chili Verde with White Beans and Butternut squash, accompanied by homemade tortilla chips. We attacked the Lemony Risotto with Green Peas and Basil, topped with fresh mozzarella—for the guys—and served with an arugula and red cabbage salad.

    Before I completely finish you off with these painfully tantalizing descriptions, I'll tell you about my top dishes. I licked my chops with two absolutely scrumptious dishes. 

    I made several moans as I slurped the Mee Goreng (spiced fried noodles) with fresh Shanghai Noodles and Crunchy Multi-Colored Vegetables. It was topped with crushed peanuts and flavored with garlic, lime juice, and cilantro. (The Mee Goreng is a staple of Indonesian street food. Here it included red peppers and multi-colored Nantes carrots.) 

    And most of all, I almost passed out tossing the Roasted Sweet Potatoes topped with Chana Masala and sprinkled with fresh mint. They were all resting on a refreshing avocado purée or sauce with cucumber. The sauce was supposed to be raita made with yogurt and mashed avocado, but I took it out since I'm anti-dairy. The avocado purée contained basic ingredients that would be found in guacamole. It was di-vine.

    Even though the sauce had been stripped, a lot of whispers and sighs ensued.

    Every time I cooked the dishes, I scanned the recipe cards to understand why the dishes were so tasty. 

    And after a few cooked meals, a light bulb flashed in my head. 

    Astonishing revelations.

    In fact, the recipes were mouthwatering due to two things: the sauces and the spice blends. 

    Know, dear guest, that I have excavated for you. As I told you earlier, Goodfood gives great recipe cards that show the right place, the ingredients, and the material to use and, on the back, the step by step recipe. 

    But they do not always detail precisely the ingredients of mixtures of spices or sauces. In particular, the veggie demi-glace.

    And they were the ones that intrigued me enormously.

    Like a truffle animal, I spotted the treasure on the main packaging. Noticing the addition of cornstarch, I concluded that demi-glace is no less than thickened broth. Buying a store-bought demi-glace is a solution, but I prefer mine done from scratch.

    To make a long story short, I tried to thickened a broth with corn starch, but it didn't turn out with the same texture or taste. 

    But my deep curiosity has paid off.

    Finally, I ended up finding a recipe for demi-glace on the Internet that I reproduced recently. It contains a combination of sweet, savory and pungy vegetables, and shiitake mushrooms.

    When I finished preparing my sauce, I was delighted! And I got an amount that will last me for a very long time.

    The demi-glace was complex and aromatic, rich but certainly not too thick, silky. It revealed a sequence of aromas that opened with the wine's slight brightness, continued with the round and woody flavor of shiitake mushrooms and ended with the sweetness of beets and carrots. 

    I don't know a better way to describe it as a sauce that felt impeccably French; that is, it tasted harmonious and refined.

    It's scrumptious enough to turn me into a cook ready to clean up the spills caused by my clumsiness and lick them lovingly.

    Get the recipe here

    Smiling girl with big afro sitting cross-legged on a sofa

    Hi there!

    I'm on a mission to help you get nutrient-dense, easy, and mouthwatering plan-based recipe ideas so you can feel stimulated, well-equipped, and confident to eat and cook better.

    Learn more about me →

    Exquisite No-Bake Chocolate Mousse

    Jul 16, 2020 · 4 Comments

    Chocolate mousse in three small jars with large coconut flakes on top on a plate being held by a man in the background

    Mousse, for me, is the ultimate fancy dessert. And this dairy-free mousse is the perfect dessert: it's incredibly light and ridiculously rich and creamy.

    Beware! You may eat an alarming amount of it.

    3 mini-jars of chocolate mousse topped with big coconut flakes
    No-bake chocolate mousse with coconut flakes
    [feast_advanced_jump_to]

    Insane Creaminess in No Time and Without the Fuss

    As far as traditional mousses are concerned (i.e., with eggs and dairy products), some mousses are dense and sticky. Others are foamy, almost frothy, with the mouthfeel of a marshmallow.

    Although the texture is not exactly like a traditional mousse, I find that mine sits squarely, cheerfully, in the middle. It's soft and creamy, light but robust. A little dense, yes, but one can't ask for anything better than a chocolate mousse made in what… two, three steps? Yes, dear friend, it won't take you more than 10 minutes (after the preliminary steps) to obtain such a delight and no more than 10 seconds to lick your lips.

    It's not too sweet, either. It's dark and deep, complex, and enriched with enough vanilla extract to complement the taste of chocolate, but without competing with.

    It surely will bring you to paradise!

    It's also effortless.

    In traditional pastry, mousse is rarely classified as being easy to make. The list of ingredients is quite short, and the method is simple. Still, we're dealing with ingredients with different time and temperature constraints, which means that it's imperative to be prepared.

    It's quite the opposite in vegan baking. You don't have to be in charge as if your life depended on it.

    No need to read the recipe a full 1,000 times and get all the tools you need in advance. No need to prepare the ingredients according to their order of time constraint (from the biggest to the least). No need to mix them while being serious like a pope.

    What Goes in It?

    Just like the traditional recipe, you only need four ingredients.

    Top view of vegan chocolate mousse ingredients (clockwise): Medjool dates in a glass bowl, a pyrex measuring cup with water, avocados cut in half, maple syrup in a small jar, cocoa powder in a small plate, scattered Medjool plates, and vanilla extract in a set of measuring spoons.
    No-bake chocolate mousse ingredients (clockwise): Medjool dates, water, avocados, maple syrup, cocoa powder, and vanilla extract.

    Main ingredients

    • Dates – I usually use Medjool dates because they have a sticky consistency. They make an excellent substitute for other sticky options high in sugar, such as syrups, caramels, and caramelized sugars.
    • Avocado – We'll use it to give the body, the thick and creamy texture. Don't worry, you won't notice the taste of avocado. It will be hidden by the bitterness of cocoa and the sweetness of dates and maple syrup. Nutritionally, it provides good sources of essential fats necessary for health.
    • Cocoa powder – the centerpiece of our mousse. This is what will give the beautiful chocolate color and cover that of the avocado. When raw, cocoa is considered a superfood full of antioxidants and opposing free radicals (responsible for the aging process and disease appearance).
    • Maple syrup – when you can choose a local product, you might as well do it! Maple syrup is a typical Quebec product that I love. It's added to extend the texture of the avocado. No sweetener is healthy. But you can rest assured that compared to others, like refined white sugar, it contains a good source of manganese and zinc—beneficial for skin health, among other things.

    How to Make this No-Bake Mousse from Scratch Step by Step

    The steps are pretty simple. First, you soak the dates in water to soften them. Meanwhile, you mash the avocados. Afterward, you add all the ingredients, process in the food processor, and there you have it.

    Mashing the avocados beforehand
    • 1
    • 2
    • 3
    • 4
    • 5
    • 6
    Making no-bake chocolate mousse step by step

    1/ Pit the Medjool dates and soak for 30 minutes;
    2/ Place the dates, maple syrup and vanilla in a food processor fitted with the S blade;
    3/ Add the puréed avocados, cocoa powder, and water;
    4/ Mix until smooth;
    5/ Mix until smooth and creamy ;
    6/ Refrigerate the mousse for at least 2 hours before serving.

    How to Get the Most Exquisite No-Bake and Dairy-Free Chocolate Mousse

    Choose the right dates

    In general, I use Medjool dates, because they have a sticky consistency. This makes them an excellent substitute for other rich sticky options sugar, such as syrups, caramels, and caramelized sugars. They're quite expensive, it's true, so in that case, you can replace them with regular pitted dates. But in this case, choose some that are also fluffy and don't usually have thicker skin. Also, be aware that a Medjool date is equivalent to two regular dates (1 Medjool date = 2 regular dates).

    Take not too ripe avocados

    At the grocery store, squeeze the avocados a little to see if they are ripe enough. If they are too mature, you will have an overly strong avocado taste.

    Other Creative Variants

    This mousse is ultra-easy to make if you want it in very few steps. But if you wish to get as close as possible to the traditional version, you can vary the ingredients that make up the base. Here are some basic options:

    • Whipped coconut cream-based chocolate mousse;
    • Coconut milk-based chocolate mousse, thickened with xanthan gum;
    • Cashew cream-based chocolate mousse, emulsified with soy or sunflower lecithin;
    • Chocolate mousse made out of a combination of coconut and cashew puree, all emulsified with soy or sunflower lecithin.
    • Chocolate mousse made out of cocoa powder and carob powder if you're afraid cocoa will overstimulate your heartbeat.

    If you wish to optionally add a thickener, agar-agar will be the appropriate choice.

    How to Serve It?

    Chocolate mousse is a delicious dessert in itself, so simply place it in a single bowl. For something more whimsical, spice it up with espresso coffee essence or alcohol such as rum or brandy.

    To bring a contrast of color or texture, sprinkle it with dried and grated coconut or crushed nuts. Or cover it with salted caramel, like the one in my brownie recipe.

    Here are other ideas for different presentations: in bowls, in small whiskey glasses with some fresh raspberries on top. And, for a picnic, in tiny paper cups with a spoonful of whipped cream. Otherwise, alone, it can act as a layering element in cakes. And finally, put it in the freezer and make it a chocolate mousse ice cream!

    Whichever way you choose to serve it, start with small portions; these are not jokes. It's quite substantial.

    Answers to Your Burning Questions

    Does dairy-free chocolate mousse have eggs?

    No, it's 100% plant-based. Initially, the eggs are there to give body and texture to the mousse. You can replace them with an ingredient that will play the same role in a vegan chocolate mousse, such as avocado, cashew cream, or whipped coconut cream.

    Can we freeze chocolate mousse?

    Absolutely! You can freeze chocolate mousse, and it will last in the freezer for up to 2 months. When you are ready to use it again, transfer it to the refrigerator and let it thaw there until you can spoon it. Or make a chocolate mousse ice cream!

    Make this Dish Now

    When it comes to spoiling yourself with a decadent dessert, serve yourself a chocolate mousse that will delight you until the last lick.

    Even without eggs and dairy, it won't disappoint you at all. In addition to making you swim in bliss, it will feed you with holy nutrients.

    So, grab your four main ingredients, concoct this delight in a jiffy and serve it carefully and slowly to not let its smoothness and beauty knock you out.

    Chocolate mousse in three small jars with large coconut flakes on top on a plate being held by a man in the background
    From Jennifer Cornbleet's Raw Food Made Simple

    If you try this recipe, I want to know about it! I always appreciate your feedback. Leave a star rating in the recipe card right below and/or a review in the comment section further down the page. You can also follow me on Pinterest, Facebook, or Instagram. Sign up for my email list, too!

    Chocolate mousse in three small jars with large coconut flakes on top.
    Print Recipe
    5 from 2 votes

    No-Bake Chocolate Mousse

    This chocolate mousse is serious stuff. If you're a total pig about desserts, I recommend you treat yourself to this guilty dessert in small portions. Although avocado is used as a base to replace butter, cream, and eggs, this no-bake mousse is ridiculously creamy. The recipe is six to eight servings, and I'm pretty sure you will probably lean for eight.
    Prep Time10 minutes mins
    Soaking & Cooling Time2 hours hrs 30 minutes mins
    Total Time2 hours hrs 40 minutes mins
    Course: Dessert
    Cuisine: Raw/No-Bake
    Keyword: avocado, cocoa powder, Medjool dates
    Servings: 8
    Calories: 261kcal
    Author: Naïby

    Ingredients

    • 8 Medjool dates pitted, soaked for 30 minutes and drained
    • ½ cup maple syrup
    • 1 teaspoon vanilla extract (optional)
    • 3 avocados mashed (about 1 ½ cups)
    • ¾ cup cocoa powder unsweetened (Notes)
    • ½ cup water
    Get Recipe Ingredients

    Instructions

    • Place the dates, the maple syrup, and the vanilla in a food processor fitted with the S blade and mix until a smooth consistency is obtained.
    • Add the avocados, cocoa powder, and water and mix until you get a smooth, creamy consistency.
    • Refrigerate for at least 2 hours before serving.
    • Covered with plastic wrap, this chocolate mousse will keep in the fridge for 3 days and in the freezer for 2 weeks.
    • Sprinkle the mousse with dried and grated coconut, crushed nuts, or strawberries.

    Notes

    • Choose the right dates: In general, I use Medjool dates, because they have a sticky consistency. This makes them an excellent substitute for other rich sticky options sugar, such as syrups, caramels, and caramelized sugars. They're quite expensive, yes, so in that case, you can replace them with regular pitted dates. But in this case, choose some that are also fluffy and don't usually have thicker skin. Also, be aware that a Medjool date is equivalent to two regular dates (1 Medjool date = 2 regular dates).
    • Take not too ripe avocados: At the grocery store, squeeze the avocados a little to see if they are ripe enough. If they are too mature, you will have an overly strong avocado taste.
    • Add carob powder: Reduce the amount of cocoa and mix with carob powder if you're afraid cocoa powder will overstimulate your heartbeat.

    Nutrition

    Calories: 261kcal | Carbohydrates: 43g | Protein: 4g | Fat: 12g | Saturated Fat: 2g | Polyunsaturated Fat: 1g | Monounsaturated Fat: 8g | Sodium: 10mg | Potassium: 702mg | Fiber: 9g | Sugar: 29g | Vitamin A: 146IU | Vitamin C: 8mg | Calcium: 57mg | Iron: 2mg

    Get Your Free Plant-Based Eating Toolkit and More

    Subscribe to my newsletter and unlock my plant-based course, nutrition charts, recipe secrets, and exclusive updates to prepare wholesome, varied & balanced meals effortlessly. All you need is a good appetite. Subscribe!

    Smiling girl with big afro sitting cross-legged on a sofa

    Hi there!

    I'm on a mission to help you get nutrient-dense, easy, and mouthwatering plant-based recipe ideas so you can feel stimulated, well-equipped, and confident to eat and cook better.

    Learn more about me →

    New Arrivals in My Home: Kitchen Accessories and Tableware

    Apr 3, 2020 · Leave a Comment

    Oranges in a rustic ceramic bowl

    Right now, I'm in a shopping state of mind that's worrisome. My mouth waters on handcrafted kitchen accessories and tableware websites. All this, to dress up my photos and my kitchen. But not just that! To also cheer me up.

    It's not that I'm depressed or anything, no. I'm bored. Boredom is never good, yet I have so much to prepare! I worked hard for you, dear guest.

    Recently I cooked demi-glace and numerous impromptu dishes that would be worth being presented here. I savored lemony risotto with green peas, pearl barley risotto with mushrooms, Panzanella salad... Yesterday we stuffed down honey-roasted cauliflower and celeriac bowls on a bed of couscous, covered with a tomato and cucumber salad and drizzled with pomegranate dressing.

    And guess what? I'm still nurturing my wild yeast. This is my third one. Long story.

    So last Sunday I went on this website that I mentioned once, Chic & Basta. This website showcases Quebec artisans’ products.

    And above all, highly sensuous pottery

    Like many, I let myself be seduced by the craft of the time. That time when we worked the land in the circles of women farmers.

    Now everything handmade is beautiful. I understand why pottery is all the rage. It's become sexy!

    Several restaurants have contributed to this enthusiasm as of late. It took birth with the nomination of Noma, a restaurant in Copenhagen in Denmark, prized as the best restaurant in the world in 2010. The star chef René Redzepi used many local ceramics.

    Bird's eye view of rustic plates of different shades of grey
    Rustic ceramics plates, bowls, and cups from Noma restaurants

    And many chefs, and others, imitated him. Now we see light beige or gray sandstone, matte, almost everywhere.

    The movement "From farm to table" influenced everything around gourmet eating and added a rustic, naturalist, hyperlocal aspect. Will we see a "From balcony to table" movement soon?  We shall see.

    Anyway, I’d been coveting the products of L’Atelier Trema for a while. They are much like other pottery I've seen on American interior design websites (especially Californian interior design). Unfortunately, the ones I wanted were out of stock everywhere. In any case, it would surely cost me an arm and a leg to deliver the goods to my homeland.

    So, decisive, I surfed in the section of the said collection on the website, put the items in my cart, paid and ran away from my computer so I wouldn’t regret it. The deal was quickly sealed.

    Yesterday I heard the doorbell ring. Obviously, I wondered who would to that in this time of confinement. I’d completely forgotten about my weekend purchase.

    But when I opened the package… Oh! How rejoiced I was. Magnificent.

    Saladier, gobelet et pot en céramique à deux tons
    Two-tone ceramic mixing bowl, tumblers, and kitchen tool crock from Atelier Trema

    It only took three days for them to receive my goods with no shipping charges. And they are hyperlocal. As you can see, what we seek is often closer to us than we think.

    Now I'm glad I dressed up my kitchen. And for the few purchases that I made, I think I don’t have to worry about my state of mind.

    Wooden spoons and forks in a big two-toned (white and sand) ceramic canister next to a matching mixing bowl with oranges in it
    Two-tone ceramic mixing bowl and kitchen tool crock from Atelier Trema
    Smiling girl with big afro sitting cross-legged on a sofa

    Hi there!

    I'm on a mission to help you get nutrient-dense, easy, and mouthwatering plan-based recipe ideas so you can feel stimulated, well-equipped, and confident to eat and cook better.

    Learn more about me →

    A Dream and a Banneton Basket

    Mar 27, 2020 · Leave a Comment

    White flour in a small mason jar and white flour in small white measuring cup

    A few nights ago, I woke up with a jolt in the middle of the night. A horrible thought shook me. I won’t be able to make my sourdough bread!

    White flour in a small mason jar and white flour in small white measuring cup
    White flour and rye flour

    Okay, I know I’m obsessed with it. This is my third post on the subject. And it may not be the last. *Singing voice*

    Just recently, our government announced for ALL stores to close on Tuesday, March 24th. When I found out, I only had 24 hours left to go shopping. My Banneton (pronounced in French) basket!

    The day before yesterday, I spoke to a friend who told me how carefree she was regarding this pandemic. At first, she invited people to visit her. She invited children to play with her kids too. Totally nonchalant. No one is calling her now.

    The air has thickened. We’re breathing mistrust. Fear.

    Oh! Montreal! You who were such a welcoming city. Now you've become austere, gray. I was so happy in the woods. The cottony snow that fell a few days ago is melting in the city. And there’s no one to walk in the slush.

    To go back to being carefree, I don’t exclude myself either. But since that famous night, I only think of bacteria.

    My leaven worries me.

    The preparation of the leaven worries me.

    The explanation I gave you about the preparation of the leaven worries me.

    And then, this other thought haunts me: No way! Did I tell you to mix the dough with your finger?! That was before the damn virus arrived. We want our bacteria, but not that thing in the bread! Yeah, I can see myself giving sourdough and COVID-19 bread. This is carelessness.

    Shortly after, the panic subsided. This ugly virus – because it’s really ugly; Have you seen its face? – will be scorched during the cooking process. Yes, burn baby, burn.

    During the day, I went on a frantic quest.

    I called two kitchen supply stores near me to find my coveted banneton. Hoping to run, to throw myself on the floor, and to slide under the door right before it closes downward. Like the heroes of action movies do.

    So, the first interlocutor didn’t know what it was. When I said it in English, "bread bowl" with my rudimentary description, he replied that he didn’t have one. Modern city-dwellers no longer use this kind of thing. Oh, okay!

    The second one also gave me a negative answer. He asked me what the advantage was, to which I replied I don't know. According to him, any salad bowl would do the trick. Okay, well, let's give up, then.

    Do you know what it is by the way? In case you don’t know, a Banneton basket is a wicker basket without handles that helps you raise round bread. I saw this stuff for the first time in the video demo to explain how to make sourdough bread.

    Last night I had a strange dream.

    I dreamed that I was making super creamy tomato soup in a cream-colored casserole dish. After, I poured it into a bowl. Everything seemed to flow wonderfully well without splashing when suddenly, I discovered solid bodies in the bottom.

    There were whole ingredients left: round red tomatoes and something else that I can't remember now. But I think it was beige. Round too. Did that mean that...?

    As soon as I woke up, I grabbed my cell phone. Look here, dear friend, this is not one of my usual ritual morning practices. Not first thing in the morning with my half-opened and crusty eyes.

    The other day, this is what happened to me and the poor guy had to get lumbered with 1 hour 30 min of public transport in the cold Montreal winter to get to work at 8 am. I saw him sitting at his desk, telling me he was worried about me. It was only then that I noticed my blunder. Sorry, Olivier. Fortunately, he forgave me.

    So yes, I hurriedly grabbed my cell phone.

    And I can't remember why, but I thought of a unique place.

    It was a little hardware store specializing in kitchen supplies in Little Italy close to my home – La Quincaillerie Dante.

    The explanation of my gesture is coming back to me now. I was thinking of the photos I wanted to take during the day. After this, I wondered if this hardware store didn't have some pretty accessories that I could have delivered.

    In these times of confinement, it’s better to take the opportunity to pimp your kitchen. And by extension, transform your home into a pleasant space, right?

    Their website seemed well designed. In the product field, I entered the word "banneton". By chance. And boom. I couldn’t believe my eyes. There it was smiling at me through the small screen.

    So, was that the meaning of my dream? To get a Banneton basket at any cost to successfully make my sourdough bread? I will do it for sure.

    I miss Little Italy too. Oh! Sweet Dante street. So many pearls to discover:

    • Anatol spices for its wide variety of spices (over 600 spices), nuts, grains, loose teas;
    • Pizzaria Napoletana, established for 70 years, for its range of thin-crust pizzas, its sober decor and its nice terrace (inside, it's like being in a huge family dining room);
    • across the street, its sister, Miss Napoletana for her products imported from Italy and her “carreto” (ice cream and sorbet cart) of gelato in summer;
    • Pasticceria Alati-Caserta for its delightful Italian desserts (approved by P'tit Montre) in a retro setting.

    Little Italy, I will wander your streets more often. In the meantime, the ride will be virtual so that my sourdough and I can rest in peace.

    [P.-S. While we’re on the subject of online shopping, I should also get a casserole dish, by the way. I don’t have one.

    P.-P.-S. I want to send all my prayers to the Italians right now who are losing a lot of their loved ones.]

    Smiling girl with big afro sitting cross-legged on a sofa

    Hi there!

    I'm on a mission to help you get nutrient-dense, easy, and mouthwatering plan-based recipe ideas so you can feel stimulated, well-equipped, and confident to eat and cook better.

    Learn more about me →

    Effortless Sourdough Starter

    Mar 22, 2020 · 2 Comments

    Bird's eye view of sourdough with bubbles in a small container held by two hands.

    How nice it is to stay in a rustic chalet for a few days. I’m surrounded by tall conifers. My book Babette's Feast and I are sitting comfortably on the sofa. And my sourdough starter is resting peacefully somewhere on my counter.

    Yesterday, the boys and I went sniffing the spring air after a morning's work at home. We’re not sitting idle here. Nope. Mr. Pleasant is teleworking, Lil’ Monster is being homeschooled, and I’m taking the opportunity to organize my life as a part-time food blogger.

    Let me remind you: the government has asked the population to remain confined indoors. This is to protect each other against the coronavirus infection. But also, to flatten the curve. I guess you must be in the same situation, too. Unless you fear nothing. That’s what a bold nonagenarian said in the news last night, as she was going to the pharmacy.

    Perhaps, even, you’re taking advantage of the situation. Perhaps, you’re acting as if you're on vacation. Floridians in the US could speak volumes. They’re going happily to the beach as if nothing is happening.

    Anyway, we had a pleasant stroll under gray skies. Then, we made a brief stop to watch the ducks wading in the river from a small bridge.

    • Bridge in Val-David
    • River in Val-David
    • River in Val-David
    A stroll in Val-David

    Then we walked to the center of Val-David.

    Admittedly, the boys’ motivation was justified by getting this one pastry.

    Have you ever heard of cronuts? Val-David offers this rare treat. Cronut is a portmanteau word composed of "donut" and "croissant". So that's a cross between a donut and a croissant. It’s a flaky donut. With a layer of chocolate on top.

    The village of Val-David was completely deserted. Not a soul was on the horizon. All shops, restaurants and bistros, and coffee were closed. Except for La Boulangerie et Pâtisserie La Mie Richard.

    Showing Magasin Général
    Le Magasin général - home accessories and café
    Showing La Mie Richard Boulangerie.
    Boulangerie La Mie Richard

    Mr. Pleasant entered the cramped space and I followed suit. I had scarcely put the tip of my toe in the entrance when I received a stern warning to stay away.

    Even if you’re accompanying someone, you have to enter one person at a time! the lady protested at the cash. She was a sexagenarian with short, white hair. Her tone was almost similar to the Soup Nazi in the Seinfeld show.

    Other customers might not guess if Mr. Pleasant and I were sharing our intimate bacteria. It was necessary to respect the social distancing instructions. And that was that! (See! That's why you need to make your own sourdough starter.)

    My desire to take photos of the attractive pastries display quickly deflated. So, like a visitor in a museum or a zoo, I observed the specimens at two meters away. I stared at the Paris Brest, the moka chocolats, the jardinières de fraises, the tartelettes aux fruits (fruit tartlets), the tartelettes à la pâte sablée (shortcrust tarts), the tartlets this, the tartlets that...

    Meh, anyway, I'm so over these treats. O-verrr. I haven’t swallowed these things crammed with rich, opulent, artery-blocking butter and eggs in such a long time. (Oh! Was that drool on the corner of my mouth?)

    Mr. Pleasant came out with a cream puff, a chocolate eclair, two squares of raspberry dessert, and a brownie. I took a few 80% dark chocolate mendiants. It’s a French confectionery assorted with walnuts, hazelnuts, and pecans.

    Back at home, we gobbled our leftovers:

    • Crispy baked yellow-fleshed potatoes, cut into wedges, breaded in corn starch, onion powder, salt, and pepper and moistened with a thin layer of olive oil
    • Grilled tomatoes, garnished with slices of garlic and sprinkled with Himalayan salt and ground black pepper
    • Roasted red pepper, coated with a little olive oil
    • Refreshing and crisp romaine salad with dill and Meyer lemon vinaigrette

    Sometime later, I went to take a look at my "creature". You know, my wild yeast. The project I started three days ago. I confess that, at this moment, I feel a bit like Dr. Victor Frankenstein, shouting loudly: It's alive! It's alive!

    Yes, my creature is indeed alive.

    It rose and is riddled with bubbles, as expected.

    Bird's eye view of sourdough with bubbles in a small container held by two hands.
    Sourdough bubbling after three days

    And I called it Nana David. I was inspired by the first syllable of my name. It’s also the same one as the last syllable of Lil’ Monster’s name. And it’s even the same one as the middle syllable of the name of the bacteria that’s making headlines at the moment (co-ro-NA-vi-rus). The David family name comes from the area where I’ve been staying for the last five days, Val-David.

    There are synchronicities here on earth.

    I took the first steps mentioned in my previous post. It was a breeze.

    My original plan was to let the ferments activate for two days. But I don’t have the required equipment. I don't have my kitchen scale and my other kitchen gizmos. So I decided to push this process up to three days.

    Anyway, in a few hours, I’ll leave this lovely region on this rainy day and violently windy, I’d like to mention, early this afternoon. (Weird! I’m seeing my kid running of joy in the pouring rain without his winter coat. He has his round sled over his head.)

    Once home, I’ll take care of feeding Nana abundantly during the next 14 days.

    Meanwhile, while wild animals enjoy their freedom, while the streets are becoming empty of all signs of life, I’ll use this time to cook other necessities of life.

    I’ll do so while I wait for my sourdough bread to magically appear before me.

    Showing a sign that says Route des belles-histoires

    Make Your Sourdough Starter Now!

    This is the time to return to ancestral know-how. You may be confined at home, but this is an opportunity to prepare subsistence.

    Prepare your sourdough starter may seem daunting. But it’s not at all. It only takes two or three major ingredients, a little sustained attention, and love. That's it.

    Follow the steps above and you’ll be off to prepare your own sourdough bread and other gourmet pastries.

    If you try this recipe, I want to know about it! I always appreciate your feedback. Leave a star rating in the recipe card right below and/or a review in the comment section further down the page. You can also follow me on Pinterest, Facebook, or Instagram. Sign up for my email list, too!

    Bird's eye view of sourdough with bubbles in a small container held by two hands.
    Print Recipe
    5 from 1 vote

    Sourdough Starter

    I'm at my debut in the preparation of a wild sourdough starter. But among the recipes I’ve looked at, this one looks very simple. This step will allow you to make several types of bakeries or delicious pastries, including your sourdough bread. You could prepare it immediately. But you should engage in a process of giving abundant food – feeding your sourdough – during the next 14 days.
    The watchwords here (or good advice) are: weigh your ingredients so that the results are always constant.
    Prep Time5 minutes mins
    Resting Time16 days d
    Total Time16 days d 5 minutes mins
    Course: Staple
    Cuisine: American, French
    Servings: 1 starter
    Calories: 535kcal
    Author: Naïby

    Ingredients

    • 75 g rye flour organic (½ cup)
    • 75 g white all-purpose flour organic, unbleached (½ cup)
    • 160 g water spring, filtered or tap water that has rested for a few hours (⅔ cup)
    Get Recipe Ingredients

    Instructions

    • In a 2 quart container (1 L), mix all ingredients. Cover with a clean cloth or loose cover (let some air pass, that’s the purpose of fermentation!).
    • Let stand for two to three days at room temperature. The mixture will rise the second day, do lots of bubbles, then deflate (or a more pleasant smell of fermentation will emerge.) At this point, the sourdough starter is born.
    • Take ¼ cup (60 mL) of the dough and place it in a clean container. Discard the rest. Add 35 g (¼ cup) of all-purpose flour, 35 g (¼ cup) of rye flour, and ¼ cup (60 g) of warm water. Stir vigorously and cover the container the previous way. Let stand at room temperature for 24 h.
    • Repeat this operation every 24 hours at room temperature for 14 days or until the mixture changes odor and gives off a sweet and pleasant fragrance. After 14 days the preparation should triple in size in a window 8 to 12 hours of feedings.
    • Your starter is ready for future use.

    Notes

    Before making bread, feed the starter and wait until it triples in volume. Use some of the yeast to make bread and continue to feed the rest at room temperature to keep it alive. It must stay like that to keep it active.
    However, if you don’t plan to make bread in the coming days, feed the yeast, let rise at room temperature for 5 to 8 hours, then refrigerate up to two weeks. This is called putting the yeast to sleep.
    If you want to use the rest of the yeast, you can use it in many ways. Check out this website to inspire you (not vegan recipes).

    Nutrition

    Calories: 535kcal | Carbohydrates: 114g | Protein: 16g | Fat: 2g | Saturated Fat: 1g | Polyunsaturated Fat: 1g | Monounsaturated Fat: 1g | Sodium: 11mg | Potassium: 361mg | Fiber: 11g | Sugar: 1g | Calcium: 34mg | Iron: 5mg

    Get Your Free Plant-Based Eating Toolkit and More

    Subscribe to my newsletter and unlock my plant-based course, nutrition charts, recipe secrets, and exclusive updates to prepare wholesome, varied & balanced meals effortlessly. All you need is a good appetite. Subscribe!

    Smiling girl with big afro sitting cross-legged on a sofa

    Hi there!

    I'm on a mission to help you get nutrient-dense, easy, and mouthwatering plant-based recipe ideas so you can feel stimulated, well-equipped, and confident to eat and cook better.

    Learn more about me →

    Life-Saving Sourdough Starter (from Scratch!)

    Mar 18, 2020 · Leave a Comment

    A bag of flour, a laddle of rhye flour, a jar of white flour, and a small wooden spoon are standing on a wooden cutting board which is on a chair.

    Making a sourdough starter.

    I’ve never thought of such a concept. The idea has always intimidated me. In fact, the idea has always frightened me. It has in the same way that the coronavirus is terrorizing a good part of the population today.

    A bag of flour, a laddle of rhye flour, a jar of white flour, and a small wooden spoon are standing on a wooden cutting board which is on a chair.
    White flour and rye flour

    The bacteria of this preparation aren’t the ones putting me in a stir, no. It’s the fact that I must submit all this increased attention to accompany this living creature.

    Take plants, for example. In principle, taking care of them isn’t so complicated. You just need to water them regularly. And maybe, if you possess an ounce of tenderness, whisper words of love to them so that their leaves shine bright.

    Here's the thing. Even when I buy low-maintenance plants, I screw up anyway. Yes! I screw up with the least demanding, the almost unkillable, the hard to crack plants which grow perfectly in arid climates.

    Just look at my snake plant. She recently lost four leaves. They softened and sagged, like rumpled clothing lying on the floor.

    And my baby Christmas cactus. Its green garlands are pulling heavily and sadly to the ground; she’s crying of humid neglect. I could be arrested for voluntary planticide.

    Fortunately, my little monster, another living creature that I take care of, isn’t suffering too much from my maternal handicap. Aside from his scouring sponge-like hair, his capillary corkscrews or other miniature balls are doing well. Even if he gets a haircut every three, four months, or I rarely untangle them.

    But not everything is a tragedy. I’m still able to give sustained attention... short-lived perhaps, but still, continuous. Anyway, right now, I don't have much choice.

    I must strive to become a pioneer woman.

    I have to go discover unknown lands, clear uninhabited, perhaps hostile, territories like a valiant explorer of lost times. Because, for fourteen days, the government prescribed to stay confined to our homes to flatten the COVID-19 contagion curve.

    So in these times of forced isolation, the most important thing that matters to me right now is being able to provide for my family's nutritional needs. More than wiping small wet body parts with toilet paper.

    And that means going back in time to survive and become self-sufficient with nothing more than flour and water.

    Obviously, it’ll be necessary to add other foods. Foods that are rich in essential nutrients upon pain of falling into vitamin deficiencies. And we don't want to revive forgotten diseases like scurvy (vitamin C deficiency).

    Anyway, the day after the government announced school closings on Friday the 13th, the idea of ​​making my own sourdough starter germinated in my mind. And at the same time, I was trying to understand the difference between bacteria and viruses on the web.

    While most bacteria are questionable, some of them are our dear friends.

    Yes, even if viruses are not welcome in my sacred temple, I’m very sympathetic to the good bacteria. Let’s not exaggerate, we cannot become round the twist germaphobes as soon as we hear about bacteria. We need some of these microbes to keep our gut functioning properly (aka our microbiome).

    And also, I have to say, we need it to give us delicious bread. One that will slip in and be digested easily.

    And so, while I was getting informed on a local news website, a video from Quebec host-chef Ricardo revealed itself to me. He had invited a member of his team to explain how to make your leaven aka sourdough starter.

    This stocky and bearded man introduced to us his three and a half-year-old sourdough starter. He baptized it by giving it a little name – his own name. His recipe calls to:

    • mix flour and water in equal parts and let everything stand (ferment) for 48 h,
    • take a part of the dough, feed it with half of the initial amount of flour and water, and leave to rest for a day,
    • feed the starter again with the same previous amount for each ingredient every 24 hours for 14 days.

    After 14 days, you get your sourdough starter and you can make your own homemade sourdough bread! I’ll explain this step when I get there.

    So, if everything goes well, my pasty concoction should give off a more or less pleasant smell of fermentation.

    However, there was something I wasn’t getting. I was getting confused with the discarding and feeding part.

    Did I have to take out a part of the newly fed dough each time? and by the same token, discard more than three-quarters of it? Or did I have to constantly feed the same preparation?

    More research was needed. And lo and behold, I found what I needed.

    But, first of all, what’s sourdough starter?

    Sourdough starter (or wild yeast) is a mixture of flour and water. This starter has fermented thanks to the natural ferments present in the flour and the bacteria present in the air.

    This makes it possible to introduce germs or bacteria to make them proliferate and to make the sourdough bread rise. Sourdough bread is characterized by its density, its irregular crumb, and its more or less acidic taste. This process gives this bread a rustic, dense, and slightly elastic texture.

    Once the breeding of bacteria has started, you just have to feed it with food, care, and attention. You have to nurture it. Otherwise, it will die. 🤔

    After the initial production of your first wild yeast, a part of it is generally kept. It's your sourdough starter, also called "levain" (in French). It can theoretically be kept infinitely.

    Yep, I can give my starter as an inheritance to my offspring or other interested people. As long as it’s given life.

    You just have to feed it regularly with flour and water to keep it alive. You don't have to wait for a new fermentation (the ferments multiply with each feeding).

    When you make your starter, it’s unique. It can vary in taste. This will depend on the flour, the environment, the geographic areas, the love words spoken to it – who knows.

    There won’t be two alike. So it's worth giving it a name.

    Why the hell would I want to bake sourdough bread?

    Well, for all the reasons mentioned above: for 14 days, I’ll be confined to my home.

    In fact, I’m 1 hour away from Montreal up North. I'm in the beautiful region of Val-David to make this event less gloomy. So you know what? I might as well make a homemade sourdough starter and go further in my baking skills than making pancakes.

    But the real good reason is that sourdough bread expires less quickly than industrial bread (made with industrial and unnatural yeast). The acidity of the wild yeast slows rancidity.

    And in such times, who wants to stay in line forevah in grocery stores to get bread when shit hits the fan?

    After this state of emergency, when you return to your peaceful and busy life, you can prepare one or two large loaves over the weekend. And you can keep them wrapped in a tea towel all week.

    Okay, I haven't done my starter yet (I'm about to do it anytime soon). But I'm writing this to you because I know it will help me get through the night better.

    This is not rocket science. But I admit it. I'm harboring some fears with regard to this creature and I tremble at the idea of ​​getting started.

    Here's how to make sourdough starter.

    In a clean and rinsed container (preferably in glass or porcelain), you start by mixing equal parts of water and flour. It can be 50 or 100 grams each, for example. Ideally, the flour should be organic whole wheat or semi-whole wheat flour.

    It seems that rye flour is the most effective. It can be used alone or mixed fifty-fifty with all-purpose white flour or bread flour.

    Also, the water should be non-chlorinated. Choose spring water, filtered water or tap water that has rested in an open carafe for a few hours. You can mix the ingredients with your finger to help the bacterial activity start or a wooden spatula.

    After, the mixture is left to rest at room temperature for two or three days (48 h or 72 h). The "creature" will begin to rise and have lots of bubbles. It will also give off an unpleasant odor, but far from being a foul and disgusting rotten smell. In this case, you’ll have to throw everything away and start again.

    Then take 20% of the mixture and discard or compost the rest and add warm water and flour. This step is optional, but it seems that by doing this, you’re somewhat making a natural selection of good yeasts.

    Well, afterward, we give it food and we have to do it daily. Possibly, always at the same time. At a certain point, the wild yeast will rise and fall predictably. And it will give off aromas that are a bit sour and very pleasant.

    This phenomenon normally occurs after two to three weeks. At this point, the sourdough starter is ready.

    It’s then possible to start making bread. Afterward, you just have to maintain the starter by feeding it regularly if you make bread often. Or you can let its bacterial dynamism decelerate in the refrigerator. We say we let it "sleep".

    There you go! Now I'll go on this magical adventure. Now, the living particles are on the verge of enchanting me more than terrorizing me.

    [PS. I’ll get back to you with more details in my next post. Then, we'll be able to get started with a sourdough bread recipe. With photos!]

    [PPS. I don't know if I’ll catch the “virus” of making bread, but I am considering taking a look at the following books:

    Flour Water Salt Yeast - The Fundamentals of Artisan Bread and Pizza, by Ken Forkish, Ten Speed Press, 265 pages, $ 41.

    There's also Tartine Bread, by Chad Robertson and Eric Wolfinger, Chronicle Books, 304 pages, $ 38.75.

    Pray that I’ll be protected.]

    Smiling girl with big afro sitting cross-legged on a sofa

    Hi there!

    I'm on a mission to help you get nutrient-dense, easy, and mouthwatering plan-based recipe ideas so you can feel stimulated, well-equipped, and confident to eat and cook better.

    Learn more about me →

    Lively Cumin Guacamole with Tomatillos

    Feb 9, 2020 · Leave a Comment

    Cumin Guacamole with sliced jalapeno in a small pot on a wooden board

    There's no doubt. To make the best guacamole, you need great ingredients. Starting with a good ripe avocado. Then come the onions, cilantro, chili, and lime juice. From there, we can add red tomatoes, as we commonly do.

    But we can also have other variants.

    In fact, there are as many variations as there are versions of a pop song. To give a twist to the popular American recipe, we're going to enhance the acid flavor of guacamole with exquisite tomatillos, which flavor combines perfectly with the other ingredients.

    Cumin Guacamole with sliced jalapeno in a small pot on a wooden board
    Cumin Guacamole with tomatillos

    A Unique Guacamole Recipe

    We can agree on this: guacamoles differ from one end to the other, from one restaurant to another, from one house to another. There's the standard guacamole, and there's the lick-your-lips guacamole.

    If we're looking for an additional flavor, something tastier, we'll add ground cumin. Thus, cumin guacamole.

    Then, when we want to contrast the textures, we tend to add tomatoes. 

    In my recipe, I replaced these with tomatillos. 

    Tomatillos are green tomatoes that bring tartiness. This is amplified by lime, which gives this sauce a refreshing taste. 

    This cumin guacamole with tomatillos is enriched with a good amount of aromatics, bringing roundness and warmth. It also has relatively large pieces. Finally, it stands well on a potato chip. 

    What Do You Put in a Cumin Guacamole?

    Here's everything you need: ripe avocados, coriander, onions, jalapeño or Serrano peppers, lime, and salt. These are the basic ingredients. Popular optional additions include garlic, tomatoes, and ground cumin. 

    I went that road. I just made a few small changes.

    I put French shallots for sweetness and tomatillos instead of tomatoes to make it different. 

    If adding tomatillos is strange for us in North American, it's certainly not Mexico. To make this recipe a reality, as I didn't find fresh tomatillos in this winter weather, I bought them in cans, something I like to do less. I don't like to do that at all, actually. I prefer all of my ingredients to be 100% fresh.

    But I wasn't disappointed.

    In the end, you get guacamole with three shades of green: the light green of the guacamole, the olive green of the tomatillos, and the forest green of the jalapeño. In any case, I can't wait to taste it with fresh tomatillos.

    Main ingredients

    • Avocados – by default, in North America, we use Haas avocados.
    • Tomatillos – due to winter weather, they are in cans but use fresh ones as soon as you can find some.

    How to Make Cumin Guacamole with Tomatillos Step by Step 

    1/ Coat the avocado pulp with lime juice

    2/ Drain and reserve the lime juice.

    3/ Crush the avocados well. 

    4/ Add the seasonings, then add the chopped onions, diced tomatillos, chopped cilantro, and chopped garlic.

    5/ Add 1 tablespoon of the reserved lime juice. 

    6/ Let stand at room temperature for 1 hour before serving.

    My Best Advice for Keeping Guacamole Bright Green

    Avocado turns brown when it's in contact with air (called oxidation). So start by preparing all your ingredients beforehand by cutting the avocados in half. Once the avocados have been cut and the pulp removed, coat them with lime juice.

    So, to prevent the preparation from browning, do this: put it in an airtight container. Tap it to remove air bubbles. Cover it with a thin layer of olive oil or warm water. The avocado is so dense that it will not absorb it. It will stay green for two full days in the refrigerator.

    To serve, pour the liquid from the container and stir the guacamole well. Add a little lime if necessary, and that's it, it's ready.

    Other Creative Variations

    The flavor variations are unlimited. You don't have to hold on to the traditional recipe. You can do whatever you want. For example, I added French shallots, cumin and tomatillos to make it different. Usually, it's best to have fresh ingredients. But if you don't have some on hand — speaking of tomatoes — well, you won't die if you put canned tomatoes.  

    Here are other ways to prepare guacamole for inspiration:

    • Types of onions – all kinds are good. White, green, or red onion, sweet, French shallot, spring onion, etc. The whole family of Alliaceae is welcome.
    • Types of tomatoes – greenhouse, Roma (makes the preparation less watery), heirloom, cherry... Dice them and stir them. If you don't have any on hand or want to save time, use canned tomatoes (not my first choice). 
    • Coriander substitute – does it taste like soap? Instead, use chives. It will be delicious too.
    • With large pieces or smooth? I like mine with a few large pieces to have a little more texture. But I can make it smooth, depending on the people I serve it to. In my parents' country, in Haiti, there's a kind of avocado puree with large pieces too. I wouldn't be surprised if it had a consistency not so different from Mexico.

    Practical and Technical Details

    How to pronounce the word guacamole?

    Before diving into the details, we'll make sure that this word is well pronounced. You say it in four syllables like this: / gua-ka-mol-e /. Now that I have settled this question let's continue...

    What do we make guacamole with? What are the ingredients in guacamole? 

    The basic ingredients are avocado, onions, cilantro, chili, lime juice, and salt. Afterward, you can flavor it with tomatoes, garlic, or ground cumin.

    Can I prepare it in advance? How long does it last?

    It will keep for up to 2 days without browning if it's stored as follows: place the guacamole in an airtight container. Tap it a bit to remove air bubbles. Cover it with a thin layer of oil or warm water, seal it and refrigerate it. To serve, pour the liquid, stir it well and add a little lime if necessary.

    What can you eat guacamole with?

    Dip some corn chips! It's the most popular choice. The texture contrast is just sublime. But you can also eat it with tortillas, vegetable sticks, or crackers. It's my favorite choice to accompany most Mexican dishes. We use it as a dip or put a large spoonful in burritos, enchiladas, tacos, nachos, and fajitas. Do as you please: eat it with what you want!

    What's the origin of the word "guacamole"?

    To get a short answer, "guacamole" simply means "avocado-based sauce" and not, ground testicle sauce (long story). This translation is a semantic misinterpretation of a literal and figurative meaning, perpetrated by bad translators. (Go here to find out about the origin of guacamole.)

    Prepare this Guacamole Now!

    No need to wait until game day to prepare this dip. It lends itself easily for all kinds of occasions.

    A basic guacamole without frills would be a rougher version, but decorating it with whimsy gives you as much pleasure. Enough pleasure to excite your palate and pinch your cheeks with freshness.

    So add exotic ingredients and get carried away.

    If you try this recipe, I want to know about it! I always appreciate your feedback. Leave a star rating in the recipe card right below and/or a review in the comment section further down the page. You can also follow me on Pinterest, Facebook, or Instagram. Sign up for my email list, too!

    Adapted from Arlton Brown from the Food Network

    Cumin Guacamole with sliced jalapeno in a small pot on a wooden board
    Print Recipe
    5 from 1 vote

    Cumin Guacamaole with tomatillos

    A unique guacamole different from traditional guacamoles. The tomatillos bring tartiness, amplified by lime. Lime gives this sauce a refreshing taste. This cumin guacamole with tomatillos is enriched with a good amount of aromatics, bringing roundness and warmth. It also has fairly large pieces. Finally, it stands well on a potato chip.
    Prep Time20 minutes mins
    Resting time1 hour hr
    Total Time1 hour hr 20 minutes mins
    Course: Side
    Cuisine: Mexican
    Keyword: avocado, tomatillos
    Servings: 6
    Calories: 176kcal
    Author: Naïby

    Ingredients

    • 3 Haas avocados halved, seeded and peeled
    • 1 lime juiced
    • ½ teaspoon kosher salt
    • ½ teaspoon ground cumin
    • ½ teaspoon Cayenne pepper
    • 2 shallots diced (or ½ medium onion) (about ¼ cup)
    • ½ jalapeno pepper seeded and chopped (optional)
    • 2 tomatillos seeded and diced
    • 1 tablespoon cilantro chopped
    • 1 clove garlic minced
    Get Recipe Ingredients

    Instructions

    • In a large bowl, place the avocado pulp and lime juice, mix to coat. Drain and reserve the lime juice, once all the avocados are coated.
    • Using a potato masher, add the salt, cumin, cayenne pepper and mash. Then add the onions, tomatoes, cilantro and garlic. Add 1 tablespoon of the reserved lime juice.
    • Let stand at room temperature for 1 hour then serve.

    Notes

    • For the preparation of guacamole, obviously, ripe avocados are ideal. It is worth buying several avocados so as not to come across unpleasant surprises, like knotty spots or brown flesh.
    • If only some of your avocados are ripe, don't despair. Take the unripe fruits, put the flesh in a food processor, add a drizzle of olive oil, and mix it until they are creamy. In a way, mixing them like that with oil deepens their flavor. It makes them richer, more ripe, unsweetened, and not starchy like the usual unripe avocados. Then, you can take this puree and incorporate it into cubes of well-ripened avocado and make guacamole from there.
    • To avoid the avocado from browning fast, prepare all your ingredients beforehand by cutting the avocados in half.
    • Stored in an airtight container, this cumin guacamole will keep up to two days.

    Nutrition

    Calories: 176kcal | Carbohydrates: 12g | Protein: 2g | Fat: 15g | Saturated Fat: 2g | Polyunsaturated Fat: 2g | Monounsaturated Fat: 10g | Sodium: 203mg | Potassium: 569mg | Fiber: 8g | Sugar: 2g | Vitamin A: 254IU | Vitamin C: 17mg | Calcium: 23mg | Iron: 1mg

    Get the story behind the recipe

    Get Your Free Plant-Based Eating Toolkit and More

    Subscribe to my newsletter and unlock my plant-based course, nutrition charts, recipe secrets, and exclusive updates to prepare wholesome, varied & balanced meals effortlessly. All you need is a good appetite. Subscribe!

    Smiling girl with big afro sitting cross-legged on a sofa

    Hi there!

    I'm on a mission to help you get nutrient-dense, easy, and mouthwatering plant-based recipe ideas so you can feel stimulated, well-equipped, and confident to eat and cook better.

    Learn more about me →

    On the Superbowl and Avocados

    Feb 9, 2020 · Leave a Comment

    Avocado cut in half next to a metallic plate of cut and whole avocadoes

    Like anything shady or that doesn't appeal to me at first, I was taken aback when I started to really love avocado.

    No, no, I'm sorry, I'm fooling you, as I have been fooled myself, by the way. In fact, the avocado in question was concealed, like a wolf in sheep’s clothing, in a raw chocolate mousse. I admit, dear guest, it’s a cheating scheme on behalf of a faux gourmet, it's no way to appreciate food if it's not in its raw, natural state, but still, it was a good prelude.

    I was in my early thirties, becoming a raw food neophyte when I discovered the recipe of a certain Jennifer Cornbleet on YouTube. My palate was still a stranger to this unsweetened pear and, needless to say, I didn't expect it to amaze me under the guise of a decadent dessert. You can imagine my surprise when I brought to my lips a caress of creamy avocado mixed with chocolate, dates and maple syrup, a sweet and velvety bite more deceptive than any secret.

    Admittedly, I didn't get exposed to the true nature of avocado, but this fruit intrigued me seriously. It intrigued me enough for me to examine, as I was removing the frills, what was really going on under there. Over time, my taste buds have improved, my wisdom broke through and it didn't take long before I really appreciated the taste of avocado.

    Now, I found myself spreading it on toasts, slipping it into green salads–or fruit salad–, and even, imagine, eating it raw directly with a spoon. Talking about evolution.

    But my evolution sometimes has limits.

    Last weekend was the 54th edition of the Super Bowl, the pinnacle of American football, and images of avocados invaded my mind. More specifically, images of guacamole. This year, we were entitled to something unique–we were witnessing the victory of a team with our very own, Laurent Duvernay Tardif (originally from Quebec).

    And this is where my evolution has limits: I don't watch football at all–even less the Super Bowl. Okay, sometimes the halftime show piques my curiosity, I anticipate any gossip-rich event, but otherwise, you won't see me in front of my TV for that sort of thing.

    On the other hand, I’m sure that my visions foreshadowed the tide of supporters nailed to their couch, somewhere in their men cave, to taste Buffalo wings — perhaps cauliflower to be trendy —to dip nachos or bread in guacamole, in other words, ground testicle sauce?

    Quite a semantic chaos exists regarding the origin of the word guacamole and its meaning.

    Ground testicle sauce is what circulates on the Internet, like an ugly indelible rumor. There are beliefs that the word "Avocado" comes from the Spanish "aguacate", itself derived from the word "ahuacatl" in the Nahuatl language which means "testicle", by analogy to the shape of this organ. I think Wikipedia claimed this before but corrected its entry. (Only English. In French, this erroneous meaning still remains).

    But from the very beginning, this word has always meant nothing other than "avocado".

    It seems that nahutlphones, if I may say so, were making an euphemism by calling their genitals "avocado" just as people say in French slang "fried eggs, watermelon, grapefruit, melons, pears, coconuts, mandarins, walnuts, strawberries, hazelnuts” to denote “breasts”; "Sausage, noodle, carrot, cucumber, baguette, andouillette, sausage, eggplant, leek, nem, banana" to designate "penis".

    Although these words are deliciously cute analogies, that doesn't make them primary meanings. Besides, in all cultures and since the dawn of time, our jewels have always evoked gastronomy. As an illustration, in English, we say "weiner" (sausage) for "penis"; the Hispanophones say " huevos" (eggs) for "testicles".    

    On this note, I will quote a specialist in Nahuatl culture who says:

    [...] we would not generally consider as "partly correct" to say that "schnitzel wiener" means "penis schnitzel" or that "nut case" means "testicle box". Spanish speakers would also not think it sensible to say that "torta de huevo" means "testicles sandwich".       

    So the Nahuatl word "ahuacatl" (pronounced / a: wakatl /) does not mean "testicle", but due to the evocative form of the fruit, it can be used metaphorically in this extended sense.

    I love it. I also love Google Translate’s translation from English to French of "nut case" for "nut" as the metal fastening. Like, you really have to trust writings that are considered authorities.  

    All this is fascinating, and I must undoubtedly devote a whole historical article on avocado and guacamole, but just like everyone else who stops more at the gastronomic dimension than the historical dimension, I’ll settle with tasting it thoughtlessly as the properly said nut-based avocado sauce.

    And it was quite special.

    Avocado cut in half next to a metallic plate of cut and whole avocadoes
    Avocados

    It seems like I could never get away from my first misleading connection with avocado, and so I have to disclose another deception. For this blog, my mission is to share with you dishes containing accessible ingredients, but caught up in my own madness–who knows–I added a rarely used and out of the ordinary ingredient (in American culture): tomatillos. In a can, on top of it.

    I don't know what took me over me, but lo and behold, I went overboard. I hope you will forgive me. This is something quite correctable, you’ll just have to replace them with red tomatoes.

    In short, it was quite an experience.

    Get the recipe here

    If you try this recipe, I want to know about it! I always appreciate your feedback. Leave a star rating in the recipe card right below and/or a review in the comment section further down the page. You can also follow me on Pinterest, Facebook, or Instagram. Sign up for my email list, too!

    Spiced Chickpea Stew with Coconut and Curry

    Jan 29, 2020 · 4 Comments

    Bursting with flavor, this spicy chickpea stew with curry and coconut will not disappoint. It's filling, nutritious, and relatively easy to make.

    The only downside is that you will pass out of pleasure before you finish your last bite.

    Spiced Chickpea Stew with Curry and Coconut
    Spiced chickpea stew with coconut and curry
    [feast_advanced_jump_to]

    A Perfect Blend of Comforting Ingredients

    This stew evokes a lot of the chana masala found in a few areas of South India or the Caribbean—Jamaica, in particular. It combines coconut with Indo-Caribbean spices, 

    Flamboyant but tasteful, this version testifies to the art of tasting, seasoning, and tasting again. 

    In fact, during the preparation, I couldn't help myself from taking licks while moaning of pleasure. Divine.

    What Do You Put in a Chickpea Stew?

    Chickpeas, chard, coconut milk, cumin, ginger, and vegetable stock to make a spiced chickpea stew
    Ingredients (clockwise): Swiss chard, coconut milk, vegetable broth, cumin, curry, crushed chili pepper, chickpeas, ginger, Piment bouc, white onion

    Like many good things, it starts with onions and garlic. Next comes a lively parade of spices. Chickpeas are first added to participate in the carnival, and then a part is removed for the garnish. 

    After that, the pouring of tasty liquids follows to finish off with fleshy leaves, which quickly soften soon after.

    For this recipe, here's what you'll need:

    Main ingredients

    • Chickpeas – I used dry chickpeas soaked in water the day before with two teaspoons of baking soda. I always prefer "fresh" ingredients. Baking soda alkalizes the water, which helps soften the skin of chickpeas faster. But if you forget this step, it's not the end of the world; you can take canned chickpeas instead.
    • Coconut milk – whole, to bring more flavor. If you fear calories, you can choose the light option, but you'll have more water and less yum.
    • Vegetable broth – In general, I always use in cube form, because I find it easier to gauge the flavor and because they don't contain all these ingredients that don't interest me. In principle, I put one cube for 1 cup of water.
    • Swiss chard – Swiss chard and chickpeas make a good duo.

    How to Make Chickpea Stew Step by Step

    A collage of four images to make spiced chickpea stew (mixed ingredients, coloring the chickpeans, adding the coconut milk, and adding the chard)

    1/ Sauté the garlic, onion, and ginger (5 min).

    2/ Add the spices (curry, cumin, and crushed chili), cooked chickpeas and seasonings (salt and pepper), then fry and brown, often stirring (8 -10 minutes).

    3/ Reserve half of the chickpeas for garnish and mash the other half to thicken the stew. Add the coconut milk, vegetable broth, and chili and leave to thicken (30-35 min).

    4/ Stir in the green leaves and stir (3-7 min).

    5/ Divide into bowls and garnish with mint, reserved chickpeas, a pinch of red pepper flakes and a drizzle of olive oil.

    6/ Optionally serve with cashew yogurt.

    How to Make this Stew a Success?

    It's quite simple. Nevertheless, you have to pay attention to the thick texture of this stew. 

    So, if you ever find that the soup liquid is too watery, you can thicken it in several ways. 

    • Option #1: Reduce the liquid to cooking;
    • Option #2: Add more whole coconut milk;
    • Option #3: Inject starch from starch chickpea;
    • Option #4: Add a powder as a thickener like chickpea flour or the like.

    If you want to have something light, I advise you not to add more coconut milk, especially as it's rich in calories. The quickest option is to inject more starch by mashing the chickpeas or adding chickpea flour if you have any—about a tablespoon.

    Other variations

    Of course, there's the original recipe from Alison Roman from the New York Times, called Spiced Chickpea Stew with Turmeric and Coconut. It's quite popular, so much that it blew up on the Internet and was called The Stew.

    I slightly modified her recipe. For hers had more coconut milk. Unfortunately, my belly could not tolerate it well. 

    And you can put other types of leafy greens instead of Swiss chard—for example, spinach or kale.

    Finally, you can add noodles in it, if you feel like it. Like penne or orzo. This addition reminds me of the traditional Haitian yellow soup, which is made from squash.

    What to Serve with Spiced Chickpea Stew? 

    Honestly, you can make it your main meal and accompany it with grilled pita bread. As it contains a good supply of proteins, this stew is very filling. 

    This stew can be served in two different styles: optionally with a quarter cup of cashew yogurt to sweeten and soften the flavors or without yogurt; garnished with fresh mint or fresh coriander. I loved the fresh mint. It brought an eccentric freshness on the palate. Regardless, this dish is even better on the second or third day.

    But if you want to serve it as the main meal, here are some side ideas:

    • Chickpea stew with rice and vegetables
    • Chickpea stew with couscous and vegetables
    • Chickpea stew with polenta and vegetables

    These suggestions can be served on another plate or, if your stew is thick enough, it can act as a curry and sit on a bed of rice, couscous, or polenta.

    Prepare this Chickpea Stew Now!

    You have everything to gain when you plan to cook a meal that includes chickpeas—especially this one—with exotic ingredients.

    The richness, consistency, and spiciness make this stew a perfect meal for the cold weather.

    Start with aromatics typical of tropical regions and you’ll quickly find yourself in front of a homely dish.

    Spiced Chickpea Stew with Coconut and Curry Recipe

    Spiced Chickpea Stew with Curry and Coconut

    Adapted from Alison Roman the New York Times

    If you try this recipe, I want to know about it! I always appreciate your feedback. Leave a star rating in the recipe card right below and/or a review in the comment section further down the page. You can also follow me on Pinterest, Facebook, or Instagram. Sign up for my email list, too!

    Spiced Chickpea Stew with Curry and Coconut in a white bowl on top of a blue jean napkin
    Print Recipe
    5 from 2 votes

    Spiced Chickpea Stew with Coconut and Curry

    The following recipe is my attempt to add a little more flavor and to mitigate the richness. Indeed, the original recipe required double the amount of coconut milk. But don't worry, my version is just as smooth and filling.
    Prep Time10 minutes mins
    Cook Time55 minutes mins
    Total Time1 hour hr 5 minutes mins
    Course: Main
    Cuisine: Caribbean
    Keyword: chickpeas, coconut milk, cumin, curry
    Servings: 4
    Calories: 230kcal
    Author: Naïby

    Ingredients

    • 2 tablespoons olive oil and more for serving
    • 4 cloves garlic minced
    • 1 large Spanish onion chopped (about 1 cup)
    • 2 inches ginger freshly grated (about 1 teaspoon)
    • 1 tablespoon ground curry
    • 1 tablespoon ground cumin
    • 1 teaspoon red pepper flakes and more for serving
    • 1 ½ cup chickpeas soaked in water the day before with 2 teaspoons of baking soda (about 3 cups cooked or 2 cans (400 g / 15 oz) chickpeas, drained and rinsed)
    • 1 400-ml can whole coconut milk (about 15 ounces)
    • 3 ¼ cups vegetable broth
    • 1 Scotch Bonnet pepper or ¼ teaspoon cayenne pepper
    • 1 bunch chard kale, or green cabbage, stems removed, leaves torn into small pieces
    • Salt and pepper
    • 1 cup mint leaves for garnish
    • 1 serving lime cashew yogurt (optional)
    Get Recipe Ingredients

    Instructions

    • Heat the oil in a large saucepan over medium heat. Sauté the garlic for 2 min until it smells fragrant. Add the onion and ginger and stir from time to time until the onion is translucent and begins to brown a bit around the edges, 3 to 5 minutes.
    • Add the curry, cumin, and red pepper flakes, then the cooked chickpeas. Season with salt and pepper. Let the chickpeas sizzle and fry in the spices and oil, stirring frequently until the chickpeas begin to decompose and become slightly golden and crisp, 8 to 10 minutes. Remove about a cup of chickpeas and set aside for garnish.
    • Using a spoon, wooden spatula or potato masher, mash the remaining chickpeas a little more to release their starch (this will help thicken the stew). Add the coconut milk (reserve ¼ cup to garnish, if desired) and broth. Bring to a boil, scraping all the pieces that have formed at the bottom of the pan. Stir in the Scotch Bonnet pepper and cook, stirring occasionally, until the stew has thickened and the flavors have started to blend, 30 to 35 minutes. (Taste a chickpea or two, not just the liquid, to make sure they’re also tasty.) For a slightly thicker stew, continue to simmer until you get the desired consistency. (Alternatively, you can add a teaspoon of chickpea flour or other thickening powder).
    • Add the green leaves and stir, making sure they’re submerged in the liquid. Cook for a few minutes so that they wilt and soften, 3 to 7 minutes, depending on the type used. Season again with salt and pepper, if desired.
    • Remove the Scotch Bonnet pepper, if used. Divide among bowls and garnish with mint, reserved chickpeas, a pinch of red pepper flakes (if you can handle the heat) and a good drizzle of olive oil. Serve with coconut milk or cashew yogurt and toasted pita bread if you have on hand.

    Notes

    • Whole coconut milk is tastier than its light version. It contains more water.
    • If you ever find that the soup liquid is too watery, you can thicken it by reducing the liquid during cooking, adding more whole coconut milk, injecting starchy starch from chickpeas, or by adding a thickening powder like chickpea flour or whatever.
    • The leaves can be replaced by other green leaves. However, be aware that Swiss chard and spinach wilt and soften much faster than kale.
    • Stored in an airtight container, this stew will keep for 5 days.
    • You can even freeze it without any problem.

    Nutrition

    Calories: 230kcal | Carbohydrates: 31g | Protein: 8g | Fat: 10g | Saturated Fat: 1g | Polyunsaturated Fat: 2g | Monounsaturated Fat: 6g | Sodium: 946mg | Potassium: 677mg | Fiber: 8g | Sugar: 7g | Vitamin A: 5695IU | Vitamin C: 35mg | Calcium: 134mg | Iron: 5mg

    Get Your Free Plant-Based Eating Toolkit and More

    Subscribe to my newsletter and unlock my plant-based course, nutrition charts, recipe secrets, and exclusive updates to prepare wholesome, varied & balanced meals effortlessly. All you need is a good appetite. Subscribe!

    Smiling girl with big afro sitting cross-legged on a sofa

    Hi there!

    I'm on a mission to help you get nutrient-dense, easy, and mouthwatering plant-based recipe ideas so you can feel stimulated, well-equipped, and confident to eat and cook better.

    Learn more about me →

    Unforgettable Vegan Pancakes

    Jan 25, 2020 · 4 Comments

    A close-up of folded pancakes in a metallic plate with strawberry sauce dripping with a small jar of maple syrup behind it and a small skillet of strawberry sauce on the side
    Vegan thin pancakes with strawberry sauce

    January arrived like a big sack of potatoes falling heavily on my shoulders.

    First, I didn’t help with my last not so very happy blog post. On Christmas Eve, on top of that. Very heavy.

    During the holidays, I "celebrated" big Christmas evening with my man's family like an observer watching fish moving around in an aquarium. I'm the type to move my hips like there’s no tomorrow on good music, but as of late, they have been put to sleep.

    A week later, I couldn't see myself shouting HAPPY NEW YEAR!!!, with 2020 glasses on my nose, a glass of champagne in one hand, a firecracker in the other with golden confetti falling on my head. Well, to tell you the truth, there’s never been any confetti in my life nor the fanciful glasses by the way (worth noting for the following years).

    Anyway, I simply chilled at home. I needed to get some peace of mind. And it was quite difficult, I would say.

    Just last Sunday, when I finally sat cross-legged to try to meditate in my living room, on my thick woolen Berber carpet, supposed to comfort me thanks to its soft and warm weaving, tears were running down on my cheeks. I couldn't contain them. Instead of emptying my head, I was filling it with scattered flash backs.

    Quite naturally, they’re etched in my memory.

    Charcoal portrait of a smiling face with eyes looking down
    Tany's portrait

    Of course, a charcoal portrait of my sister, lying on my wall shelf, stood straight ahead of me. Enough to help calm my mind. All of a sudden, I feared that I would never be able to get my wandering thoughts about her out of my head again during that supposedly moment of wholeness.

    Sometimes, I wonder if I should move this portrait to put it in the kitchen instead. For if I had to associate a room with her personality, it would be this space, this space imbued with fire and heat, and spices and zest. That's how I would describe her.

    Ah... I'm still thinking about her famous crêpes that she made so well. And then, this thought comes to mind, it’s true, I never got her recipe and I’ll never get it again. A secret, a gem lost in the ocean.

    But one day something turned the tide.

    A few months ago, while I was walking with my little monster to buy comic books, as usual, I stopped at the cookbook table. A dark cover book with light shapes in the center caught my eye.

    In front of a dark barn wood paneling wall, there was this brunette, dressed in pale light summer clothes, hair tied loosely, eyes half-closed and riveted downward, mouth ajar, shoulders uncovered and prominent collarbones, right arm folded—from my perspective—, hand frozen downward with a strawberry caught between her fingers. As you look at the photo, we understand that it’s meant to be placed in the middle of other strawberries, these strawberries which were comfortably sprawling on small creamy apple-green spiky cushions, shaped like Kisses chocolates.

    She was assembling a fruit pie.

    Above her head, we could read the title in large white capital letters Les Bonnes Choses (The Good Things), then just below in a smaller font: Cuisine végane au fil du jour (Vegan cuisine throughout the day). And at the very top Éline Bonnin was written in an even smaller font.

    In this moody atmosphere, she looked so angelic.

    A girl is putting a strawberry on a fruit tart
    Les Bonnes Choses by Élise Bonnin

    She stood out from the dark background, illuminated with soft light and surrounded by a vase of small white flowers to her left and a Mason jar of white flour to her right. She seemed to be calling me to her. I think I heard the high and angelic note: AAAAAAAH (no, no kidding). So I went over to her, grabbed the book, and started to leaf through it out of curiosity.

    My curiosity paid off. Within five seconds, I discovered a recipe for thin vegan pancakes. The photo was convincing.

    But not enough to trust the author right away.

    Because you see, I tried many vegan pancake recipes to be disappointed. There are these people online who boast about the ultra-soft side of the preparation when that’s not the case at all.

    Oftentimes the texture was as pasty as a dry morning mouth. Times a thousand. I didn’t see how someone else was going to sell me another vegan pancake, and thin on top of it. I turned the book over and read the back to learn that...

    Éline Bonnin was trained in tableware from Nantes and Toulouse. She was a pastry chef in France before coming to settle in Quebec. [...] She is now a chef in Montreal [...].

    She had me at: pastry chef.

    If there was someone who had to know how to make thin pancakes like my sister’s, but in a vegan version, I said to myself, it had to be her: French and pastry chef, I was more than convinced.

    So I entered the bookstore with the sole intention of buying two books for my little one and came out with four: two comic books, Les Bonnes Choses and food literature (Un Chemin des tables from Maylis de Kerangal).

    Vegan pancakes worthy of this appellation.

    I was really happy to have made thin eggless pancakes for the first time. I showed them proudly to my friend Juju with a photo and she asked me if they were gluten-free. Well, this recipe isn’t, but I had to give Éline a chance before venturing into other things.

    Come to think of it, this recipe is very similar to that of my pre-vegan days, the only difference being that you replace the eggs with cornstarch. However, it seems to me that I have already tried to make this simple substitution, but perhaps I was too ambitious in replacing white flour with other types of flour such as quinoa or millet flour. Far too grainy. I think I also failed with whole wheat and spelt flour. Go figure what must've happened.

    Mr. Pleasant (my man’s name has been updated for the new decade) knows how to make crepes Suzette. He flavors them with orange juice, but Eline—yeah, we're girlfriends now—does it with orange blossom water, which is just as nice.

    Frankly, these thin and lovely vegan pancakes surprised me deliciously.

    During frying, they take a beautiful shade of gold, and when they’re done frying, their outer edges sport a pretty lace finish and emit a fine crunch that dissipates in a few seconds in the mouth. Their flavor is unassuming and familiar. Fresh out of the pan, they're light and just fluffy enough to amaze you: they're egg-free pancakes, remember.

    In any case, it’s true that I lost my little Tany, but I won a recipe that will make her unforgettable.

    So, maybe, maybe during these moments of preparation and cooking, even if my pain is immeasurable, I might suffer a little less. These moments will be our rendez-vous for both of us. It’ll be our rendez-vous filled with this quiet moment of pain and joy, bitterness and sweetness, heaviness and lightness, and all the while angelic.

    [Happy birthday, Dad. And I thank the creator, my sister’s friend, for this magnificent portrait.]

    Prepare these thin egg-free pancakes now!

    When you want to have a nice breakfast, thin vegan pancakes can fulfill this role.

    It's very easy to do. Mix all the liquid ingredients into the dry ingredients, then mix everything. Thin your dough with water, if necessary, then make your pancakes. That's all.

    You’ll have in a short time lightly flavored pancakes which will bring you nothing but happiness.

    Bon appétit!

    Vegan Pancakes Recipe

    A close-up of folded pancakes in a metallic plate with strawberry sauce dripping with a small jar of maple syrup behind it and a small skillet of strawberry sauce on the side

    Adapted from the book Les Bonnes Choses: Vegan cuisine au fil du jour by Éline Bonnin.

    If you try this recipe, I want to know about it! I always appreciate your feedback. Leave a star rating in the recipe card right below and/or a review in the comment section further down the page. You can also follow me on Pinterest, Facebook, or Instagram. Sign up for my email list, too!

    A close-up of folded pancakes in a metallic plate with strawberry sauce dripping from the creases with a small jar of maple syrup behind it and a small skillet of strawberry sauce diagonally
    Print Recipe
    5 from 1 vote

    Vegan Pancakes

    These vegan pancakes remind me a lot of my little sister’s. The original recipe calls for ¼ cup of sugar, but I reduced the amount since rice milk is naturally quite sweet. Speaking of rice milk, the author mentions in the ingredients section to familiarize yourself with other types of vegetable milks (aka plant-based drinks), such as soy, almond, coconut or oat milk, but I opted for the milk aforementioned because of its more liquid texture than the others. If you're in a hurry, you can cook the pancakes immediately, but letting the dough rest in the fridge increases the binding effect of the mixture.
    Finally, the strawberry jam adds a more colorful note. These thin dough patties are worth eating hot otherwise they harden (and much more as leftovers), so eat them as fast as you can.
    Prep Time10 minutes mins
    Cook Time15 minutes mins
    Course: Breakfast
    Cuisine: French, Vegan
    Keyword: rice milk, sucanat, wheat flour
    Servings: 12 crepes
    Calories: 192kcal
    Author: Naïby

    Ingredients

    • 2 ½ cups all-purpose wheat flour
    • ¼ cup cornstarch
    • 3 tablespoons Sucanat sugar or Muscovado sugar (Notes)
    • Pinch salt
    • 2 ½ cups rice milk
    • 1 tablespoon coconut oil liquefied
    • 1 teaspoon orange blossom rum or vanilla water
    • rosemary fresh, for garnish

    Quick Strawberry Jam with Maple Syrup

    • 3 cups strawberries frozen or seasonal
    • ½ cup raw agave syrup or maple syrup
    • 1 teaspoon cornstarch (Optional) (Notes)
    • ½ teaspoon vanilla extract
    Get Recipe Ingredients

    Instructions

    • Make the sauce: In a small saucepan, bring the strawberries and maple syrup to a boil. Cook over medium heat for about 10-15 minutes or until the texture thickens slightly. Set aside and let cool.
    • Put the flour, starch, sugar and salt in a mixing bowl and mix everything. Gradually pour in the vegetable milk, mixing quickly with a whisk until it is liquid. Add the oil and orange blossom water. If time permits, let stand for 1 hour. If the dough is too thick, add 1-2 tablespoons of water.
    • Heat the lightly oiled pan over high heat. Pour a ladle of dough and cover the pan. Peel the dough with a spatula, checking that it is browned enough. Turn it over to cook the other side. Reduce the heat to medium and cook the other pancakes.
    • Serve immediately and garnish with fresh rosemary.

    Notes

    Sucanat is derived from the name natural sugar. This and muscovado sugar are raw, unrefined sugars, brown in color.
    Cornstarch can be added to further thicken the jam.

    Nutrition

    Serving: 1g | Calories: 192kcal | Carbohydrates: 39g | Protein: 4g | Fat: 2g | Saturated Fat: 1g | Polyunsaturated Fat: 1g | Monounsaturated Fat: 1g | Sodium: 21mg | Potassium: 83mg | Fiber: 1g | Sugar: 13g | Vitamin A: 5IU | Vitamin C: 21mg | Calcium: 15mg | Iron: 1mg

    Get Your Free Plant-Based Eating Toolkit and More

    Subscribe to my newsletter and unlock my plant-based course, nutrition charts, recipe secrets, and exclusive updates to prepare wholesome, varied & balanced meals effortlessly. All you need is a good appetite. Subscribe!

    Smiling girl with big afro sitting cross-legged on a sofa

    Hi there!

    I'm on a mission to help you get nutrient-dense, easy, and mouthwatering plant-based recipe ideas so you can feel stimulated, well-equipped, and confident to eat and cook better.

    Learn more about me →

    Ode to My Sister

    Dec 23, 2019 · 2 Comments

    High trees with sun setting behind them

    It's all still fresh in my head.

    For three months I have been suffering. I have been suffering a lot during these first 19 days of December. Heartbreaking memories come to mind here and there.

    The disturbing news over the phone, the collapse, the crying. A surreal scenario or a real nightmare, whatever… I suffer from the loss of my younger sister, Tayana, which occurred three months ago. On September 1st, 2019.

    Anger comes out at times, like the steam escaping furiously from the lid of a boiling pan. My sister's memories haunt me at random times: during my drive to work or home, during my shower, at night.

    Yes, I am suffering from the loss of my little sister, Tany, and I’m still angry. I don't remember the last time I told her I loved her.

    Oh, I have so much sorrow.

    I was told that it lasts a while and that acceptance naturally follows. If that’s true, I urge it to hurry. I write these distressing words, these words which burst out of my heart—my heart which I see drawn on a lacerated canvas—looking at times, hanging on my wall, the photo of my smiling sister, with boyish hair, short and cottony,  on a bronze background. I see her, placed aside, head raised, teasing look, lips curled up with her two rabbit teeth displayed. She loved showing her teeth in photos. Pretending to be like a little girl.

    Now I see her in my mind, in a little flared dress, twirling with her skirt raised by her thin fingers, like little girls do when they wear a pretty dress. She loved to feel like a princess.

    In recent days, I have forced myself to finish writing my last posts about my summer trip [part 1, part 2, part 3, part 4], the last two parts of which stayed sitting on a shelf this whole time. I will honestly admit that I struggled to do it. Fortunately, three-quarters were already written.

    Keeping a blog. There are many more important things than that, I know, but for me, writing is therapeutic. Besides, I was told that writing about her would do me good.

    So, I’m following this advice. Yes, no doubt, it would do me good.

    Laughs that resonate so hard they make the walls shake.

    This is how I described my sister when I announced her tragic death in writing to those around me. Thunderous laughter, mocking laughter, hysterical laughter. Her laughter was the essence of her personality. Speaking loud too. She was full of energy, frisky, fiery. She had a bold, perceptive, brilliant mind.

    Brilliant, she was. Despite the fact that she hadn't finished high-school and therefore logically not gone to college, Tany had managed to carve out a promising place for herself in a large video game company. She was self-taught. She had learned to draw, to paint and to code from a very young age. Like me, she loved music. She became a DJ and started playing the guitar. She was truly multi-talented.

    She was very passionate about everything she did and did whatever she loved. Intrepid. Where people saw limits, she saw only endless horizons. Ah yes, she followed her own mind. But, that’s what also brought her down.

    On September 1st, as she went to celebrate Labor Day in the wild with her friends, she went to relax on a lake, alone, on a floating island in the late afternoon. She tried to persuade friends to go, but no one accepted. It seems that not a soul saw her go away.

    And then, a few hours later, she was falling asleep and dreaming so deeply that her soul detached itself from her body and left us forever. Extreme fatigue, loss of consciousness, malaise? No one knows what happened.

    One thing is certain, Tany loved life too much—well, I am sure of it—so that dying of discomfort, or suffocation caused by intense and unending vomiting, was the thing that caused her anxiety attacks. So much so that when this happened to her, she went to the emergency room to be calmed. Ironically, I suspect that her worst nightmare, the onset of discomfort, has materialized.

    It was only the next day, a Monday morning, that she was found, asleep at the bottom of the lake. December 19th strongly woke up her memory. My family got together to celebrate her. It was her birthday. She would have been 36 years old.

    Tany loved good food. At family brunches, my specialty was fruit salads, hers were crêpes Suzette. She was always excited while she worked the dough. Without measuring anything, she whipped everything in a large plastic yogurt container and spread the pancake batter in the pan with a ladle, while bouncing and joking around. Her pancakes were always perfectly cooked.

    But I never got the recipe from my little Tany who illuminated the room with her stunning energy and radiance. I hadn't had a chance to spend some quality time with her in oh so long.

    And that, I regret enormously.

    The beginning of September came like a whip with Fall making its entry by shortening daylight hours and by imposing, until its lowest point—winter solstice—the darkness of the night.

    But the end of December ends with the onset of winter, which is turning the tide. Quietly, after these three days of darkness at its lowest point following the solstice—therefore, Christmas Day—clarity will prevail by bringing a glow, a brightening, a burst of peace.

    Tany, wherever you are, even if I was sometimes the hard and severe big sister, even if I was sometimes moralistic and serious, even if I was sometimes rigid and hurtful by my frankness, know that I really loved you. I really loved you.

    If I happened to be like that, it's because I just loved you too much. Really.

    And I wanted the best for you.

    I miss you. I'll really miss you.

    Your big sister.

    On Costa Rica and Caribbean Rice and Beans — IV

    Dec 20, 2019 · Leave a Comment

    Dark rice in an enamel plate with a fork in it

    After two good weeks of well-deserved rest, it's time to get down to business.

    Gone are the days of being served in Costa Rican restaurants on the Caribbean coast. Gone are the days when I fell back into my cave in idleness. Yes, it's time to get busy in the kitchen.

    Dark rice in an enamel plate with a fork in it
    Two plates of Caribbean Rice and Beans

    I can already feel the heaviness of back to school—and not only that. While cooking light has been my favorite activity, I won’t let myself be intimidated by my homeland’s cuisine (I mean, my parents’, rather).

    Because I won't lie to you, Haitian cuisine has always seemed tedious to me.

    The hours spent preparing vegetables: cabbage, turnip, eggplant; squash, carrots, mirliton (chayote); potatoes, cassava, malanga; yam and plantain, which should then be washed with lemon so that they don’t oxidize quickly; green beans that are cut into strips (a while back, they were razor-cut!); onions, French shallots, fines herbs that are cut finely…

    Then, there is the languorous cooking of meat, soups, and some typical simmered dishes.

    Ah yes! I forgot about dried beans.

    Usually, you have to soak them for a long time. This removes the triggers for the not-so-sexy releases puffs or pffs. But I think my ancestors had no idea about that. They did it simply to speed up cooking.

    Although familiar and customary, this last operation is quite bearable. Truth be told, you'll never see me handling them with a mournful air. Immersed in water, dried beans just wait patiently in a bowl until they are boiled and mixed with other foods such as, say, quinoa or, as is customary in the Caribbean, rice.

    In fact, when I think about it, bah! given the ease of the task, I would soak them anytime without any problem. Ah! My sweet, sweet beans.

    If you have a stellar and reliable memory like mine (hum, hum), you just have to remember to do it the day before or if you’re well equipped, to cook them in a pressure cooker.

    This is how—I suspect—most of the Caribbean restaurants in Costa Rica, even modern cooks, prepare them. (Brief summary: during my vacation on the Caribbean coast of Costa Rica, I dared to ask the head of the restaurant Lidia's Place to give me a cooking class, which she kindly accepted).

    One thing is certain, Lidia Palmer prepares them this way before slipping them into the rice.

    In any case, we never get tired of this typical dish.

    Red rice and beans, I ate it almost every day during my vacation. This reminded me of my Caribbean roots, those moments when my mother prepared them. To this day, she makes big portions for the whole family, in case the laziness of cooking takes hold of me. Fortunately for me, these are my back-up dishes.

    And luckily for my little man, he loves it. In my ancestors’ country, we call this dish Di ri ak pwa colé in Creole, but in Central America, we say Rice and Beans in English. Not Arroz con pintos in Spanish, but Rice and Beans.

    The Costaricanos prepare it like us, the Haitianos, with the only difference that they add coconut milk—which certain regions in Haiti also do, but not typically.

    And I, well, I hardly ever prepare it. But thanks to my stay, I was inspired to do so upon my return to Montreal to remember my moments in the South and my childhood.

    But I cooked my rice and beans recipe my way.

    My rice combines a combination of Jamaican origin and Haitian spices. It includes coconut milk with cloves. Also, I added tomato paste, as some Haitians do, but it's really optional (my family would send me to hell for this addition). It was to simulate the orange color observed during my private cooking class in Costa Rica.

    I really played with the ingredients to add more flavor and after a few tries, my little one and I determined that adding a cube of (natural) broth really enhanced the taste. I used red onions because they taste better than white onions. Smaller than typical onions, shallots are used to give a milder or sweeter taste.

    And I got a very satisfactory result. My little monster has given its seal of approval.

    Caribbean Rice and Beans on a fork
    Caribbean Rice and Beans

    I ate this dish for a long time in my youth. At the time I ate it with chicken or beef in sauce. Today, the rice would gladly accompany well-seasoned and spicy tofu or tempeh.

    Seasonings and spices give this rice its unique taste. Take long grain rice and not basmati. It will be firmer (basmati rice in the photo). The addition of Scotch Bonnet pepper fossilizes it in Caribbean cuisine. Caution: this pepper is almost at the end of the Scoville heat scale. Translation: it’s extremely spicy! Small and stocky, it is one of the spiciest hot peppers in the world. They are orange, red or green in color, and their heat is mainly found in the seeds, so they must be handled with care. Normally, we don't put tomato paste, but despite the condescending looks of Haitian cooks, I gave it a try anyway. It turned out browner than usual, but it was very tasty.

    Rice and Beans keep pretty well in the fridge and freezer, so it's worth making a big batch ahead of time. You can eat it with a green salad or even put it in burritos.

    Bring the Caribbean to you now!

    Bring an exotic touch to your meals. You only need three main ingredients: rice, beans, and coconut milk.

    For beans, don’t forget to prepare them in advance or at worst, use canned beans, if short on time. Then add your spices and voila.

    You’ll quickly find yourself in the Caribbean heat without flying there.

    Coconut milk gives a creamy, slightly sweet flavor to the soft rice, while the spices and hot pepper give a delicious spice to the dish.

    Finally, after all this rambling about my trip, I give you a well-deserved recipe.

    Two plates of Caribbean Rice and Beans on white plates on a wooden board
    Caribbean Rice and Beans

    If you try this recipe, I want to know about it! I always appreciate your feedback. Leave a star rating in the recipe card right below and/or a review in the comment section further down the page. You can also follow me on Pinterest, Facebook, or Instagram. Sign up for my email list, too!

    Dark rice in an enamel plate with a fork in it
    Print Recipe
    5 from 1 vote

    Caribbean Rice and Beans

    Rice keeps fairly well in the fridge and freezer, so it's worth making a big batch ahead of time. You can eat it with a green salad or even serve it in burritos.
    Prep Time10 minutes mins
    Cook Time30 minutes mins
    Soaking Time1 day d
    Course: Main
    Cuisine: Caribbean
    Keyword: coconut milk
    Servings: 4
    Calories: 696kcal
    Author: Naïby

    Ingredients

    • 1 cup red beans dried or 1 can (Notes)
    • 3 teaspoons salt divided
    • 1 stalk celery
    • 2 tablespoons olive oil coconut or sunflower
    • ½ red onion finely chopped
    • 2 shallots finely chopped (about ¼ cup)
    • 2 teaspoons garlic crushed (about 4 cloves)
    • ½ cube vegetable broth (Optional)
    • 1 teaspoon tomato paste (Optional)
    • ¼ teaspoon ground pepper
    • 1 cup coconut milk
    • 2 cups long-grain white rice washed and drained
    • 1 Scotch Bonnet pepper (Optional) (Notes)
    • 1 bouquet garni ½ bunch of thyme, ½ bunch of parsley and 4 cloves wrapped in gauze (cheesecloth)
    Get Recipe Ingredients

    Instructions

    • Cook the kidney beans: Wash and drain the beans. In a saucepan, put 6 cups of water and the salt and bring to a boil. Reduce the heat and boil over medium heat, not covered, for 1 h. Add the celery and cook for another 30 minutes or until the skin creases. Taste to see if they are tender. Drain and keep the liquid to cook the rice later.
    • Cook the rice: In a cast-iron casserole (or medium-sized saucepan), heat 1 spoon of oil over medium heat. Stir in onions, shallots, 2 teaspoons of salt and ground pepper and stir for 2 minutes. Add the cooked beans and sauté for 5 minutes. Add 3 cups of the cooking water from the beans and coconut milk and bring to a boil. Add the rice and cloves, stir and boil until the water evaporates. Lower the heat, stir the rice and place the hot pepper, thyme, and parsley on top of the rice. Cover and cook for 30 minutes. Remove the hot pepper, thyme stems, and parsley. Stir before serving.

    Notes

    Never touch your face or eyes after touching them, especially after touching the seeds. In general, if you’re told in a recipe not to cut them, don’t do so, apparently at the risk of making your food inedible (Lidia Palmer did it anyway and it was edible, so who knows). For other peppers, no problem. IN NO CASE ADD SEEDS. Unless you want to burn in hell. Use habanero peppers if you can’t find Scotch Bonnet peppers. On the other hand, these are a little less sweet than the previous ones.

    Nutrition

    Calories: 696kcal | Carbohydrates: 111g | Protein: 19g | Fat: 20g | Saturated Fat: 12g | Polyunsaturated Fat: 1g | Monounsaturated Fat: 6g | Sodium: 1787mg | Potassium: 1028mg | Fiber: 11g | Sugar: 3g | Vitamin A: 376IU | Vitamin C: 11mg | Calcium: 161mg | Iron: 9mg

    Get Your Free Plant-Based Eating Toolkit and More

    Subscribe to my newsletter and unlock my plant-based course, nutrition charts, recipe secrets, and exclusive updates to prepare wholesome, varied & balanced meals effortlessly. All you need is a good appetite. Subscribe!

    Smiling girl with big afro sitting cross-legged on a sofa

    Hi there!

    I'm on a mission to help you get nutrient-dense, easy, and mouthwatering plant-based recipe ideas so you can feel stimulated, well-equipped, and confident to eat and cook better.

    Learn more about me →

    On Costa Rica and Caribbean Rice and Beans — III

    Dec 18, 2019 · Leave a Comment

    Rice and beans in big commercial pot

    It was a moment like no other.

    For a whole morning, I’d been buzzing in Lidia Palmer's privileged kitchen from Lidia's Place and smelling the vapors of her star dishes. It took me cojones to do it (part 1 here) and because of that, it takes a part 3 to tell you this story—this simply unique event.

    That morning, to put myself in the Caribbean spirit, I dressed up as a Creole woman—a modern one to say the least. So I wore loose, flowy black gaucho pants and a salmon-colored tank top. These are just details. Here’s the icing on the cake: I wrapped a black and white patterned scarf on my head and I put on round brass earrings in a semi-crescent shape, bought in Morocco the previous year. The only thing that was missing was a fruit basket on my head to complete the look of a perfect Creole lady!

    I hopped on my rented bike and drove to Lidia's Place. On the narrow road, as I pedaled briskly, I admired the green foliage of giant trees, which went up and down similar to when you see draped furniture.

    When I got there, I attached my bike to a post and stared at the empty and calm rustic restaurant in the blazing sun. I pushed the wooden barrier and took the passage through which Lidia had gone out that memorable evening. I saw her on my right through the window frame.

    The great lady was officiating in front of the furnaces.

    "Hello! I greeted.
    — Come in!” she said smiling.

    I walked along the wall and then went into the kitchen. Lidia approached me and, quite naturally, we kissed each other on the cheeks, à la française.

    "I prepared the meat. I was waiting for you to arrive so I could show you what I was going to do with it."

    She showed me two huge bowls with chicken legs in one of them and pieces of beef in the other one.

    "I coated the meat with mustard and tomato sauce, and added salt. Next, I'm going to brown the chicken and simmer it with the beef. For about two hours.
    — Did you marinate it overnight?
    — No, no. I did it all this morning”, she said, stirring the pieces of beef with her hand in the bowl. “Have you ever cooked huge amounts like this?
    — No, never.
    — I never did before having my own restaurant.” She turned to a large saucepan that contained oil waiting on the fire. "To color my chicken, I add brown sugar and let it cook until it turns brown. But be careful not to char it, otherwise, you’re screwed. "

    She added the brown sugar which started to crackle and to clump together quietly. Shortly after, she transferred the bowl of chicken thighs to the hot pan, stirred the chicken, and colored each piece. Finally, she transferred the beef to the second large pan.

    A bag of flour, a laddle of rhye flour, a jar of white flour, and a small wooden spoon are standing on a wooden cutting board which is on a chair.
    Chicken and beef

    Further on my right, I saw something else on the fire.

    There was a large pot filled with a mysterious liquid.

    " What is it? I asked.
    — This is the coconut milk in which we’ll cook the rice and beans.
    — I’ve already seen my mom extracting the flesh from a mature coconut. It’s quite a job to do it by hand.
    — Ah, well, I don't do it by hand. After breaking it in half, I grate it with my automatic scraper and grinder. Then I transfer everything to a bowl and squeeze until I get the milk. I keep the liquid and get rid of the fibers.
    — How much milk did you extract from coconuts so far?
    — Nine."

    Lidia took me to see her metal machine in her back kitchen. I had never seen such a machine. Oh, my dear, my mind mumbled the Sound of Music. Yes, I thought this thing could be one of my fav-or-ite things... Ariana Grande-style: "I see it, I like it, I want it, I got it".

    I saw some on Amazon but I never tried any of them so I can’t give you a review. Anyway, after this demonstration, we returned to where the liquid lay. It was orangy-yellow like the color of the sun.

    I was wondering why the liquid had such a coloring. I think I asked her why, but either I didn't understand her answer, or I quickly forgot the reason. I suspect there was tomato paste or curry. (I may know this when preparing the dish later.)

    In short, she added the main ingredients: previously rinsed white rice and cooked beans preserved from another cooking. Later, she incorporated a bunch of tied thyme—to facilitate the removal of the mini bundle of twigs—celery and... So there you go. Once again, I didn’t take note of all the ingredients. Sorrrryyyy. But here’s a photo to redeem me.

    An orange liquid with herbs are simmering in a large pot
    Coconut broth with fine herbs

    To enhance the taste, she never uses broth cubes, as many cooks do. No Maggi or other chemically transformed broths that cloud our minds, she said (preach, sister!). She always let natural ingredients speak for themselves.

    She’s been advocating this from the start.

    "How did you learn to cook? I asked her.
    — I learned everything from my mother first. Then, my parents would take turns telling my sisters and me, 'It's your turn now. Go cook for the whole family'. Yeah, like that. We had to do it for them and for all our siblings. Later, I had my first professional cooking experience in 1986 at Stanford, which at the time was one of the best Caribbean restaurants in the country. I went to work in other restaurants afterward.
    — And what led you to create your own?
    — People made me work too hard. As if I was being taken advantage of. I got tired of it and thought, 'Never again. I will no longer work for anyone else but me.' At my home, I began to prepare and sell Pupusas and Jurney, a Caribbean treat baked in coconut milk. And a few years later, Lidia's Place was born. It wasn't easy, you know."

    A few moments later, Lidia returned to see the meat cooking. Upon discovering the pans, the fragrant vapors rose like an erupting volcano. The meat—the chicken and the beef—had browned well. To add flavor, she added curry powder.

    Beef simmering

    Look, dear friend, I may not be eating meat, but I have to admit it smelled treacherously good.

    A deep and depraving scent filled the kitchen.

    To accentuate it, Lidia cubed hot peppers, green peppers, celery, and onions, which she added in the last moments of cooking. Then, in the end, she added the meat juice that had marinated earlier.

    Seasoning the beef

    While the meat was simmering, Lidia told me about her experience in a more personal way: her achievements and her struggles in her family and professional life. She confided in me with such ease that I was touched. I was touched by both her softness and her robustness. In her kitchen, standing by her side, I listened attentively to everything she was saying to me, like a girl having finally reached adulthood to hear her mother's old secrets.

    Frankly, I was very fortunate and privileged to be able to listen to her story.

    She was very generous in letting me enter her intimate, physical and personal space, something she had never agreed to do before, from what she told me. I was flattered to hear that it was my energy that had lifted the shield from her usual refusals. She wasn’t wrong, you know, I've been known to be overflowing with energy—a little too dizzying, at times.

    After this intimate conversation, she set out to prepare the tomato sauce. She simply blanched the tomatoes, peeled them, cut them into pieces, and seasoned them before putting them in a saucepan over low heat. Later, she added onion rings. She simmered everything until she got a liquid sauce.

    Making the tomato sauce

    Now it was time to move on to the rice and beans.

    You have been very patient to have let me chat for all this time. Three articles! That takes some doing! However, you’ll be disappointed to know that I didn’t get Lidia’s recipe. I dared not ask her. Anyway, she cooks without measuring, so I'm not sure I could’ve gotten it.

    But I remember this.

    Earlier in this post, I told you that Lidia had added rice and beans with herbs to an orangy coconut milk-based liquid. But she had also added a very finely cut hot pepper, that my parents call Scotch Bonnet pepper in Haiti. It’s easily found in the Caribbean. Normally, it is the custom for the Carribeans to add it whole in a dish to give a slightly pungent taste, but Lidia clearly violates this rule. She never found it made her rice too hot.

    And I also told you that the beans were preserved from another cooking, it’s "canned" beans in a certain way.

    The detail I didn't mention to you is that when she cooks a large number of beans in a pressure cooker, she puts celery in them to flavor them. During my visit to Lidia's Place, a new batch of beans was due, so I was able to attend.

    Cooked red beans

    Pressed against each other, the red beans were well split.

    Finally, just before the end of cooking, Lidia added parsley stems to give it a fresh aromatic scent.

    After this beautiful morning of about two hours in Lidia's Place kitchen, I was able to put my invisible apron aside and sit in the dining room, empty of customers, to stick my fork in this long, awaited rice. To enhance my experience, Lidia had prepared a plate of rice and beans in a half-ball shape, accompanied by the aqueous tomato sauce, more red beans in a sauce (at my request) and avocado slices so I could have a balanced meal—since I was not going to eat either the chicken nor the beef (by the way, I agreed earlier to taste the resulting sauce to honor it).

    A plate of bean sauce iand tomato sauce in small bowls with caribbean rice in half a ball next to slices of avocado and Beans — Personalized Vegan Dish at Lidia’s Place
    Red beans sauce, tomato sauce, rice and beans, and avocados

    The presentation leaves a bit to be desired, but the tasting was exceptional! The rice was perfumed with coconut to perfection. It was not overpowering, and the spicy taste was so discreet that it teased the nostrils. And how about those sauces! The bean sauce was round. Each bite brought fleshy and tender beans to the bite. The tomato sauce, meanwhile, flowed voluptuously on the tongue.

    Now, thanks to everything I had learned, I was looking forward to preparing my own recipe upon my return.

    I was finally going to find out if my private lesson was going to pay off.

    To be continued…

    On Costa Rica and Caribbean Rice and Beans — II

    Aug 31, 2019 · Leave a Comment

    Inspiration signs in front of green leaves in Costa Rica Trip - Puerto Viejo

    Sometimes, events occur synchronically.

    You secretly anticipate that something spe cial will come to fruition—the same way you wish to receive, on Christmas day, a gift that you’ve been eyeing forever—and then magic happens. For a dyed-in-the-wool cook like me, it would be some products found at Williams Sonoma, caressed with concupiscence for the nth time (Le Creuset cast-iron Dutch oven, come to me). Or as a fashionista, it would be something like, oh say, Tom Ford's book or more reasonably, this book on my wishlist.

    That's exactly what happened during my trip to Costa Rica, this famous night where I celebrated my boyfriend's birthday at the renowned restaurant Lidia's Place on the second day of our arrival in the village of Puerto Viejo de Talamanca.

    As by synchronicity, the big boss lady appeared before us.

    “Ah, la dueña del restaurante!” said Mr. Man, enthusiastic.

    He started a conversation with her in Spanish, which he then pursed in English. We praised her cuisine with compliments. Even the Lonely Planet corroborated our statements (we discovered it also mentioned that eatery later at the table). Apparently, the stars of the restaurant are the lobster and the red snapper, both of which showcase incredibly fresh seafood. The jerk chicken is also impressive. These come with her famous rice and beans flavored with coconut milk and other usual accompaniments (crispy fried plantains and fresh green salad).

    I watched her with a kind of fascination mixed with curiosity and wonder as I tried to read her ethnic background. That is, earlier in the day, I’d read a bit about the immigration of African descendants to Costa Rica.

    Its history is captivating.

    In sum, about 8% of the Costa Rican population is of African descent black or mulatto (mix of Europeans and Blacks)—the Afro-Costa Ricans. Most of them are English-speaking descendants of black Jamaican immigrant workers of the 19th century. They represent the largest group of Jamaicans living outside the Anglophone-dominated diaspora.

    Well, I won’t tell you the country’s history with a big H (you can read a part of it in a later section), but I will intertwine Lidia’s story in a part of it.

    So, I asked her about her family's story, as would an inquisitive and innocent child.

    Her great-grandfather arrived from Jamaica to work on the railway construction starting from 1871. In fact, more precisely, he was one of the first workers (123 workers) who arrived by boat to the newly built Port of Limón the year after. They had been recruited under contract for the project, in the goal of evacuating agricultural production—with coffee becoming the main export from the center of the country—to the Caribbean coast, and then to Europe.

    Previously, harvests were transported from the Pacific coast through inaccessible terrain in the jungle on the Atlantic coast, and exporters had to return to South America, which increased costs and eliminated competitiveness.

    At that time, his great grandfather stayed in the province and founded his family there. As, later, in 1890, the railways suffered a financial crisis, he and many other workers were forced to support themselves by working in agriculture, especially the banana industry, whose production has reached its peak in 1907.

    I don’t know when her immediate family moved to Puerto Viejo, but that's where she grew up and lived all her life. Jamaican customs and language were preserved in English, and she and her siblings learned to speak Spanish in school. Like most Afro-Costa Ricans, Lidia's family is trilingual.

    Indeed, in addition to English (because of their strong links with Jamaica) and Spanish, they also speak Mekatelyu, a creole very close to Jamaican Creole and those spoken in Colon (Panama), Miskito (Nicaragua), Belize, and Saint-André (archipelago off Colombia). Mekatelyu is a transliteration partly derived from English: "make I tell you" or, in classical English, "let me tell you".

    As I read more about the history of Afro-Costa Ricans, I learned that Jamaican workers were confined to the Caribbean coast (Limon Province) until 1948.

    "Workers usually lived on plantations and knew little about Costa Rica outside their immediate environment. The contact was minimal, as banana plantations in Costa Rica were in the hands of foreigners. They did not speak Spanish and kept Jamaican customs. They had their own schools with teachers from Jamaica. Until 1949, Costa Rica had segregation laws whereby blacks lived exclusively in the Caribbean province of Puerto Limón.”

    Suddenly, a feeling of warmth seized me.

    I bluntly and shamelessly asked her if she would give me a private cooking class and how much she would charge for this privilege—surely, I was under the vaporous effect of my red wine and, by the way, the previously swallowed lobster bite.

    She answered slowly, weighing her words, that it was possible. I could come from 7:30 a.m. and we could discuss the process then. Delighted, I wrote her phone number down and then asked for the bill.

    After our departure, Mr. Man pointed out my innocent clumsiness: you never discuss prices like that in tropical countries. You just don’t do that. He was probably right, but I felt damn proud of being daring that night.

    Except that the next day, my unbridled audacity deflated.

    And the day after that too and the next day, and the day after. I told myself that I had to call her early enough before the opening, or just after closing her soda to avoid disturbing her during her working hours.

    But I procrastinated.

    I procrastinated for several more days, actually. In the meantime, I was taking full advantage of beaches with high-rolling waves at Playa Cocles, Punta Uva, and Cahuita National Park—the most beautiful beaches in Costa Rica, apparently. As I was fighting the waves, one of them gave me a beating—it made me tumble under the water—and I lost the hearing of my left ear. It was unheard of.

    During my little sacred miracle morning, I was reading a chapter on a book about intuition—I’m practicing capturing the inner and outer energetic waves, because more often than not, I’m too often the girl who regrets not having been faithful to my flair or feelings—when suddenly, I felt a bolt of energy pass through my body. I finally pulled out my cell phone and looked for Lidia's number in my notes. I called her right away.

    It was Monday, and I was calling her at a good time, during her day off. She was visiting Limón with her family and was shopping there. I could either come the next day or the day after, both days were fine; I had only to confirm which one. That's what I did later in the evening. As Mr. Man and I hadn’t planned anything, I decided to see her the next day.

    As you can well imagine, I was longing to live this bold and secretly desired synchronicity since day one of my arrival.

    (To be continued…)

    Inspiration signs in front of green leaves in Costa Rica Trip - Puerto Viejo

    On Costa Rica and Caribbean Rice and Beans — I

    Aug 21, 2019 · Leave a Comment

    Close-up of bright green tropical leaves

    A few weeks ago, I went in a hideaway in Puerto Viejo de Talamanca, a region on the Caribbean coast of Costa Rica, with an "eat-pray-love" purpose, and let’s say that it was practically successful.

    Let's start from the last third of my purpose.

    Love. It was really good to consolidate and proclaim my love for my man — sometimes clumsily (I'm far from being a skilled romantic) — in a space free of distractions and daily occupations.

    Pray. Oh, yeah, I grounded myself. Meditation was ensured every day in the wee hours of the morning on an inviting wooden terrace in front of a breathtaking view of wild beauty: the jungle in the foreground. Right after my sessions, I fed myself with inspiring readings while rocking myself in my hammock. There, I relaxed abundantly.

    Two hamacs on a wooden balcony facing tropical trees
    My view from my balcony on Playa Cocles, Costa-Rica

    Like this little guy.

    Sloth resting

    Eat. I was a little reluctant to eat in restaurants and wanted to cook at home, but who can blame a girl to want to indulge in farniente (doing nothing)? Especially since there are plenty of places to forage. On the other hand, if you’re looking for a great gastronomic experience, this is not really the place. I mean, maybe I'm wrong, but there were a few times when the dishes weren’t faint-worthy.

    Of course, there’s a host of restaurants where you can enjoy local cuisine while listening to Reggae or Calypso music or the fiery waves of the beaches breaking on the shore. Strangely (or not), contrary to my expectations, few are held by locals, namely the natives Bribrí, the Rastas of Jamaican descent or even, the descendants of the Spanish settlers. For example in the center of the village, the owners are mostly European foreigners (many Italians, surprisingly). In defense of Puerto Viejo, I didn’t rake the whole village with a fine-toothed comb.

    Anyway, for vegetarians or vegans of this world, Puerto Viejo is the perfect foil to feel heady with freshness: juicy pineapples, melting mangoes, silky guanabanas (soursop), homely mamones (kind of lichee), velvety maracuyas (passion fruit), bright carambolas …

    Tropical fruits in crates
    Fruits in Puerto Viejo market, Costa Rica

    I was also served with, obviously, typical plant-based Caribbean dishes.

    Certainly, the local specialties radiate.

    There’s some international cuisine too, but you should mostly be chasing after the coconut rice and beans. Then, add fried and crushed plantain bananas (patacones) as a side, quench your thirst with bastidos (fruit smoothies), and of course, spoil yourself with chocolate!

    Baskets of small bags of cacao between two yellow with an old lady standing behind the stand
    Different types of cacao in Puerto Viejo market, Costa Rica

    That's what I did the first day of our arrival in the evening in a soda (small family restaurant), which I didn’t note the name, and the next day at lunchtime at Salsa Brava, seated in front of a beach lined with palm trees. There, I also added slices of eggplant and zucchini scented with garlic and dipped in olive oil, moan-and-faint-worthy, thank you very much (they were the best I swallowed during my whole my trip).

    But that evening, no rice with beans. I changed the situation.

    Because I planned to celebrate Mr. Man’s birthday in a special place with a different menu. Anyway, it was an evening full of twirls, I tell ya.

    Warning! I interrupt this post to tell you that it's time to go get yourself a cup of iced tea or something else or, if necessary, go and take care of some bigger priority first, because I'm going to open the valves of chattiness. Also, in case you haven’t noticed, the main title sports "Part 1" in the subheader.

    Good. On Mister's birthday, I chose a restaurant strongly recommended by our Lonely Planet 2019 travel guide for its seafood—Laszlo's. It had to be the cherry on the Sundae, according to Mister’s optimistic expectations (no pressure!) after I had offered him the day before our departure: 1) a guide to know how to taste wine that will prevent him from appearing ignorant in front of the wine waiter (I include myself in this ignorance); 2) Tickets to attend a Cuban group honoring Buena Vista Social Club at the end of September.

    After parking our ridiculously fuel-efficient SUV rented 4x4, we arrived at our destination to find ourselves in front of an obliterated space. A few meters away, a sign displaying the village map confirmed that the place had vaporized indeed, despite the restaurant’s recent reviews on Trip Advisor and, moreover, dated a few months earlier.

    Decidedly, the restaurant must’ve disappeared recently. I took the guide again and suggested my second choice of the same kind, which didn’t appear either on the village map. Okay, forget seafood, I thought.

    Now, we were on a frantic search for a befitting place.

    Sitting comfortably in the car, we spent five to ten minutes consulting the web, delving into the reviews and checking restaurants’ existence.

    "Why not go to Nena?” suddenly suggested Mister, his face lit by the blue glow of his cell phone. “The one we drove by near the apartment? It seems good, doesn’t it?”
    “The kitchen closes at 8:30 pm,” I replied, “and we have exceeded the time by six minutes.”
    “Let's try to go there anyway," he insisted, "you never know. "

    Things are doomed, I thought to myself. We drove to the restaurant. As we parked in front, a waiter came towards us with an air of desolation. I felt the bad news.

    "Is the kitchen closed?” Mr. Man inquired in Spanish.
    “Yes, I'm sorry," replied the waiter.

    Things are doomed, I thought to myself. We drove to the restaurant. As we parked in front, a waiter came towards us with an air of desolation. I felt the bad news.

    "Is the kitchen closed? M. Man inquired in Spanish.
    "Yes, I'm sorry," replied the waiter.

    There, things are really doomed, I thought, helpless. Here was a simple evening turned into a complicated evening, a hunt for restaurants. We started browsing the web again and this time, it proposed Lidia's Place. It offered Caribbean cuisine. I wasn’t completely thrilled with the type of cuisine, repeating like a chorus —but what do you want, we were on the Caribbean coast. Its score of 4.5 and its more than 640 positive reviews seemed very tempting.

    Granted! But the restaurant closed in about ten minutes.

    We called the place and our arrival in extremis would not be a problem. In order not to lose a single second, we used the Waze app, which guided us off the main road.

    "Ah! I read that we find the best restaurants in neighborhoods," exclaimed Mister.

    Indeed, wonders are often hidden off the beaten path.

    We were quietly piercing the damp darkness of the night when we saw a yellow sign which its red and bold letters which seemed to be inflamed. On the left, there was a circle in which appeared the drawing of an Afro-Caribbean mama with a scarf on her head. Despite my shortsightedness, I could’ve seen the radiance of her warm smile for miles away. Under the sign was marked "Carribean food since 1996". Ah, a restaurant established for over 20 years, things were looking good.

    Drawing of an Afro-Caribbean mama with a scarf on her head next to Lidia's Place sign at night in Puerto Viejo
    Lidia's Place Restaurant in Puerto Viejo, Costa Rica

    We entered a rustic open space and sat among the last guests. A man with a shaved head, dressed in a white tee-shirt adorned with a yellow triangular fabric collar with African motifs, welcomed us, holding the menus in his hand. He asked us if we had called earlier.

    We started by selecting our glasses of wine (a white one for Mister and a red one for me) and, for the dishes, Mister opted for a very frisky lobster, which would soon see its life abridged by cooking (may it rest in peace). It would be accompanied by coconut rice and beans, and a small green salad. As for me, since I had already filled my stomach with the same type of rice earlier, I decided on a humble green salad with cherry tomatoes, slices of mango, and paper-thin translucent apples. As an accompaniment, I had crunchy patacones.

    Our contrasting dishes arrived—a hearty dish against an all-light one. While Mister was enjoying his meal, the garlic vapors emanating from the lobster caressed my nostrils and spelled me off point-blank. Mysteriously, I pricked my fork inside the critter split in two head first, I took a piece of the sand-colored flesh...

    ... and I scandalously put it in my mouth.

    The flesh was impeccably cooked and fragrant, with melting tenderness, a penetrating garlicky flavor, and a caustic freshness. Di-vine. I moaned. (Sorry, no photos.) *Ashamed*

    I think that for a second, I was ready to throw off my diet to devour this stuff, like a skewed nun who lifts her black dress over her head, her underwear unveiled, and who runs headlong into the crowd. I was ready to exceptionally lift my 15-year dietary restrictions during my stay. I was in a paradise of freshness, I thought.

    But after this food transgression and fleeting happiness, I gave myself a mental slap and came back to my senses. "Forgiveness is a beneficent miracle for the heart desiring peace, harmony, and freedom," once said an internet user. I went to repent before his analog in the aquarium. I also gave it my gratitude and blessing.

    We finished our meals clean with a slice of light-hearted chocolate cake to top it off.

    As we cleaned our dishes, we saw a full-featured figure emerging from a dark, narrow hallway. The ambered ceiling light gradually revealed the face of a black woman wearing a scarf on her head.

    "Ah, the dueña del restaurante!" said Mr. Man, enthusiastic.

    Yes, it was her. And as fate would have it, she approached us naturally and gently, as would behave a magnetic object under the influence of a magnetic force.

    We were soon going to have a befitting meeting.

    (To be continued…)

    Summertime Cauliflower and Cumin Fritters with Lime Cashew Nut Yogurt Sauce

    Jul 21, 2019 · Leave a Comment

    Ramekin with yogourt sauce next to fritters on a small plate with lime wedges

    For almost a year, I’d been immersed in a kind of cave, an underground cavern. In this life of a hermit, I didn’t act like a good cavewoman at all while my man went out hunting. I didn’t prepare any gourmet food. No soul food. Nothing. Nada. Niet. Madness, indeed.

    The minutes, the days, the months disappeared under my nose and before I knew it, after long cold and arduous months, the sun shone generously in the sky, the heat finally exhibited itself and my birthday was tiptoeing sneakily behind my back.

    And so to make this catch eternal, I organized an evening with friends, an evening that would allow me to get out of my hole, to display this little beast in the public square, and, frankly, to fill a page of my social calendar which had been yawning for far too long.

    A potluck was therefore prescribed.

    And my dining table was beautifully dressed.

    There was a feast of omnivorous and vegan dishes, including my little roasted peppers and my cauliflower “fritters” with lime “yogurt”, and more. Why these quotation marks, you ask? You’ll see later that these two items will look deliciously misleading, illusory.

    The evening began quietly with the arrival of Manue, radiant, with a bottle of rosé, Le Pive Gris, and a brown paper bag with tiropitas in her arms (Greek puff pastry rolls with cheese; mine were vegan). Initially, only red and yellow peppers—slowly roasted an hour earlier in the oven in sunflower oil, then drizzled with red wine vinegar—and a bowl of potato chips lay on the table.

    And they were longing to surround themselves with other tasty companions.

    I hastily opened the bag partially haloed with grease and slid the tiropitas into the oven on a baking sheet to warm them up. We quickly poured ourselves a glass of wine and sipped it on my back balcony, long and narrow and embellished with a potted gardenia distilling a sweet scent, barely fragrant red and white petunias, and my scarlet pink petal bougainvillea—definitely the focal point. The latter was highly perched and had been bought the same day for the occasion (I love them, thank you Mr. Man!) After a few weeks —no, after a year or two, rather—working on the decor of my balcony I was proud to have finally created something idyllic.

    The other guests followed. My neighbor Valentina, tall and slender, arrived discreetly with a gift card to spend in my favorite bookstore; Malak, showing her beautiful toned legs, with a cheese platter (blue, gouda and double cream brie) and red grapes; Julia, a lively brunette, with three dishes from India Rosa restaurant: papadums (very thin fried bean pancakes flour encrusted with cumin seeds), tandoori mushrooms, and a vegan pizza on naan bread; Blondine, reminiscent of Jennifer Lawrence (according to Valentina), with bags of potato chips, salsa sauce, and guacamole.

    Shortly after, Fudji arrived crowned with her trilby-styled black hat with a prosciutto tray and a gift that I unpacked instantly, cute little silver jewels. As soon as she arrived, Fudji, always generous with her time and energy, gave me a helping hand in the kitchen to tackle the frying of my cauliflower dough in hot oil. After giving her instructions, I looked fearfully at the contours of the little balls shuddering and sizzling in the golden liquid.

    My recipe was a last-minute experiment.

    Bird's eye view of cumin cauliflower fritters and nut-yogourt sauce ingredients on a white wooden board (clockwise): cauliflower, parsley, flax seeds, cashew nuts, lime, garlic, shallots, curry powder, cumin powder, and cinnamon
    Cumin cauliflower fritters ingredients (clockwise): cauliflower, parsley, flax seeds, cashew nuts, lime, garlic, shallots, curry powder, cumin powder, and cinnamon

    Yes, earlier this week I had flipped through the pages of my new Ottol Ottolenghi cookbook, entitled Ottolengui.

    My eyes had stopped on cauliflower and cumin fritters and lime yogurt sauce. The recipe included eggs (in the dough) and dairy yogurt (in the yogurt, of course). I had already guessed that I was going to replace eggs with flax seeds and dairy yogurt with some sort of cashew nut cream.

    Yes, I knew what I was going to do in theory, but I also knew that, in practice, things were very likely to go unsmoothly.

    Indeed, God knows that we should always use tested and proven recipes for special occasions.

    I had already experienced failures, and I would’ve been stupid to re-experience them. Um yes. This was not the time to experiment. However, my friend, there’s something you need to know: I like living dangerously. And sometimes, I'm stupid. So, being the stubborn woman that I am and not afraid to lose face (like a cat has nine lives, I think I have nine faces), I did it anyway.

    Yellow batter in food processor
    Cumin Cauliflower fritters' batter

    While the cauliflower fritters hardened in little oblong balls and filled the air with their heat and their intoxicating smoke, the other girls spat their ashen smoke on the balcony.

    Caro was the last to join us. She arrived with a sleepy look— but that wouldn’t last very long (you'll see why later)—with triangle puffs with feta and ricotta cheese and spinach and feta cheese. They were frozen, so I put them in the oven next to the tiropitas. I opened other bottles of white wine (all randomly and conveniently wine), received from the guests, and a bottle of sparkling wine.

    I took Caro to join the others who were comfortably settled in my exterior living room and chatting with each other as if they had known each other forever.

    During their exchanges, I concocted on the double the semblance of yogurt.

    Lime Cashew Nut Yogurt Sauce

    In the end, the small bodies didn’t look like the photographed fritters in the cookbook. Too bad, I said to myself. I piled them on a plate, seasoned them with salt and pepper and sprinkled them with parsley. Then, I laid them nonchalantly on the table next to the other dishes, among which were the freshly baked dishes.

    We were now ready to begin the carnage.

    I called the girls and we sat down to admire the show. There were ohs and ahs. I was jubilant with joy. It had been ages since my table had been so happily set up. We attacked the dishes and scraped our plates with glee, discussing between bites.

    I especially licked my lips with the veggie pizza on Naan bread. Its crust was thin but crisp, supple but robust, light but meaty. The taste of Indian spices was round and their flavors went up fondly into the nostrils. A real treat.

    But I was also uplifted by my experimental fritters.

    Opened fritter with a spoon with traces of nut yogurt sauce  in the middle
    Moist cumin cauliflower fritter

    My eyes widened with pleasure when my teeth split and crossed their thin crust. They were admirably light, impeccably soft, and had a pleasant spicy fragrance. The accompanying sauce was the perfect accomplice to refresh the palate and soothe the dance of spices that stirred in my mouth.

    It was fabulous. I inadvertently dropped a drop of greasy substance on my new top, a present received from work—oh dear, but I preferred that to a big drop of drool (though that would have been demonstrative of my admiration for these delights). I quickly ignored the event and focused on my next bites.

    Aside from this clumsiness, the opinion was unanimous about my fritters. They were a huge success.

    Click to view.
    Lovely, no ?

    There. Hot conversations resulting from sensual bites. As proof, Caro had become very talkative. And so were we all, by the way. All that must’ve excited all of us too much, indeed.

    Maybe, but we had a good reason to be. And me, even more. I had a dangerous experience, I came out of a black hole to celebrate a much pinker one, and the next few days, especially, seemed more promising.

    Cauliflower and Cumin Fritters on a plate
    Veganized and inspired by Yottam Ottolenghi

    If you try this recipe, I want to know about it! I always appreciate your feedback. Leave a star rating in the recipe card right below and/or a review in the comment section further down the page. You can also follow me on Pinterest, Facebook, or Instagram. Sign up for my email list, too!

    Ramekin with yogourt sauce next to fritters on a small plate with lime wedges
    Print Recipe
    5 from 1 vote

    Cauliflower and Cumin Fritters with Lime Cashew Nut Yogurt Sauce

    I’ve never tasted the original version, but even if the addition of flax seeds (the binder) adds a nutty flavor that’s more present than initially, I think my version of fritters is just as addictive. Chia seeds would surely have done the trick and would act more lightly behind the scenes. The cashew nut yogurt is one of my creations; it’s derived from one of my raw sour cream recipes. These fritters can be enjoyed hot or warm, all by themselves or in pita bread— with yogurt, of course. They are perfect for summer picnics or lunchboxes (add tomatoes to accentuate the freshness). Adults and children alike will love them. In this case, it’s worth doubling the recipe to have more to devour or to have some prepared in advance.
    Prep Time30 minutes mins
    Cook Time15 minutes mins
    Total Time45 minutes mins
    Course: Appetizer
    Cuisine: Vegan
    Keyword: cauliflower
    Servings: 4
    Calories: 379kcal
    Author: Naïby

    Ingredients

    Flax Seeds Eggs

    • 4 tablespoons ground flaxseed Note
    • ⅔ cup water

    Lime Cashew Nut Yogurt Sauce

    • 1 cup cashews soaked in water for 30 minutes
    • ¾ cup water plus additional to dilute, if necessary
    • Zest of 1 lime
    • 2 tablespoons lime juice
    • 1 teaspoon onion powder
    • ½ teaspoon sea salt
    • Ground pepper
    • ¼ cup cilantro minced

    Cauliflower Fritters

    • 1 cauliflower (about 320 g)
    • 1 cup all-purpose flour plus ¼ cup for immediate service or to thicken
    • ¼ cup Italian parsley chopped, plus a few leaves to garnish
    • 1 clove garlic crushed
    • 2 teaspoons ground cumin
    • 1 teaspoon ground cinnamon
    • ½ teaspoon ground turmeric
    • 1 ½ teaspoon salt
    • 1 teaspoon black pepper from the mill
    • 2 cups sunflower oil for frying
    Get Recipe Ingredients

    Instructions

    • Prepare the flax seeds eggs. In a small bowl, put the ground flax seeds and add the water. Let it sit until the mixture thickens.
    • Meanwhile, bring a large pot of salted water to a boil. Remove cauliflower leaves, if necessary, and cut into small bunches. Place them in water and cook them for 15 minutes or until tender. Drain in a colander.
    • Prepare the lime yogurt. In a high-speed blender or small blender, place the water, cashews, zest, lemon juice, garlic, onion powder, salt, and black pepper, and mix until well blended, obtaining a smooth consistency. Taste and check if the cream is tart enough with a pronounced taste of lime. Add more lime if needed. Stir in the coriander and mix briefly.
    • Prepare the fritters. In a food processor, put the cooked cauliflower, flour, parsley, garlic, shallots, spices, salt, and pepper, and mix until smooth and homogeneous. Add the flax seeds egg and mix well. Let cool in the refrigerator at least 1 hour before serving time until the dough takes. For immediate service, add the rest of the flour.
    • Pour the oil into a large saucepan so that it covers the walls to about 1 inch (1.5 cm) in height and place on high heat. It is important that the dough balls rest on a surface. (To save sunflower oil, it’s possible to do it in a small saucepan but the frying time will be longer). Once the oil is very hot, measure 3 tablespoons (or fill three-quarters of a quarter cup) of cauliflower dough and place in hot oil. Separate the fritters with a spatula. Do not overload the pan. Cook the fritters for 3 to 4 minutes on each side —make sure to ventilate the environment.
    • Let the fritters drain well on paper towels. Place on a plate, and garnish with parsley leaves. Serve with lime cashew yogurt on the side.
    • Placed in an airtight container in the refrigerator, the lime cashew yogurt will keep for five days, and the fritters for a week.

    Notes

    The nutritional values don't include the oil.
    It is always best to grind whole flax seeds yourself for the best results. To save time, you can grind a large amount in advance and keep it in an airtight container in the fridge or freezer.

    Nutrition

    Calories: 379kcal | Carbohydrates: 46g | Protein: 14g | Fat: 18g | Saturated Fat: 3g | Polyunsaturated Fat: 5g | Monounsaturated Fat: 8g | Sodium: 1222mg | Potassium: 809mg | Fiber: 8g | Sugar: 5g | Vitamin A: 404IU | Vitamin C: 78mg | Calcium: 96mg | Iron: 6mg

    Get Your Free Plant-Based Eating Toolkit and More

    Subscribe to my newsletter and unlock my plant-based course, nutrition charts, recipe secrets, and exclusive updates to prepare wholesome, varied & balanced meals effortlessly. All you need is a good appetite. Subscribe!

    Smiling girl with big afro sitting cross-legged on a sofa

    Hi there!

    I'm on a mission to help you get nutrient-dense, easy, and mouthwatering plant-based recipe ideas so you can feel stimulated, well-equipped, and confident to eat and cook better.

    Learn more about me →

    After-Christmas Party Stuffed Cabbage Rolls

    Dec 15, 2018 · Leave a Comment

    I don't know about you, but cooking the day after the big Christmas or New Year celebrations becomes an impossible mission almost every year. I develop a kind of cookingitis, a shiftlessness in the kitchen. At times likes this, stuffed cabbage rolls come to my rescue.

    Stuffed cabbage rolls with tomato sauce on top cut into on a white salad plate with a casserole dish in the background
    Stuffed Cabbage rolls

    Yes. The day after an evening of great grub, wine drinking and serious booty shaking, I just want to stay wrapped under my thick blankets and nap all day.

    When, finally, I manage to get out of bed and walk through the kitchen, I'm generally struck by an impressing scene, the scene of my kitchen exposing, like an exhibitionist, everything that should be hidden. A real disaster. A battlefield. Total chaos.

    I hate any object piercing my skin, but if a foul, ferocious animal ran through my kitchen and an emeritus hunter chasing it had shot it and inadvertently touched me with his poisoned arrow, I would’ve thanked him. I would’ve thanked him for taking me back to Morpheus.

    It’s obvious that I don't aspire to cook under such conditions.

    Fortunately, I always come back from these festive meals with enough leftover dishes. Because I always make too much food for these kinds of occasions.

    Which is good for you. I'm going to show you how to save stuffing leftovers (the one I published last week) and turn them into stuffed cabbage rolls.

    It’s an effortless recipe that you can concoct the day after the winter festivities when the lazy bugs have taken over you.

    I assure you it will be simple (if you have already prepared the stuffing in advance). It takes less than five steps and, look at the ingredients, you only need three.

    It starts with cabbage.

    3 simple ways to separate cabbage leaves

    Whole cabbage upside down

    Stuffed cabbage rolls are particularly popular in Central and Eastern Europe, but are found in other types of cuisines as well. Regardless of the origin, to make them, you must first soften and separate the cabbage leaves firmly and closely to the head.

    Here are three ways to go about it.

    Method # 1: Push the head into the water

    The head of the cabbage, that is. This is the most common way of separating the leaves. You remove the base first by cutting an angled circle around the heart of the cabbage.

    Bird's eye view of a dark-skinned hand holding a cabbage turned upside down with vegetable knife stabbed inside

    After, with a large serving fork, you stab the heart of the cabbage and you cook (blanch) the whole head of the cabbage. Know that it takes a minute or two for the outer leaves to soften; the inner leaves take longer. So, you’ll have to take out the cabbage head with boiling water repeatedly to remove the softened layers until you reach the heart.

    My shortcut! I detached the leaves of the cabbage before even blanching them. It's much faster and less annoying.

    Method # 2: Put a bag over its head and electrocute it

    Mmmh... it sounds a little macabre, right? Even criminal.

    With a little water, the microwave oven acts as a steamer. You just have to put the cabbage head in a microwave-safe dish, plus ½ cup of water. You cover the dish and program the appliance to 10 minutes of cooking at maximum power. Then, using a serving fork or sturdy tongs, you turn the head of the cabbage so that the heart is turned upward.

    Remove the microwaved head and allow it to cool until it can be safely handled. To make sure the interior is well cooked, remove some leaves. If this is not the case, return the cabbage to the microwave for additional cooking time.

    Method # 3: Throw the body in the freezing cold

    No comment. But really, I wonder what lies in the depths of my undoubtedly disturbed soul. My dear cabbage, who or what do you really represent?

    Here, you use the effect of cold to your advantage rather than that of heat. The first step is to remove the tough and damaged leaves from the cabbage. Then, after having rinsed it and sponged it well, you put it in a plastic resealable bag. You freeze it overnight.

    When you're ready to use it, you thaw it, and the leaves will come off easily. This is because cabbage retains water. Thus, when frozen and thawed, it releases water to wilt the leaves.

    I opted for the shortened version of method #1 because, well, let's see, blanching cabbage leaves is less confining and doesn’t require that I prepare in advance. Believe me, I'm not the type to remember such details, like putting cabbage in the freezer, after the stress I put on myself to perfect exceptional dishes. In these moments, I get lost in time and space and often Mister Man brutally brings my feet back onto the ground.

    Then, once back to reality, that's when I see what time it is and I leave in a hurry, leaving behind the famous chaotic scene. A real crime scene.

    But order can be born out of chaos

    Savoy cabbage in a cloth bag with a white bowl of stuffing and a medium jar of tomato sauce
    3 main ingredients to make stuffed cabbage rolls: Savoy cabbage, vegan stuffing, and tomato sauce

    Sometimes, wonderful things emerge from disordered moments. Stuffed cabbage, for example, I dreamt of making this recipe for ages. And this is the perfect opportunity. I still have this image in my head, a fresh image, in close-up, a quarter of an entire stuffed cabbage with, between its superimposed green and triangular leaves, a soft preparation reminiscent of a meat pâté.

    But it was a meat pâté. So, more precisely, I dreamt of veganizing this recipe for ages.

    Initially, I wanted to advance in this adventure, really, with a whole cabbage. But after that, I changed my mind. When we’re in a chaotic kitchen, my friend, do we really want to embark on an extravagant endeavor? This operation requires more steps than a lazy bum can tolerate.

    In addition, after reflection, leftover stuffing would not have been enough for a recipe as majestic as this one. So, I had to cut corners. I replaced this utopian idea with stuffed cabbage rolls, a dish that can be prepared in no time. Oh ! Whole Stuffed Cabbage! You who have haunted me since the dawn of time, one day we shall meet.

    So, after loosening the cabbage leaves with the traditional method, I just assembled my rolls, and that's all there is to it!

    Rolling a cabbage leaf with vegan stuffing

    As stuffed cabbage rolls are traditionally made with tomato sauce, I spread them below and above the rolls, placed in a row in a baking dish. My bottled tomato sauce came from my local grocer.

    Bird's eye view of casserole dish with stuffed cabbage rolls topped with tomato sauce
    Stuffed cabbage rolls covered with tomato sauce

    I put it all in the oven with aluminum foil on top for 20 minutes, then removed it to brown the top for a few minutes.

    I was longing to sink my teeth into this dish that perfumed the room with its tomato scent during cooking. When I finally opened the oven door, my eyes widened with happiness, my voice whispered "oh" and "ah" and my body almost melted as I was contemplating my cute creations, snuggled against each other like little kittens.

    Look at the brood of my whole stuffed cabbage!

    One stuffed cabbage roll with tomato sauce being lifted by a spoon
    That's how your stuffed cabbage rolls should look like

    These stuffed cabbage rolls were as beautiful as my dream. The stuffing, if you remember, slightly brightened with the sweetness of the raisins, the acidity of the Granny Smith apples and the crunchy toasted walnuts, doesn’t shy away from the rich, round and voluptuous taste of the tomato sauce. My satisfaction was such that I devoured my bites until the last crumb.

    By themselves, these rolls won’t fill you up, so pair them with mashed potatoes, quinoa, tofu or a green salad, for example. Otherwise, you can make them more filling by mixing quinoa, brown rice or soft tofu into the stuffing.

    Simplify your life after Christmas celebrations

    Stuffed cabbage rolls with tomato sauce on top cut into on a white salad plate with a casserole dish in the background

    After putting a lot of energy into preparing food for your big celebrations, cooking the next day may seem difficult.

    But you can take that lightly and be clever. For this recipe, be sure to come back with leftover stuffing — which you must’ve prepared in large quantities obviously — to create something simple.

    Make sure you also have a whole cabbage and tomato sauce at your disposal. Follow the instructions below and roll to the adventure.

    Then, savor the veggie cigars that will give you the joy of attacking your future tasks.

    But before you do that, relax and close your eyes.

    And take the time to roll in pleasure.

    If you try this recipe, I want to know about it! I always appreciate your feedback. Leave a star rating in the recipe card right below and/or a review in the comment section further down the page. You can also follow me on Pinterest, Facebook, or Instagram. Sign up for my email list, too!

    Stuffed cabbage rolls with tomato sauce on top cut into on a white salad plate with a casserole dish in the background
    Print Recipe
    5 from 1 vote

    Stuffed Cabbage Rolls

    When you have all your three ingredients at hand, stuffed cabbage rolls are an effortless dish that you can concoct the day after your big winter holiday festivities, especially when you’re not feeling full of energy.
    Prep Time10 minutes mins
    Cook Time20 minutes mins
    Total Time30 minutes mins
    Course: Side
    Cuisine: European, Vegan
    Keyword: cabbage, tomato sauce
    Servings: 12 rolls
    Calories: 6kcal
    Author: Naïby

    Ingredients

    • 12 leaves Savoy cabbage
    • 2 cups vegan stuffing leftovers
    • Tomato sauce
    • Parsley for garnish
    Get Recipe Ingredients

    Instructions

    • Preheat the oven to 350 °F/180 °C.
    • Bring a large pot of water to a boil and cover.
    • Meanwhile, use a small sharp vegetable knife to remove the heart from the cabbage. To do this, cut a circle at an angle around the heart of the cabbage. Shred the heart of the raw cabbage and mix it with the stuffing. Discard the outer leaves that are browned or damaged and detach 12 leaves of the cabbage. With a knife, shave the spine thin of the leaves. Add the leaves to the boiling water and cook (blanch) until softened for 2 to 4 minutes. Work in batches as needed.
    • While the cabbage leaves are blanching, place a large bowl of ice water next to the pot. Using tongs, transfer the leaves to the ice water. This helps to harden the cabbage leaves. Drain and pat dry. Let cool.
    • To assemble, place 3 tablespoons to ¼ cup stuffing mixture in the center of each sheet. Roll by folding the sides firmly. Secure with toothpicks. Repeat the process until all the stuffing mixture is used up. Put aside.
    • In a 9 x 13-inch baking dish, spread tomato sauce. Place the rolls on the sauce in a row, seams down and cover with more sauce. Add pepper.
    • Cover with foil and bake for 20 minutes.
    • Uncover and leave under the grill (broil) for 5 to 7 minutes to brown the top. Garnish with parsley.
    • Serve 2 or 3 rolls per person with the tomato sauce and serve with quinoa, mashed potatoes or green salad.

    Nutrition

    Calories: 6kcal | Carbohydrates: 1g | Protein: 1g | Fat: 1g | Saturated Fat: 1g | Polyunsaturated Fat: 1g | Monounsaturated Fat: 1g | Sodium: 7mg | Potassium: 55mg | Fiber: 1g | Sugar: 1g | Vitamin A: 240IU | Vitamin C: 7mg | Calcium: 8mg | Iron: 1mg

    Get Your Free Plant-Based Eating Toolkit and More

    Subscribe to my newsletter and unlock my plant-based course, nutrition charts, recipe secrets, and exclusive updates to prepare wholesome, varied & balanced meals effortlessly. All you need is a good appetite. Subscribe!

    Smiling girl with big afro sitting cross-legged on a sofa

    Hi there!

    I'm on a mission to help you get nutrient-dense, easy, and mouthwatering plant-based recipe ideas so you can feel stimulated, well-equipped, and confident to eat and cook better.

    Learn more about me →

    The Magic of Pumpkin Soup

    Dec 5, 2018 · Leave a Comment

    Still life (clockwise or left to right: pumpkin cut in half, parsley, two small jars of cinnamon and nutmeg, whole pumpkin, coconut flakes resting on small bag jute, miso in a spoon, cinnamon sticks, Medjool dates, green and yellow pumpkin seeds in a small sieve, garlic cloves, red onion cut in half

    Did you know that the pumpkin symbolizes abundance, prosperity, and dreams ready to be realized? Whole, it represents the world we currently live in; the seeds represent your dreams—be it evanescent images created overnight or a deep aspiration.

    On the other hand, each seed means a possible achievement in your life and a blessing ready to be given.

    Here's the best: Since an average pumpkin can hold around 500 seeds, you can literally count the number of your blessings!

    Oh! how bad i needed to believe it!

    It had been almost three months, if not longer, that the desire to cook had faded, when one evening in October, as I was hosting my Parisian girlfriend at home, I decided to make pumpkin soup. The same one that I had prepared exactly a year earlier when she was leaving for the City of Light. She had enjoyed it so much so that, delighted, she asked me to pass the recipe on to her and had reproduced it many times.

    In the evening, I consulted my old raw food blog—usurped by Indonesians who now posted half-naked girls there—to remember the recipe and, with resistance, I got down to the task. I threw in my stainless steel steamer basket, placed above a saucepan filled with boiling water, the previously cut pumpkin with garlic and onion. I let the whole thing cook for about ten minutes (a recommendation from Dr. Fuhrman, a doctor in favor of the plant-based diet, who says that steaming garlic and onion increases nutrient density).

    Meanwhile, I roasted the pumpkin seeds in the oven, drizzled with tamari. In my blender, without thinking too much about it, I added canned coconut milk without guar gum, the now softened ingredients, and the cooking water. Then followed the harmony of flavors with miso (umami, the savory taste as described by the Japanese), maple syrup, nutmeg, and cinnamon—all three excellent pairings with pumpkin.

    I finished with the salt and pepper and mashed everything. Oddly enough, I found myself in a state of maximum focus, full commitment, and satisfaction despite my detachment. I was in the zone, the flow, the total absorption by my occupation.

    When you enter the flow, you open the key to total happiness. Throughout your whole being, you feel alive, connected to yourself, and at peace.

    But the moment was short, and I came back to reality. I took off the blender lid to assess how my concoction tasted, and when I brought the first bite to my mouth ...

    I was off the mark

    The taste differed from that which, according to my memories, had so enamored me. The miso had stifled the other flavors, especially the pumpkin flavor. Of a darker brown than usual, the tasty paste was more intense to the taste, and I had put too much of it. Obviously, its taste varies according to the composition.

    I decided to go on a different tangent.

    I added ginger, then curry. A Thai-inspired soup, why not? (I knew it was a big mistake to invent a recipe on D-Day.) My perfectionism and my fear of disappointing others took hold of me. Obsessed and feverish, I kept tasting the soup with the teaspoon and adjusting it as I went, hoping to find the perfect taste again.

    But at one point, putting a stop to my madness became urgent; otherwise, I would have stayed there all night, even if I was licking my lips with glee. Yes, my licks had, all the same, seized me with an enveloping warmth and titillated inexpressible well-being inside me. They had reconnected me with the love of this art that, in normal times, I love to share with my friends. This love, which, for months, had frozen in my veins and transformed into an incapacitating substance.

    It was getting late, I had to let go, we had to get something in our mouths. And that's what we did. This is what the evening's menu consisted of:

    Appetizer: roasted pumpkin seeds (oops, no, they had burned)

    Starter: pumpkin soup

    Main meal: sweet potato fries (baked 1 hour earlier) and tofu sautéed with teriyaki

    Dessert: fresh fruit

    The supper went well. Eventually, my girlfriend noticed that the soup was different, but unexpectedly she thought it was good. Phew!

    But these little changes made it perfect.

    When I remade my soup, I made a coconut cream from scratch with grated and unsweetened coconut flakes and cooking water (from the cooked pumpkin) to stay on the whole food theme. I had reserved part of it for the finish. 

    I also replaced the maple syrup with dates. Bye, bye concentrated sugar—although better than white sugar, maple syrup is still concentrated sugar—hello, fiber. Finally, to create a contrast of colors and textures, I sprinkled the soup with parsley and homemade roasted pumpkin seeds (better this time), and pumpkin seeds (the green ones).

    Bird's eye view of roasted green pumpkin seeds on the left next to yellow pumpkin seeds to the right
    Grilled green pumpkin seeds (left) having the look different from the extracted pumpkin seeds (right)

    This soup is also good topped with pine seeds and roasted sesame seeds. Regardless, the result was exhilarating.

    This ocher-yellow soup has it all. The very moment the bite mixed with parsley, coconut milk, and seeds caressed my palate, I felt comforted by the texture cozy and thick. It felt like I was wrapped in a velvet sheet. There are notes of coconut, of course, and aromas reminiscent of the warmth of autumn.

    Get the recipe here !

    High-Nutrient and Easy Vegan Pumpkin Soup (less than 30 minutes)

    Dec 5, 2018 · Leave a Comment

    Made with fresh ingredients, this pumpkin soup is quick and easy to make. It's creamy, thick, succulent, and packed with nutrients. I assure you, you will cook it for years to come.

    Overhead view of two bowls of pumpkin soup placed diagonally with a glass of red wine in the left corner and roasted pumpkin and squash seeds on a small plate
    Vegan Pumpkin soup
    [feast_advanced_jump_to]

    The Most Nutrient-Rich Pumpkin Soup

    As the pumpkin is in high season during October and November, it becomes a must-have in the fall celebrations. So it's time to cook with it before it leaves us behind.

    Some people would rather turn their backs on it and go for canned pumpkin purees, but I won't. No, no, no.

    Ô! Intimidating pumpkin! The days when cutting you open scared me like a cat in front of the rain is over.

    Yes, over! I've armed myself with a lot of courage, conviction, and confidence to take the bull by the horns.

    If this fall squash also gives you a cold sweat, I'm sending you some strength to tackle it in the kitchen.

    So today, if you're not averse to a bit of carving and blending, I have a super simple pumpkin recipe that includes a unique preparation method that will save you time and nutrients. Nutrients, how? My recipe is prepared from scratch, without canned products. My pumpkin is fresh, and so is my coconut milk.

    Consequently, you get the benefits of a soup containing active nutrients rather than sleeping.

    Okay, that's right. This adventure involves a sharp operation with a knife, but don't worry. It won't turn out like a bloody Annie Wilkes scene like in the Misery movie.

    The moderate work will be worth it. And you'll see, this ocher-yellow soup has everything to offer. I was delighted with it.

    The very moment the bite mixed with parsley, coconut milk, and seeds caressed my palate, I felt comforted by the cozy and thick texture. It felt like I was wrapped in a velvet sheet. There are, of course, notes of coconut and aromas reminiscent of the warmth of autumn.

    What Goes in it?

    Look, the ingredients are pretty straightforward, and this soup is a snap if you choose store-bought products. However, as I wanted to boost this soup's nutritional value, I prepared the ingredients from A to Z.

    Still life (clockwise or left to right: pumpkin cut in half, parsley, two small jars of cinnamon and nutmeg, whole pumpkin, coconut flakes resting on small bag jute, miso in a spoon, cinnamon sticks, Medjool dates, green and yellow pumpkin seeds in a small sieve, garlic cloves, red onion cut in half
    Ingredients for pumpkin soup (clockwise or left to right): pumpkin cut in half, parsley, cinnamon and nutmeg, coconut flakes, miso, Medjool dates, green and yellow pumpkin seeds, garlic, red onion

    Main ingredients

    • Pumpkin – peeled and cut into large pieces. As explained previously, I chose a pumpkin that is good for baking: smaller and rounder than the Jack O 'Lantern pumpkin. To preserve all the nutritional magic of the nutrients, I used a less aggressive cooking method, such as steaming. If you want to go the convenient route, grab some canned pumpkin puree (the color will be a little darker).
    • Coconut Cream – made from scratch, it is made from flakes of grated, unsweetened coconut and the cooking water from the steamed pumpkin. Again, if you're looking for convenience, go with store-bought coconut milk. Cashew milk works well too, given the creamy side.

    Seasonings

    • Red onion – this is my go-to choice for adding flavor and antioxidants.
    • Garlic – to enhance the taste even more, as I like!
    • Miso – gives umami, a round and delicious broth taste and the benefit of fermented nutrients (great for better digestion). The vegetable broth will also do the trick or, why not, a demi-glace vegetable sauce.
    • Medjool Dates – this is optional if you find your soup is not sweet enough or if you've gone wrong with a variety of pumpkin (like, say, Jack O'Lantern, maybe?). It's 100% whole and natural sugar and it gives a flavor reminiscent of maple syrup, I think. They also bring a creamy side.
    • Pumpkin spice pumpkin – my spice blend is homemade! I used nutmeg, cinnamon powder, ground black pepper, and salt.

    How to Make it from Scratch

    Okay, above was part one. Here's how to do the rest.

    • Overhead view of pieces of pumpkin, onion, and garlic in a pot for steaming
      1
    • Pieces of pumpkin, onion, and garlic steaming
      2
    Steaming the vegetables

    1 / Place the pieces of pumpkin, onion, and garlic in a steamer basket.

    2 / Steam them with a lid.

    3 / Roast the pumpkin seeds, drizzled with tamari, for garnish (optional).

    Bird's eye view of roasted green pumpkin seeds on the left next to yellow pumpkin seeds to the right
    Grilled green pumpkin seeds (left) having the look different from the extracted pumpkin seeds (right)

    4 / Make the coconut cream.

    A small glass bottle with coconut milk at the right of spilled coconut flakes on a brown surface and a black background
    Coconut cream in a small bottle

    5 / Puree the steamed food, the cooking water, the coconut cream, and the seasonings in the blender.

    6 / Transfer to a medium saucepan and simmer..

    My Top Tips to Make it a Success

    Is your soup too bland for your taste? Normally with the aforementioned spices, it should be quite tasty. But if you want even more flavor, you can add this:

    Thai Red Curry – Sauté 2 tablespoons of red curry paste in ½ tablespoon of oil over medium heat. Cook for 2 minutes until really fragrant, then add it to the recipe.

    Ginger – Sauté 1 tablespoon of finely chopped ginger in ½ tablespoon of oil, then proceed to the recipe.

    Cumin, coriander, and smoked paprika – Stir in ½ teaspoon of each of the spices.

    Turmeric, cilantro, and cayenne pepper – Stir in 1 ½ teaspoon of ground turmeric and cilantro and ¼ teaspoon of cayenne pepper.

    Is your soup too sweet? If your soup is getting too sweet for your taste, try to balance the flavors by adding ingredients that are: acidic (1 teaspoon lemon, apple cider vinegar, or white vinegar), bitter (1 ½ teaspoon turmeric ground to retain color), or spicy (hot sauce, chili peppers or ground dried peppers).

    If none of that works, hey, well, you'll have to double the recipe (without the sweet ingredient, of course).

    Is your soup too watery? If your soup seems too runny while cooking, increase the heat so that the excess moisture evaporates. Do not leave it on high heat too long: the soup thickens as you cool it.

    Other solutions to thicken it involve adding a powdered thickener like flour, corn or potato starch, arrowroot, guar gum, or xanthan... This also makes it possible to obtain a smooth result.

    If it remains too watery, add pasta, rice, tapioca, or potatoes to soak up the excess liquid. Oh! Well, look at that! That gives you other variations of pumpkin soup. Let's see more.

    Other Creative Variations

    I haven't come up with the following suggestions yet. Still, I'll share with you some interesting pumpkin soup ideas to add to my repertoire in the future:

    • Pumpkin and sweet potato soup
    • Pumpkin and Butternut Squash Soup
    • Pumpkin and Carrot Soup
    • Lentil Pumpkin Soup
    • Pumpkin and chickpea soup
    • Pumpkin and ginger soup

    How to Serve it?

    It can be served hot or cold, but its mild, strong flavor works best with other fall staples like butternut squash and apples. You can also try sprinkling the top of your soup with the following toppings:

    • Coconut cream – to create a contrast of colors.
    • Parsley – for the same reason.
    • Roasted pumpkin seeds – to create contrasting textures. I used the ones in my pumpkin. I roasted them in the oven, drizzled with tamari. Other choices include roasted sesame seeds or roasted pine nuts.
    • Croutons of bread, pasta (penne, fusilli, rigatoni), or potatoes - for the same reason (contrast in textures).

    If your soup gets thick enough, toss it into a delicious salad wrap or slip it into a risotto.

    How to Cut a Pumpkin without Hurting Yourself

    Bird's eye view of a small pumpkin sitting on a wooden board
    Yikes! A whole pumpkin

    In my humble beginnings, almost everywhere I looked, the most recommended way to cook a pumpkin, or any other squash, was to put it in the oven or in the microwave for about 15 or 20 minutes. Why? This method softens the flesh before scraping it with a spoon.

    But it didn't suit me. I wanted to skip this step, get straight to the point, and reduce cooking as much as possible.

    So, I decided to prepare it raw. Yes, raw. Well… kind of raw. Difficult, you think? Not at all.

    You will need a sharp knife (ideally a chef's knife or utility knife) and a Y-peeler for this operation. Not a peeler that isn't worth a dime, bought at the $ 1 store, get it? Pumpkin has tough skin, so you need good tools.

    Good. Follow me.

    • Dark-skinned hand holding and cutting a small pumpkin crosswise
      1
    • 2
      2
    • A dark-skinned hand holding and cutting a small pumpkin crosswise
      3
    • Slices of pumpkin looking like small sailboats on a brown surface
      4
    Cutting the pumpkin

    1 / After washing the pumpkin, cut it in half, not exactly in the middle. Don't even try to cut the stalk. It is as hard as steel. On the other hand, you can try to tear it off if that amuses you.

    2 / Seed it.

    3 / Place it face down, then peel it. Don't hesitate to take it in your hands to peel the skin at the ends.

    4 / Finally, cut it into pieces.

    Do you see how easy it is to peel, seed, and cut a pumpkin? Without even losing a finger? And the whole operation lasts much less than ten minutes.

    Answers to Your Burning Questions

    What's the best pumpkin to use for soup?

    Round, flesh-filled pumpkins are a good choice for cooking. The pulp also has a better texture (less grainy) and is smoother. It's called in American English "Sugar Pumpkin" or "Pie Pumpkin." So, pick some smaller in shape than the monstrous pumpkins found in a typical pumpkin field.
    Of the American variety Jack O'Lantern, the latter have hollow cavities, lean flesh, and are rather tasteless. They have been designed to facilitate cutting and therefore make Halloween lanterns. This is why they have a thinner shell and generally have less flesh (or pumpkin casings) inside. Plus, they're more grainy and stringy, and they tend to hold more water than smaller pumpkins.

    What is the difference between pumpkin and potiron (in Europe)?

    Potiron (in French) happens to be slightly flattened. We don't always notice it, but if you observe them well, you will see a blue tint on the stem above the fruit. Their peduncle is closer to a thick cork stopper and gives the impression of being spongy, while that connected to the pumpkin presents a thin, short, hard, and angular appendage.
    Typically, the potiron's heart is rather spongy, while the pumpkin has a more stringy consistency.
    Be careful. Squash with soft flesh can make the soup a little watery. Find flawless pumpkins that make a hollow sound when struck. Once cut, make sure the flesh is bright in color and not fibrous.

    What's a good pumpkin substitute?

    Winter squash with a dense texture and sweet flavor will make the best soups. This is what old-fashioned varieties like Butternut squash or Kabocha (Queensland blue in Europe and elsewhere) have. In Australia, there is the Japanese (otherwise known as Kent), which also gives a good result, its flesh apparently being more consistent and smoother.

    For potiron in Europe, select the Hungarian Blue or the Hubbard Blue and exclude the bright red from Etampes, which will have a bland flavor. Finally, the sweet potato is also a good option.

    Are the extracted pumpkin seeds good for you?

    Yes, they are valued as a source of the mineral zinc, and the World Health Organization recommends their consumption as a great way to get this nutrient.
    In commercial form, if you want to maximize the amount of zinc obtained from your pumpkin seeds, consider purchasing them in unshelled form. They are not a very rich source of vitamin E in the alpha-tocopherol form, but recent studies have shown that pumpkin seeds provide us with various forms. Roughly speaking, vitamin E helps you have good protection against degenerative diseases.

    Can we eat them raw? And what about the pumpkin?

    You can do that, but in this case, put them in boiling water to remove the sticky flesh. Here's how to eat extracted pumpkin seeds: roast them in the oven with a little salt, tamari, or other spices of your choice. As for the raw pumpkin, it's not very appetizing.

     Make this Dish Now

    You may feel incapable of tackling what seems unfamiliar or far away. So you hesitate, you procrastinate, you avoid.

    But have no fear! As soon as you cross the first barrier of inertia and work on something that's falsely threatening, everything becomes fluid.

    Cutting the pumpkin, for example, is as easy as pie. You can prepare it as easily as a boss lady.

    Now, with your newfound knowledge and techniques, you can whip up pumpkin soup that's as heartwarming and soothing as the twilight glow.

    It will bring you warmth, happiness, and a good mood.

    It will provide you with food for your body, your mind, and your soul.

    If you try this recipe, I want to know about it! I always appreciate your feedback. Leave a star rating in the recipe card right below and/or a review in the comment section further down the page. You can also follow me on Pinterest, Facebook, or Instagram. Sign up for my email list, too!

    Overhead view of two bowls of pumpkin soup placed diagonally with a glass of red wine in the left corner and roasted pumpkin and squash seeds on a small plate
    Print Recipe
    5 from 1 vote

    Vegan Pumpkin Soup

    This soup will bring you warmth, happiness, and a good mood and provide you with food for your body, your mind, and your soul.
    Prep Time10 minutes mins
    Cook Time20 minutes mins
    Course: Soup
    Cuisine: American, Canadian
    Servings: 4
    Calories: 329kcal
    Author: Naïby

    Ingredients

    • 4 cups pumpkin peeled, seeds reserved and cut into chunks
    • ½ cup red onion chopped
    • 3 cloves garlic
    • ½ cup coconut flakes grated, unsweetened, plus ¼ cup
    • 2 tablespoons miso or 2 vegetable broth cubes
    • 1 Medjool date or 2 small soft dates or 2 tablespoons maple syrup (Optional)
    • ½ teaspoon ground nutmeg
    • ½ teaspoon ground cinnamon
    • ½ teaspoon black pepper from the mill
    • ¼ teaspoon salt
    • 1 cup roasted pumpkin seeds assorted (green and/or yellow reserved)
    • 1 tablespoon tamari
    • ½ cup parsley chopped
    Get Recipe Ingredients

    Instructions

    • In a medium pot, bring 8 cups of water to a boil. Place the pumpkin, onion, and garlic in a steamer basket. Cook for 10 minutes until the ingredients soften. Set the cooked ingredients aside.
    • In the blender, transfer 1 cup of the cooking water, add ½ cup of the coconut flakes and blend until smooth and creamy. Scrape the edges from time to time. Spread ¼ cup of the coconut cream and set aside.
    • Add 3 cups of the cooking water, the remaining coconut flakes, pumpkin, cooked onion and garlic, optional dates, nutmeg, cinnamon, pepper, and salt. Mix until obtaining a smooth and creamy consistency. To keep it warm, transfer the thick liquid to the pot and heat over low heat for 5 to 10 minutes.
    • Meanwhile, place the assorted pumpkin seeds on a baking sheet lined with parchment paper and drizzle with tamari. Roast in the oven for 10 minutes.
    • Divide into bowls and garnish with a tablespoon of coconut cream. Top with parsley and sprinkle with fresh pepper, if desired. Serve immediately.
    • Placed in an airtight container in the refrigerator, this pumpkin soup will keep for three days.

    Notes

    • For more flavor, add this:
      • Thai Red Curry - Sauté 2 tablespoons of red curry paste in ½ tablespoon of oil over medium heat. Cook for 2 minutes until really fragrant, then add it to the recipe.
      • Ginger - Sauté 1 tablespoon of finely chopped ginger in ½ tablespoon of oil, then proceed to the recipe.
      • Cumin, coriander, and smoked paprika - stir in ½ teaspoon of each of the spices. Turmeric, cilantro, and cayenne pepper - stir in 1 ½ teaspoon of ground turmeric and cilantro and ¼ teaspoon of cayenne pepper.
    • If the soup is too sweet, try to balance the flavors with other tastes:
      • Acidic ingredients - 1 teaspoon of lemon, apple cider vinegar, or white vinegar)
      • Bitter ingredients - 1 ½ teaspoon of ground turmeric to retain color.
      • Spicy ingredients - hot sauce, chili peppers, or ground dried peppers. If none of that works, double the recipe (without the sweet ingredient, of course).
    • If the soup seems too runny during cooking, increase the heat so that the excess moisture evaporates. Do not leave it on high heat for too long: the soup thickens as it cools. Other solutions to thicken it involve adding a powdered thickener like flour, corn or potato starch, arrowroot, guar gum, or xanthan ... This also makes it possible to obtain a smooth result. If it is still too runny, add pasta, rice, tapioca, or potatoes to absorb the excess liquid.

    Nutrition

    Calories: 329kcal | Carbohydrates: 27g | Protein: 13g | Fat: 22g | Saturated Fat: 9g | Polyunsaturated Fat: 6g | Monounsaturated Fat: 5g | Trans Fat: 1g | Sodium: 549mg | Potassium: 852mg | Fiber: 6g | Sugar: 12g | Vitamin A: 10530IU | Vitamin C: 23mg | Calcium: 77mg | Iron: 5mg

    Get Your Free Plant-Based Eating Toolkit and More

    Subscribe to my newsletter and unlock my plant-based course, nutrition charts, recipe secrets, and exclusive updates to prepare wholesome, varied & balanced meals effortlessly. All you need is a good appetite. Subscribe!

    Smiling girl with big afro sitting cross-legged on a sofa

    Hi there!

    I'm on a mission to help you get nutrient-dense, easy, and mouthwatering plant-based recipe ideas so you can feel stimulated, well-equipped, and confident to eat and cook better.

    Learn more about me →

    Vegan Apple, Sage and Onion Stuffing

    Nov 23, 2018 · Leave a Comment

    Vegan stuffing on a salad plate with the stuffing's casserole dish in the background

    Some say there’s no real Thanksgiving dinner without a turkey. I say, there’s no real Thanksgiving dinner without stuffing.

    Vegan stuffing on a salad plate with the stuffing's casserole dish in the background
    Vegan apple, sage and onion stuffing

    In Canada, this holiday has been over for well over a month now, but I can imagine Americans who took their time to prepare their big meal for the big day.

    I know how difficult it can be to deprive yourself of stuffing, a delight that brings so many festive memories and happiness.

    Do you think that I’d do without it or that I’d just look at it out of the corner of my eye like an animal watching its prey?

    Hell no! If you're anything like me, you wouldn’t want to feel sidelined or deprived of this traditional dish.

    Well, you know what? I found a way to veganize it, my friend! You won’t stuff the turkey with it; nah uh, you'll stuff your mouth with it.

    And it’ll be served as a side dish instead.

    You’ll see, it’ll be as tasty and rich in flavor as the traditional recipe.

    Here’s how to make your bread a winner

    Slices of bread behind cubes of bread in a baking sheet
    Sourdough bread

    To have a good stuffing, it starts with the main ingredient: bread.

    Another thing, if you don’t want to end up with a pasty disaster in your mouth, you'll have to follow the next steps. So, you’ll need:

    1 / The right type of bread: white bread will soften and lose its shape when diced and after baking. So you’d better choose a firmer bread. I decided on sourdough bread. But wheat bread and ciabatta bread, apparently, will also do the trick.

    2 / A dry bread: the idea is to turn bread into breadcrumbs. You can dry your bread by letting it sit on the counter all night or by putting it in the oven for a few minutes. I even think you could put it in your toaster at a low intensity—an even faster method (oh yes! I’m all for it 🙋‍♀️).

    3 / “Enough space” between your bread pieces: once the bread is cut into pieces, I advise you to spread them over a large surface of a baking dish. This will help them finish with a crispy texture when baking.

    Once you understand this, you can enliven your stuffing with other ingredients no problem.

    And it's really not complicated

    You know, I tried to dive deep into my memories to recollect the first time I tasted this delicacy and I came back empty-handed. As empty-handed as an unfortunate pirate returning from a treasure hunt.

    It doesn’t matter, though. My first impression is now engraved in my memory and, in recent years, I’ve seen roasted turkey accompanied by stuffing often enough to be inspired to recreate it—on its own, as a side dish.

    Wondering how tantalizing it’ll be, huh?

    As a rule, turkey juice acts as a flavor enhancer. In fact, that's what gives the umami taste (a Japanese term meaning tasty). I'll cover this later.

    Anyway, since I never prepared stuffing before—neither animal-based nor plant-based—I had to go do some research on the Interwebs.

    After reviewing several recipes, I understood you could easily make a vegan stuffing in four simple steps (see step-by-step guide below).

    But I’ll give you the details of my creation right away.

    Because my stuff is very tasty

    Ingredients to make vegan stuffing displayed in a still life style.
    Vegan apple, sage and onion stuffing ingredients (from left to right clockwise): Granny smith apple, walnuts, vegetable broth, sourdough bread, red onions, sage, thyme, brown mushrooms, garlic, and golden raisins

    To concoct my stuffing, I first cut my bread into pieces and I dried them into breadcrumbs (croutons) with the baking method.

    Croutons on a baking sheet
    Sourdough croutons

    Then I sautéed onion and garlic in oil (I could’ve also done it in a little bit of broth if I wanted to avoid fats). Several recipes include celery, but I didn’t do it here because, I don’t know, I wanted to be a little different. I preferred adding sautéed cremini mushrooms instead and for a specific reason (stay tuned).

    Cooking the onions and mushroom

    After that, I combined the breadcrumbs with the sautéed vegetables, plus other affinities.

    As many stuffing recipes contain a mixture of sage and thyme, I followed suit. Anyway, I totally agreed with this combination of herbs. They add a depth of aromas that go well with any type of poultry—hey! mine is invisible.

    I think they are the preferred herbs in the traditional recipe. And I understand why.

    As the dish was baking, they perfumed my kitchen with such a pleasant scent.

    Now let's talk about the broth. Earlier, I mentioned turkey juice. In this vegan recipe, the broth (a vegetable broth, obviously) will be the one that recreates the "meaty" taste, the umami.

    Remember my sautéed mushrooms? I gave them the role of intensifying it precisely, in taste and texture.

    But I didn’t stop there! I sophisticated and harmonized my recipe with green apples—for a slightly acid taste—and golden raisins—for a slightly sweet taste.

    croutons, diced apples, walnuts, sage leaves in a casserole dish
    Croutons, diced apples, walnuts, mushrooms, and sage leaves

    I mixed everything and made sure that the breadcrumbs, well everything, soaked in the broth long enough before baking the dish.

    Finally, just before the end, I sprinkled crushed walnuts on top, which roasted for a few minutes. Know that the apple, raisins, and walnuts are optional.

    vegan stuffing on white rounded plate with a casserole dish in the background
    Vegan apple, sage and onions stuffing

    When I took my dish out of the oven, I could not wait to dig my fork in there. At the first bite, your teeth break a crispy surface and then sink into a moist dimension, brought by the softness of the inner part of the breadcrumbs and the melting flesh of the mushrooms. The flavors explode in your mouth. The pleasant and savory taste of the broth and the roasted aromas of the nuts invade the palate and caress the cheeks with a comforting, festive warmth.

    How to Make Vegan Stuffing Step-by-Step

    1 / Turn the bread into breadcrumbs (as mentioned before).

    2 / Sautée vegetables.

    3 / Combine breadcrumbs, sautéed veggies, and herbs with broth and optional ingredients (e.g. nuts and/or fruits).

    4 / Bake in a baking dish covered with foil and then, uncovered to brown the top.

    Prepare this Vegan Stuffing Now!

    During the holidays, the traditional stuffing may seem inaccessible to you. Because it’s often made with or out of meat.

    And when this happens, you're ready to ring the death knell of your tasting.

    But it doesn’t have to be this way.

    You can turn traditional stuffing into an enjoyable dish of the same caliber. You don’t need much. Essentially, breadcrumbs, sautéed vegetables, and a tasty broth.

    Follow the instructions below to prepare it as soon as possible.

    You won’t be disappointed. This vegan stuffing will awaken your taste buds and those of other guests.

    Even unshakable meat eaters will love this version too.

    Enjoy!

    Vegan stuffing on a salad plate with the stuffing's casserole dish in the background

    If you try this recipe, I want to know about it! I always appreciate your feedback. Leave a star rating in the recipe card right below and/or a review in the comment section further down the page. You can also follow me on Pinterest, Facebook, or Instagram. Sign up for my email list, too!

    Vegan stuffing on a salad plate with the stuffing's casserole dish in the background
    Print Recipe
    5 from 1 vote

    Vegan Apple, Sage and Onion Stuffing

    A tasty and rich side dish that won’t leave others indifferent for your holiday dinners.
    Prep Time5 minutes mins
    Cook Time45 minutes mins
    Total Time50 minutes mins
    Course: Side
    Cuisine: Vegan
    Keyword: walnuts
    Servings: 4 -6
    Calories: 779kcal
    Author: Naïby

    Ingredients

    • 1 loaf sourdough bread cut into 1-inch dice (about 8 cups)
    • 2 tablespoons olive oil
    • 1 red onion chopped
    • 2 tablespoons garlic chopped
    • 8 oz cremini mushrooms minced
    • 2 Granny Smith apples diced
    • 1 cup golden raisins (optional)
    • 1 tablespoon sage leaves fresh, chopped
    • 1 tablespoon thyme leaves fresh
    • 3 cups vegetable broth or 2 bouillon cubes dissolved in 3 cups water
    • 1 cup walnuts crushed (optional)
    • Salt and ground pepper to taste

    Garnish:

    • Sage leaves and thyme sprigs
    Get Recipe Ingredients

    Instructions

    • Preheat the oven to 350 °F.
    • Make the breadcrumbs: bake the bread pieces on a baking tray for 10-15 minutes.
    • Meanwhile, in a skillet, sauté onion and garlic in 1 tablespoon olive oil over medium heat for 5 minutes until onion becomes translucent. Put aside. Sauté the mushrooms in the remaining oil for 5 minutes until the water evaporates. Put aside.
    • In a 9 x 13-inch baking dish, place bread and remaining ingredients except for walnuts. Mix well. Incorporate the broth and stir well. Let everything soak up the liquid. Cover the dish with aluminum foil and bake for 30 minutes.
    • Remove the aluminum foil and sprinkle with walnuts. Increase the heat to 400 °F and bake for 15-20 minutes or until golden brown.
    • Remove from oven and let cool. Garnish with sage leaves and thyme and serve immediately.
    • The stuffing is better when served the same day, but it will keep for up to 3-4 days, placed in an airtight container in the refrigerator.

    Nutrition

    Calories: 779kcal | Carbohydrates: 119g | Protein: 21g | Fat: 29g | Saturated Fat: 3g | Polyunsaturated Fat: 16g | Monounsaturated Fat: 8g | Sodium: 1297mg | Potassium: 969mg | Fiber: 10g | Sugar: 38g | Vitamin A: 514IU | Vitamin C: 12mg | Calcium: 144mg | Iron: 7mg

    Get Your Free Plant-Based Eating Toolkit and More

    Subscribe to my newsletter and unlock my plant-based course, nutrition charts, recipe secrets, and exclusive updates to prepare wholesome, varied & balanced meals effortlessly. All you need is a good appetite. Subscribe!

    Smiling girl with big afro sitting cross-legged on a sofa

    Hi there!

    I'm on a mission to help you get nutrient-dense, easy, and mouthwatering plant-based recipe ideas so you can feel stimulated, well-equipped, and confident to eat and cook better.

    Learn more about me →

    Invigorating Ginger and Thyme Lemonade

    Jul 29, 2018 · Leave a Comment

    Two glasses of lemonade in front of a small wood container of lemons

    This fresh and fancy lemonade infused with lemon thyme and ginger has nothing to do with the cloudy, saccharine-laden, colorless carbonated lemonade. 

    It’s invigorating and is the perfect refreshment on hot summer weather or when you’re feeling a bit low on energy.

    Two glasses of lemonade in front of a small wood container of lemons
    Ginger and thyme lemonade
    [feast_advanced_jump_to]

    The Best Lemonade When You Need a Pick-Me-Up

    At this time of the year, when I’m shuffling up a hill in the scorching sun or stuck on a stuffy bus in the fuming traffic, a cold glass of lemonade might often appear before me, spontaneously, like a mirage of refreshment.

    But not any old lemonade.  The mouth-puckering, traditional drink. The kind that will soothe me. The kind that will charge me as if I was inhaling fresh air around Niagara Falls. This type of lemonade!

    If you’ve been feeling dehydrated, drowsy, sluggish, like a dog walking around with its tongue sticking out, maybe it’s time to perk up your body with some real, fresh lemonade. 

    Pst! Without simple syrup, though.

    What is Simple Syrup?

    Caster sugar on a green salad plate
    Caster sugar

    Simple syrup, also called simple sugar, is made with two ingredients: refined white sugar and water. You dissolve sugar in heated water (in equal parts) and that's it. It’s that simple (hence the name maybe?) Now here are my thoughts on this.

    Swallowing simple syrup is like sticking a needle in your arm with liquid heroin.

    Am I being too outrageous? Today, it’s well known that sugar is addictive—just like liquid, syrupy heroin (see the analogy?). And we eat too much of it.

    In 2009-2010, reports have shown that Americans consume about 18 teaspoons of added sugar per day when, according to the American Heart Association, the daily limit for a woman is 6 teaspoons (20-25 grams or 100 calories) and 9 teaspoons (30-37.5 grams or 150 calories) for a man. If you’re over that limit, it wouldn’t be outrageous to say that you’re overdosing.

    How to Make Lemonade without Simple Syrup

    Most commercial—and even homemade—lemonades are loaded with sugar. They’re usually sweetened with simple syrup.

    So should you eliminate sugar?

    Well, going sugar-free would be best. Eating naturally occurring sugars from fruit would be wiser. But, adding natural sweeteners may be the answer.

    Because certain natural sweeteners like cane sugar, maple syrup, agave nectar, or honey (not vegan) contain some minerals compared to refined white sugar, which has none. But hold up:

    Natural sweeteners might be better alternatives, but they're not any healthier.

    They are still refined, high in calories and devoid of fiber. They will spike your blood sugar and provoke highs and lows.

    Listen, I know we can’t all be perfect. So I always say: when choosing something unwholesome, choose the lesser evil.

    Which I did. To create my mocktail, my sweetener of choice was maple syrup to make maple simple syrup. I’ll tell you in a moment how I made it, but for now, I’ll advise you to make it first as a stand-alone ingredient, then add it to your lemonade. This will also allow you to create other drinks with or without alcohol.

    Now let’s dive into the sourness of the drink.

    What’s in a Ginger and Thyme Lemonade?

    Ginger and thyme lemonade ingredients (from left to right clockwise) : thyme, lemons for lemonade, maple syrup, and ginger
    Ginger and thyme lemonade ingredients (from left to right clockwise): thyme, lemons for lemonade, maple syrup, and ginger

    Here’s what you’ll need for this recipe:

    Main ingredients

    • Water – you can use rested tap water, distilled or spring water;
    • Simple maple syrup – this is simply made with water and maple syrup (see below);
    • Lemon – make sure they’re not too hard or else, you won’t have a lot of juice.

    Seasonings

    • Ginger – use fresh ginger, for sure;
    • Lemon Thyme – if you can’t find any, normal thyme will do.

    How to Make Ginger Thyme Lemonade Step by Step

    To begin, I combined 1 part water and ¾ part maple syrup to make my maple simple syrup. Apparently, it’s the best ratio to replace sugar, as 1 cup of sugar contains more air, more space between the crystals. I then infused the mixture with a few sprigs of lemon thyme and grated ginger (sliced ginger is shown in the picture) until it simmered. After, I let it cool while the thyme and the ginger steep for extra flavor. Then I strained the syrup, transferred it to a small jar and refrigerated it until ready to use.

    A small jar on maple syrup, thyme sprigs, and slices of ginger
    Maple simple syrup

    Finally, in a pitcher or a mason jar, I diluted lemon juice with water and added a portion of the infused maple simple syrup. I reintroduced fresh lemon thyme and the strained ginger to the lemonade to boost the flavor. I refrigerated the beverage for a few hours and served it over ice with garnishes of lemon rinds and thyme.

    How does Ginger Thyme Lemonade Taste Like?

    This lemonade is tart, but it’s not overpowering. I'm not a fan of cloying sweet lemonade so this fits me perfectly. If you like yours sweeter, then there should be enough simple syrup to sweeten it. The ginger and the thyme flavors are subtle, and the maple syrup gives a distinctive flavor like that of iced tea.

    If you want the ginger to be subtle, you could add sliced ginger instead of grated ginger in the infused maple simple syrup. Talking about infused simple syrup, be creative. Consider adding vanilla beans, cinnamon sticks, cloves, fresh or dried chiles, various citrus rinds like grapefruit or lime, mint or other fresh herbs, or even edible flowers like lavender or rose petals. And in your lemonade, consider adding cucumber for a unique twist.

    It’s also amazing mixed with iced tea or splashed with a little vodka, gin, whiskey, or alcohol of choice. Cheers to that!

    Make this Perfect Summer Thyme Drink Now!

    We can all agree that the sweet and sour flavors of real lemonade seem to hit the spot like nothing else on a hot day.

    But beware of which lemonade you choose as a refreshment. Commercial "old-fashioned" lemonade is often just as sugary as its colorless cousin.

    But the fresh kind made with natural sweeteners is a better candidate to quench your thirst.

    So mix yourself a batch of this lemonade. Be sure to add a lot of ice. (It’s best ice-cold.)

    Then sit outside on your porch, your patio, or your front steps and look forward to sunnier days, lazy summer afternoons and weekends.

    Or better yet, walk around the neighborhood, singing: « Rollin' down the street, smoking fresh air, sipping on lemon juice. Laid back (with my mind on my health and my health on my mind).

    Ginger and Thyme Lemonade Recipe

    Two glasses of lemonade in front of a small wood container of lemons

    If you try this recipe, I want to know about it! I always appreciate your feedback. Leave a star rating in the recipe card right below and/or a review in the comment section further down the page. You can also follow me on Pinterest, Facebook, or Instagram. Sign up for my email list, too!

    Two glasses of lemonade in front of a small wood container of lemons
    Print Recipe
    5 from 1 vote

    Ginger and Thyme Lemonade

    Make the perfect summer drink with infused flavors to invigorate you. With ginger and lemon thyme as your spices, you’ll have a unique lemonade. Give it a taste.
    Prep Time25 minutes mins
    Cook Time25 minutes mins
    Resting Time8 hours hrs
    Total Time8 hours hrs 50 minutes mins
    Course: Drink
    Cuisine: American, Canadian
    Keyword: ginger, lemons, thyme
    Servings: 4 -6
    Calories: 178kcal
    Author: Naïby

    Ingredients

    Infused Maple Simple Syrup

    • 1 cup water
    • ¾ cup maple syrup or agave or honey
    • 8 sprigs lemon thyme or regular thyme, divided
    • 1 tablespoon ginger grated (Notes)

    Lemonade

    • 4 cups water
    • ¾ cup lemon juice (from about 6 medium lemons)
    • 4 sprigs lemon thyme
    • Ginger slices for extra steeping (Notes)
    • Thyme for extra steeping and garnish
    Get Recipe Ingredients

    Instructions

    • First make the infused maple syrup: Combine water and maple syrup to a medium saucepan over medium heat. Add ginger and sprigs thyme, and bring to a boil. Reduce to a low heat, cover and simmer for about 5-8 minutes. Remove from heat and let cool to room temperature for 25 minutes. Strain and refrigerate until further use.
    • In a large pitcher, add lemon juice and dilute it with water. Add ⅔ cup of the simple syrup mixture and reserve for later use.
    • Add the ginger slices, some lemon rinds, and lemon thyme to steep if desired. Refrigerate for at least 8 hours. Serve over ice with garnishes.

    Notes

    For a lighter ginger flavor, add 6 ¼-inch sliced ginger. In this case, you might need ginger slices for extra steeping in the lemonade.

    Nutrition

    Calories: 178kcal | Carbohydrates: 45g | Protein: 1g | Fat: 1g | Saturated Fat: 1g | Polyunsaturated Fat: 1g | Monounsaturated Fat: 1g | Sodium: 21mg | Potassium: 209mg | Fiber: 1g | Sugar: 37g | Vitamin A: 145IU | Vitamin C: 23mg | Calcium: 90mg | Iron: 1mg

    Get Your Free Plant-Based Eating Toolkit and More

    Subscribe to my newsletter and unlock my plant-based course, nutrition charts, recipe secrets, and exclusive updates to prepare wholesome, varied & balanced meals effortlessly. All you need is a good appetite. Subscribe!

    Smiling girl with big afro sitting cross-legged on a sofa

    Hi there!

    I'm on a mission to help you get nutrient-dense, easy, and mouthwatering plant-based recipe ideas so you can feel stimulated, well-equipped, and confident to eat and cook better.

    Learn more about me →

    Hearty Lentil, Barley and Sweet Potato Salad

    Jul 19, 2018 · 2 Comments

    Lentil, barley, and sweet potato salad with broccoli and baby tomatoes in a glass baking dish sitting on a wooden board

    This lentil, pearl barley, and roasted sweet potato salad is a creative way to enjoy salads that don't just consist of green leaves. It also contains juicy cherry tomatoes and crunchy broccoli that add a colorful touch to this dish.

    Enhanced by the warm taste of cumin and topped with a mustard dressing to accentuate the flavors, this lentil salad is perfect for lunches and all occasions. For instance, potlucks, picnics, barbecues, and celebrations around the pool.

    Lentil, pearl barley and sweet potato salad in a baking dish surrounded by stacked plates and bowls
    [feast_advanced_jump_to]

    Is Lentil Salad Healthy?

    Oh, yes! Lentils are great! They have good nutritional value and are among the most protein-rich plants.

    Yep! When boiled, these seeds contain about 18 g of protein per cup. Well, maybe you can't evaluate how good that is, so let me explain it to you.

    To find out how much protein you need a day, you take your weight in kilograms, then multiply it by 0.8. You change the units from kilograms to grams, and that's your daily need. If you want to stay in pounds, multiply your weight by 0.36.

    A chart to calculate your protein daily requirement for a sedentary lifestyle. Multiply your body weight in pounds by 0.36 or your body weight in kg by 0.8
    Daily protein requirement calculation chart for a sedentary lifestyle

    You usually eat three times a day, don't you? Divide what you just calculated by three, and it's your daily need per meal if you want to have an equal number each time. As an illustration, let's pretend I weigh 54 kg (120 pounds) (I said let's pretend). That was my weight in my Skeletor era when I was diagnosed with hyperthyroidism  (I'm 5 ft 7, I was skinny).

    So to meet my daily protein needs, I would need 43.2 g. And if I had to divide that by 3 meals, I would need 14.4 g of protein per meal.

    Important note! Dividing your protein requirement by meal is just to give you an idea. That's not the rule. You could have a meal with less or no protein and catch up with other meals. 

    So now, if I have a healthy weight of 54 kg (120 pounds) and I eat a cup of lentils, I would fully meet my protein requirement because they provide 18 g of protein/cup. Isn't that great? I told you lentils were great.

    Don't overlook this small detail: it's actually great only if you absorb your nutrients well. And that's hard to measure, so try to exceed the minimum daily needs.

    What Goes Well with a Lentil Salad?

    First of all, know that there are several varieties of lentils. There are green lentils, red lentils, beluga lentils, Puy lentils... you're not going to get bored. They vary in shape and taste.

    Then, plenty of other ingredients blend beautifully with the lentils. My salad is a mixture of lentils, pearl barley, and sweet potatoes.

    Here are the ingredients for my lentil salad:

    Main ingredients 

    • Pearl barley – it's a cereal made of a grain, and its fibrous envelope has been removed to make it edible. We also remove its outer layer of bran, polish it to give it the lustrous appearance of a pearl. This process strips the barley of the nutritional values of the bran. But this makes it aesthetically more interesting, and above all, makes its cooking process much faster. Its taste is similar to brown rice, but with a harder texture (but less hard than whole barley). It has a nutty-like taste.
    • Beluga or Puy lentils (French lentils) – Beluga lentils are black lentils, native to Canada, whose sweet flavor is similar to hazelnut and chestnut
    • Lemon
    • Sweet potatoes – cooked with the skin for a rustic taste
    • Broccoli
    • Cherry tomatoes

    Seasonings 

    • Dijon mustard
    • Apple cider vinegar
    • Extra-virgin olive oil – good quality olive oil will make all the difference, that's for sure
    • Ground cumin – if you have a spice grind, freshly ground or ground cumin a few days ago always tastes better than cumin that's been staying in your cupboards since your move in your first apartment
    • Fresh garlic
    • Salt (sea or kosher) and freshly ground black pepper – kosher salt sticks better to food

    How to Make Lentil, Pearl Barley and Sweet Potato Salad Step by Step

    • 1
    • 4
    • 6

    1/ Roast the sweet potato and cherry tomatoes in the oven.

    2/ Cook the pearl barley and lentils separately.

    3/ Steam the broccoli florets and cool under cold water.

    4/ Mix the steamed broccoli, grains, roasted veggies with olive oil, lemon, salt, and pepper.

    5/ Whisk mustard, vinegar, cumin, garlic, and olive oil.

    6/ Pour over salad, stir well, and serve.

    How to Make the Best Lentil Salad in Little Time

    That's how this recipe starts. I started by roasting sweet potatoes — with the skin to make it more rustic — with cherry tomatoes. Use organic rather than conventional sweet potatoes, which tend to taste blander.

    Meanwhile, I boiled the pearl barley and lentils separately. The types of lentils I used were cute Beluga lentils that I had left from another recipe.

    If you use other types of lentils, they may not hold their shape as well — especially red lentils. Stay away from them for this recipe unless you want a porridge. You can get away with Puy lentils (French lentils).

    In the end, I steamed broccoli on one of the boiling pans to save time and cleaning. If there's one thing I hate to do the most, that's it. So I always try to find smart ways to avoid this, like putting the cover of my food processor in a clear plastic bag. Ha! Did you know this trick? What?? Call me lazy, I don't care. 😜

    To finish the dish, I prepared a mustard dressing, mixed everything, and voila! Too easy, isn't it? You can do all this in 30 minutes.

    What Does this Lentil Salad Taste Like?

    Colorful cherry tomatoes, broccoli, and sweet potatoes provide a warm contrast to the earthy tones of lentils and pearl barley. They bring this seed salad to life. It's not a salad with a great personality that 'be like: "Look at me!" You will first notice the simplicity of balanced flavors.

    The light dressing gives the dish liveliness. You'll have more bites of slightly hard lentils and pearled barley and bites of sweet potatoes. Then from time to time, a roasted tomato will surprise you by bursting and releasing all its juice in your mouth.

    Other Ways to Make a Lentil Salad

    Lentils are so versatile. Here are some other lentil salad ideas that I've already prepared, or have in my sights:

    • Lentil salad with beets and spinach (recipe from Yotam Ottolenghi)
    • Lentil salad with pomegranates and pomegranate dressing
    • Lentil salad with quinoa and spinach
    • Lentil salad with zucchini

    In addition to salads, you can put lentils in soups, salads, vegetarian patties, etc.

    This dish is a good salad for lunch at work! You can eat it hot or cold.

    You can also put it in burritos, mix it in green salads — if you really miss them — like spinach, or add it to a simple tomato soup.

    Make this Now

    Sometimes you can get bored with the same boring green salads that have the same boring ingredients.

    But you can get very creative with your salads. They don’t have to be green only.

    You can make colorful salads with other veggies. They can be somewhat crunchy salads with grains. Comforting salads with legumes.

    And most of all, they can be very filling just like the one I showed you.

    Now go ahead and mix things up a bit!

    Enjoy!

    Lentil, pearl barley and sweet potato salad in a baking dish surrounded by stacked plates and bowls

    If you try this recipe, I want to know about it! I always appreciate your feedback. Leave a star rating in the recipe card right below and/or a review in the comment section further down the page. You can also follow me on Pinterest, Facebook, or Instagram. Sign up for my email list, too!

    Lentil, barley, and sweet potato salad with broccoli and baby tomatoes in a glass baking dish sitting on a wooden board
    Print Recipe
    5 from 1 vote

    Lentil, Barley and Sweet Potato Salad

    Salads don’t have to be boring! Here’s a high-protein veggie salad that’s light, comforting and filling. Perfect all year-round.
    Prep Time20 minutes mins
    Cook Time30 minutes mins
    Course: Main
    Cuisine: American
    Keyword: high-protein, picnics, summer
    Servings: 4
    Calories: 280kcal
    Author: Naïby

    Ingredients

    • ½ cup Pearl barley
    • ½ cup Beluga or Puy French lentils
    • Juice of 1 small lemon
    • 2 cups sweet potatoes scrubbed, skin on, cubed (½ inch thick)
    • 1 ½ cup broccoli head cut into small florets (a small head)
    • 1 pack cherry tomatoes
    • 1 tablespoon mustard
    • 1 tablespoon apple cider vinegar
    • 1 tablespoon extra-virgin olive oil
    • 1 teaspoon ground cumin
    • ½ teaspoon garlic crushed (1 clove)
    • Salt and freshly ground black pepper
    Get Recipe Ingredients

    Instructions

    • Preheat oven to 375° F.
    • Place the sweet potato onto one half of a non-stick baking tray, and the cherry tomatoes onto the other half. Drizzle both with a little olive oil and season with salt and black pepper. Roast in the oven for 20 minutes or until potatoes are soft in the middle when tested with a small sharp knife. Set aside.
    • Place Pearl barley in a small saucepan along with 1 ½ cup water and cook for 15-20 minutes or until all the water is absorbed and lightly cooked. You’ll know when it’s cooked when the texture is soft but still a little nutty with it still has a little bite to the barley.
    • At the same time, cook the lentils in another saucepan with 1 ½ cup water according to your packet’s instructions.
    • Rinse both the barley and lentils in cold water and drain thoroughly before adding both into a large mixing bowl.
    • Drizzle olive oil and squeeze over the juice of 1 small lemon. Season generously with freshly ground black pepper and add a pinch of salt.
    • Using one of the same saucepans used to cook the barley or lentils, cook the broccoli florets in a steamer on top of the saucepan. Alternatively, half fill another saucepan with cold water, bring to the boil over high heat then add the broccoli in a steamer. Cook over high heat for 2-3 minutes then drain and plunge into a bowl of iced water. This helps the broccoli to retain its bright green color when cooked and cooled. After 2 or 3 minutes of cooling in the iced water, drain broccoli again and add to barley mixture along with the roasted tomatoes and cubed sweet potato.
    • In a small bowl whisk together the mustard, vinegar, cumin, garlic, and olive oil and pour over salad, tossing well to coat everything evenly.
    • Stored in an airtight container in the fridge, this salad will keep up to 5-7 days.

    Notes

    • Clean the skin of the sweet potato well. I keep it to give a rustic taste. You can peel it if you prefer.
    • Stick to Beluga lenses. If you use other types of lenses, they may not hold their shape as well — especially red ones. You can get away with Puy lenses (French lenses). 
    • Uses organic rather than conventional sweet potatoes, which tend to taste blander. 
    • Stored in an airtight container in the refrigerator, this lentil salad will keep for up to 5 days.

    Nutrition

    Calories: 280kcal | Carbohydrates: 50g | Protein: 11g | Fat: 4g | Saturated Fat: 1g | Polyunsaturated Fat: 1g | Monounsaturated Fat: 3g | Sodium: 102mg | Potassium: 544mg | Fiber: 12g | Sugar: 5g | Vitamin A: 9939IU | Vitamin C: 46mg | Calcium: 72mg | Iron: 4mg

    Get Your Free Plant-Based Eating Toolkit and More

    Subscribe to my newsletter and unlock my plant-based course, nutrition charts, recipe secrets, and exclusive updates to prepare wholesome, varied & balanced meals effortlessly. All you need is a good appetite. Subscribe!

    Smiling girl with big afro sitting cross-legged on a sofa

    Hi there!

    I'm on a mission to help you get nutrient-dense, easy, and mouthwatering plant-based recipe ideas so you can feel stimulated, well-equipped, and confident to eat and cook better.

    Learn more about me →

    Freaking Firm Black Bean Veggie Burger (Effortless & Baked)

    Jul 13, 2018 · Leave a Comment

    A burger on a thin wooden board with ketchup oozing our of it

    This vegetarian burger is firm but moist, simple but tasty and is done quickly.

    It's firm enough that you can place it between all your favorite toppings. But it's tender and tasty enough for your palate to be fooled by the fleshy texture. Goodbye, traditional burgers; hello, veggie burgers of the future.

    Black bean burger
    [feast_advanced_jump_to]

    An Easy Black Bean Veggie Burger

    Many recipes require so many steps that they seem as fun as assembling complicated Ikea furniture.

    Of course, you could go for the ease of pulling a commercial frozen vegetarian burger out of the freezer and microwave it in less than two minutes.

    But most of the time, these burgers are a total disappointment.

    They’re either stale or weird-tasting.

    Ok, I exclude the brand Beyond Burger. Its patties are still delicious. But have you seen the prices? $9 (tax-free) for two patties.

    Regardless, whether they are yucky or tasty, burgers should not be that expensive.

    That's why I'm going to show you how to make vegan black bean burgers that don't take long to make.

    What's in a Black Bean Veggie Burger?

    Black bean burger ingredients. Clockwise: red onions, corn, black beans, ground oats, flax seed egg, garlic, miso, celery, sunflower seeds, and cayenne pepper

    Here's what you'll need:

    Main ingredients

    • Black beans – use dried beans for a firmer texture.
    • Corn – you can use frozen or fresh.
    • Rolled oats – I grounded them in a spice/coffee mill.
    • Sunflower seeds – for even more protein.
    • Celery – natural salt.
    • Onion – yellow or red. However, red gives more taste.

    How to Make a Black Bean Veggie Burger Step by Step

    My recipe starts with soaking black beans overnight and then cooking them. Meanwhile, you grind the flax seeds and the rolled oats ①. Once the beans are cooked, you crush them in a bowl ② and add the binding agents (flax egg and ground oats), chop vegetables, add spices ③, and you mix everything ④.

    Finally, you shape the "ground meat" into a ball with ½ cup, place them on a baking sheet lined with parchment paper and spank them until they flatten into a patty. ⑤⑥

    You bake them and voilà! ⑦

    [I would like to take this opportunity to say that in Quebec, the patties are called "boulettes" in French-Canadien as in "meatballs", although they are flat.]

    Keys to Success: My Top Tips

    To save time, you can cook a large number of black beans in advance if you wish and freeze them so that you can be ready at any time. Of course, if they’re frozen, don't forget to thaw them in advance too.

    And what happens if you forget to do all that? Mmmm... I'd tell you to watch out for the pressure cooker! Of course, this appliance speeds up the cooking process of dried beans in less than an hour and can be a game-changer, but you could miss out on cooking them too much.

    Besides, does it really take out the bad guys away? I don’t know. I haven't seen any literature on the subject...

    At worst, use canned beans 😞 (no! I did not just say that after my argument above). If this should happen, let them drain long enough to remove as much water as possible. However, the results are out of my hands.

    Another thing, make black bean burgers without a food processor.

    Some people use it to chop all their ingredients super finely, but you won't need it. Well, you won't have to do it at all. You're just going to dice a few vegetables, and the potato masher will do.

    To make sure the patties aren’t crumbly, we’ll use a drying agent like oat flour.

    I made mine homemade by just grinding the oats in my mini blender (you can also use a spice grinder or coffee grinder). It's possible to do this in advance and store it in a cool place or to buy flax and oat flour.

    But be aware that grains of all types stay fresh longer whole form rather than ground.

    How to Keep Your Black Bean Burgers from Falling Apart

    A dark-skinned hand holding a veggie patty in front of a dark background
    Freaking firm black bean patty

    Okay, let's start by getting this out of the way.

    Don't use canned black beans! They won't do it for this recipe.

    First, the texture varies from brand to brand. Second, some are really, really soft, and make your burgers mushy.

    I know this for a fact. Well, ahem, putting the batter in the food processor didn't help, but I don't think that was the only problem. You see, since canned beans are soaked in liquid for who knows how long they tend to absorb too much water when boiled.

    So we’re going to use dried black beans for this recipe.

    Bird's eye view of dried black beans scattered on a wooden surface
    Dried black beans

    Also, to make sure the patties are not crumbly, we’ll use a drying agent like oat flour.

    I made mine homemade by just grinding the oats in my mini blender (you can also use a spice grinder or coffee grinder). It is possible to do this in advance and store it in a cool place or to buy flax and oatmeal flour.

    But just so you know, seeds keep fresher in whole form rather than ground.

    Now, to make sure they fit together, you'll also need binding agents. Binding agents such as "flax egg" or "chia egg." This simply means ground flaxseed or chia seeds, which are soaked in water for a few minutes until a gelatinous substance forms.

    These plant-based "eggs" and oat flour will act as your glue.

    Other Creative Variations

    Here in Montreal, I teach a plant-based culinary workshop through Airbnb Experience, where I show people how to make mouth-watering vegan meals. When I created it, teaching people how to make an easy vegetarian burger was at the top of the list.

    Inspired by my raw food experience and one of Angela Liddon's recipes from her blog Oh! She Glows, I made lentil burgers.

    So you can easily replace black beans with lentils, and it's super good! Use all the other varieties of beans: red kidney beans, pinto, chickpeas, you name it!

    Update (April 2020): I'm not giving the course at this time.

    Serve this Black Bean Burger with...

    This burger settles well on a lettuce leaf or hamburger buns with slices of vegetables and condiments.

    These vegetarian burgers go well with:

    • French fries
    • Guacamole
    • Salsa sauce
    • A few slices of avocado and red onion
    • Hot sauce, like sriracha
    • Barbecue sauce as in my Vegan Buffalo Cauliflower Wings recipe.

    As for what to eat them with, have black bean burgers with sweet potato, quinoa, couscous, brown rice... Heck, any type of grains!

    Other black bean recipes!

    • Black bean soup speckled with corn and topped with cubed avocado, cubed tomatoes, and cilantro sauce
      Fuss-Free Spicy Black Bean Soup
    • Dark rice in an enamel plate with a fork in it
      On Costa Rica and Caribbean Rice and Beans — IV
    • Easy Mango Quinoa Salad with Maple-Lemon Dressing

    Answers to your Burning Questions

    Are Black Bean Veggie Burgers Healthy?

    As for commercial burgers, who knows what’s in them to keep forever. In my opinion, homemade burgers are certainly healthier, as you avoid dubious ingredients.

    On the other hand, not all black beans are created equal.

    I don't know about you, but it makes me a little paranoid to see food that's been soaked in viscous liquid for 100 years. Yes, technology has something to do with it, but these products seem frighteningly less nutritious.

    I suspect that the nutrients from canned products leach into the liquid.

    I know canned products are convenient, but seriously, preparing dried beans is really easy. Just soak them the day before to remove anything that encourages your tush to ring out like the sound of a trumpet and your digestive system to provoke severe nervous tics.

    Black beans are high in protein. They contain about 60 g/cup. What's great about the plant-based egg (flax or chia) mentioned above is that it includes an extra dose of protein. Aaaannd! You get a little omega 3, which is excellent for brain health.

    Flax seeds in a white enamal cup and chia seeds in a small Mason jar with spoonful of both grains leaning on the white cup

    Dry beans contain phytic acid and other foods that make it difficult to absorb nutrients. They can be called "antinutrients". The downside with these types of antinutrients is that they prevent you from absorbing iron and other precious minerals.

    So, to disarm them further, I called in a squad. Apple cider vinegar to the rescue! And to be even more efficient, I added some kombu algae when they boiled to enrich them with trace elements.

    Paranoia at its climax. Or is it orthorexia (obsession with healthy eating)🤔? Anyway, I talked about it all in my Mango Black Bean Quinoa recipe.

    Of course, you don't have to do all that. I'm showing you how to increase the nutrient density of black beans here.

    Finally, in most recipes, the burgers are fried in oil, but mine are baked. You may lose the beautiful golden crust, but they will always be tasty and much healthier.

    How Do They Taste Like?

    It depends on whether you buy it at the grocery store or if you make my recipe.

    As for my recipe, I used corn for sweet taste. I kept a small portion of sunflower seeds from a lentil burger recipe I'd made a while back. And I incorporated celery for the crunchy texture. Lemon juice was added for acidity and miso paste for umami. As for onion powder and poultry seasoning, they were used to give the depth of taste. The real winners here are miso paste and poultry seasoning.

    Miso paste brings a full and savory taste, just like broth does. The flavors really carry out with those herbs. Make it a staple in your spice list!

    But poultry seasoning won't be the only staple in your kitchen.

    These black bean veggie burgers will be too!

    Make these Veggie Burgers Now

    You want veggie burgers that hold their shape and are easy to make. And you want them to be your go-to recipe whenever your burger craving pops up.

    Making firm burgers seems impossible, but it’s achievable when you know exactly what to do.

    Never neglect the power of flax eggs and oat flour.

    So grab your ingredients and potato masher and have a smashing party.

    Black bean burger

    If you try this recipe, I want to know about it! I always appreciate your feedback. Leave a star rating in the recipe card right below and/or a review in the comment section further down the page. You can also follow me on Pinterest, Facebook, or Instagram. Sign up for my email list, too!

    A burger on a thin wooden board with ketchup oozing our of it
    Print Recipe
    5 from 1 vote

    Black Bean Veggie Burger

    Finally, a vegetarian burger that’s firm and easy! Perfectly moist and tender, this black bean burger is as satisfying as a meat burger. Try it for yourself.
    Prep Time45 minutes mins
    Cook Time30 minutes mins
    Total Time1 hour hr 15 minutes mins
    Course: Main
    Cuisine: American, Canadian
    Keyword: black beans, miso
    Servings: 8 patties
    Calories: 1406kcal
    Author: Naïby

    Ingredients

    • 2 tablespoons flaxseed ground Note
    • 2 tablespoons miso
    • 2 tablespoons water
    • 1 cup black beans cooked (Note
    • 1 cup corn frozen or fresh
    • ½ cup oats ground into flour
    • ½ cup sunflower seeds (Note)
    • ½ cup celery chopped
    • ½ cup yellow or red onion, chopped
    • 2 tablespoons lemon juice
    • 2 tablespoons extra-virgin olive oil
    • 2 teaspoons poultry seasoning
    • 1 teaspoon garlic crushed (about 2 cloves)
    • ½ teaspoon sea salt
    • ⅛ teaspoon cayenne pepper
    Get Recipe Ingredients

    Instructions

    • Mix the ground flaxseeds in 6 tablespoons of water in a small bowl and set aside for 5 minutes, until it thickens, making sure the water is completely absorbed.
    • Preheat the oven to 400 degrees F.
    • In a large bowl, mash the black beans with a potato crusher. Add corn, oatmeal, sunflower seeds, celery, onion, lemon juice, olive oil, poultry seasoning, garlic, salt, and cayenne pepper.
    • In a small bowl, use a fork to mix the miso and water together to form a loose paste.
    • Stir in the paste and stir well until the batter comes together. It is possible to mix the mixture with a large spoon or the potato masher while mixing at the same time.
    • Using half a cup, remove the batter, press firmly, and shape into a ball. Place on the baking sheet lined with parchment paper and form a 1 inch (2 cm) patty, tapping over it. Repeat until the batter runs out. If your hands get too sticky, wash and dry them before you continue. Bake the patties and cook for 20 minutes. Turn over and continue cooking for 10 minutes, until the desired texture is reached.
    • Serve on a lettuce leaf or hamburger buns with slices of vegetables and condiments.

    Notes

    • You can also use ground chia seeds
    • Use dried beans, preferably, soaked 8 to 12 hours earlier! To increase their nutritional value, you can optionally dip them with 1 tablespoon of apple cider vinegar and cook them with kombu strips. I explain the principle in my quinoa recipe with mango and black beans. Prepare them in advance without a problem.
    • Speaking of nutrient density, use sunflower seeds preferably soaked for at least 30 minutes to 2 hours (to have better digestion)
    • You can make oat flour yourself by grinding it in a spice grinder or coffee grinder. But you can use it already made too.
    • Red onion gives more taste
    • Don't use a food processor! Otherwise, the batter will become too soft.
    • Stored in a sealed container, these vegetarian burgers will keep in the refrigerator for up to 5 days and in the freezer without any problems.

    Nutrition

    Calories: 1406kcal | Carbohydrates: 143g | Protein: 49g | Fat: 79g | Saturated Fat: 9g | Polyunsaturated Fat: 28g | Monounsaturated Fat: 36g | Sodium: 2496mg | Potassium: 2083mg | Fiber: 39g | Sugar: 17g | Vitamin A: 918IU | Vitamin C: 30mg | Calcium: 283mg | Iron: 13mg

    Get Your Free Plant-Based Eating Toolkit and More

    Subscribe to my newsletter and unlock my plant-based course, nutrition charts, recipe secrets, and exclusive updates to prepare wholesome, varied & balanced meals effortlessly. All you need is a good appetite. Subscribe!

    Smiling girl with big afro sitting cross-legged on a sofa

    Hi there!

    I'm on a mission to help you get nutrient-dense, easy, and mouthwatering plant-based recipe ideas so you can feel stimulated, well-equipped, and confident to eat and cook better.

    Learn more about me →

    • « Go to Previous Page
    • Go to page 1
    • Go to page 2
    • Go to page 3
    • Go to Next Page »

    Primary Sidebar

    Smiling girl with big afro sitting cross-legged on a sofa

    Whole plant-based food advocate, recipe developer, food stylist & photographer, dedicated to sharing nutrient-rich plant-based recipe ideas that will make you feel stimulated, well-equipped, and confident to cook and eat better.

    Learn More

    Hand rolling a cabbage leaf, reading the ultimate guide to plant-based eating, click here, get your free course now

    Fall Recipes

    • Tomato and bread soup in a bowl on a wooden board
      Scrape-the-Bowl Pappa Al Pomodoro
    • Creamy corn fusilli with green onions and basil in a cast-iron pan on a wooden board and other decorative items
      Melissa Clark's Creamy Corn Pasta {Vegan Version}
    • Pumpkin Banana Bread {Easy and Healthy}
    • Tofu sisig in a sizzling cast-iron skillet
      Tasty Filipino Tofu Sisig Recipe {Healthy & Simple}
    • Blueberry cobbler topped with ice cream in a bowl with baking pan in the back
      Healthy Vegan Blueberry Cobbler
    • Velvety Butternut Carrot Ginger Soup

    Popular Posts

    • Easy Haitian Rice and Beans (Diri Ak Pwa)
    • Simple and Creamy Coconut Milk Alfredo Sauce in Pasta (Vegan + Gluten-free)
    • Homemade vegan half-and-half in three small glass jars and in front of a small mason jar of coconut cream, all on a piece of jute
      The Best Vegan Half-and-Half
    • Vegan Soup Joumou (Haitian Squash Soup)
    • Two glasses of lemonade garnished with mint on a surface
      Easy Healthy Homemade Lemonade with Mint
    • Three small glass jars of garlic-infused oil, surrounded by decorative garlic bulbs, one of which contains garlic cloves cut in half and the others have only the oil
      Life-Changing Garlic-Infused Oil {Low FODMAP}

    Footer

    ↑ back to top

    About

    • Privacy Policy
    • Disclaimer
    • Terms & Conditions
    • Accessibility Policy

    Newsletter

    Unlock recipe secrets and exclusive updates to prepare irresistible & friendly meals. All you need is a good appetite.
    Subscribe!

    Contact

    • Contact
    • Services
    • Press & Media

    As an Amazon Associate I earn from qualifying purchases.

    Copyright © 2021 Biting into Life

    • Français
    • English

    Rate This Recipe

    Your vote:


    A rating is required
    A name is required
    An email is required